Poser – the program (Z Appendix)

Appendix Poser.ini settings

This file hosts a lot of settings. Some of them can be changed by the user, via a preferences or settings dialogue. Some settings are just internal (colors, pane and window size and position, coms ports), some are for testing purposes (all sorts of logging), some make a legacy impression to me. This chapter is not completed yet, and might grow under Poser updates. More details are welcome.

BOUNDING_BOXES 1 Menu Display \ Tracking
DEPTH_CUE 0 Preview pane & Display menu
SHOW_LIGHTS 0 Hierachy Editor
DRAW_OFFSCREEN 1 Render Settings \ Preview \ Display Engine
BEND_BODY_PARTS 1 Menu Display
HILITE_BODY_PART 1
BACKFACE_CULL 0 Render Settings \ Remove Backfacing Polys
BACKGROUND_COLOR 22527 20479 17917
FOREGROUND_COLOR 16000 16000 16000
UI_BACKGROUND_COLOR 54227 51143 47288 Content of the BG Color node
UI_BACKGROUND_IMAGE 0 File \ Import \ Background Image
STATUS_BAR_LOC 10 600
QUATERNION_ON 0 Menu Animation \ Quaternion Interpolation
USE_META_UI 1 Use settings from XML file for UI definition details
LAUNCH_PREFERRED 0 General Preferences \ Document \ Launch behavior
UI_PREVIOUS 1 General Preferences \ Interface \ Launch behavior
GRAPH_PALETTE_LOC 728 721
GRAPH_PALETTE_SIZE 560 240
GENITALS_ON 0
SETUP_ROOM_MORPH_RETARGET 0
FIRST_TIME_CP 1
FIX_MISMATCHED_SCALE_ZONES 0
LAST_PROJ_GUIDE “” Menu Window \ Project Guide
PROJ_GUIDE_PALETTE_SHOW 0 Menu Window \ Project Guide
DONT_SHOW_QUICK_START_DIALOG 1 Menu Window \ Quick Start (front page: Don’t show…)
PYTHON_EDITOR_PATH “” General prefernces \ Misc \ Python
USE_COMPRESSION 1 General preferences \ Misc \ Save Files
MTS_BROADCAST_KEY “”
HTML_WINDOW_LOC 240 120 681 642
HTML_WINDOW_ON 0
UNIT_SCALE_FACTOR 2.621280 General preferences \ Interface \ Display – Units (@ meters)
DEFAULT_CREASE_ANGLE 80.000000 General preferences \ Document \ Smoothing
UNIT_SCALE_TYPE 5 General preferences \ Interface \ Display – Units
ALLOW_ANIM_LAYERS 0
AUTO_OPEN_MTL_LIBS 0
FACE_ROOM_HQ_TEXTURE_WIDTH 512
FACE_ROOM_HQ_TEXTURE_HEIGHT 512
DOC_TOOLS_ON 1
ENABLE_MTS_STREAMING 0
USE_OPENGL 1 Menu Display \ Preview Drawing + Render Settings \ Preview
OGL_SOFTWARE_ACCUM_BUFFER 1
OGL_ALLOW_PBUFFERS 0 Render Settings \ Preview
USE_EXTERNAL_BINARYMORPH 1 General preferences \ Misc \ Save Files
USE_P5CLOTH_DYNFMT 0
WRITE_FILE_SEARCH_LOG 0
MTL_VIEW_SIMPLE_ADVANCED 1 Open material Room in Advanced Mode
CACHED_RENDERS_MAX 25 General Preferences \ Render \ Cache
CHECK_FOR_UPDATES_ON_LAUNCH 1 General Preferences \ Misc \ Software Update
CHECK_FOR_UPDATES_COUNT 3
OBEY_ORIGINAL_NORMALS 0
PORT_SETTING 1517
MEM_AVAIL_MINIMUM 33554432
AUTO_RESIZE_BUCKETS 0
BUCKET_RESIZE_PCT 0.375000
LAST_OPEN_SAVE_PATH “…”
WRITE_MEMORY_LOG 0
FIGURE_CIRCLE 1 Menu Display \ Figure Circle
TABLET_MODE 0 General Preferences \ Interface \ Mouse Input
RECENT_FILE “…” Filled on the fly, max 10 entries
RECENT_FILE “…” … ditto
DO_UNIVERSALPOSE 1 General Preferences \ Library \ Pose Sets
HARDWARE_SHADING 0 Render Settings \ Preview \ Enable HW Shading
HARDWARE_SHADING_OPTIMIZATION 1
ENABLE_HARDWARE_SHADOWS 0 Render Settings \ preview \ Enable HW Shading
TRANSPARENCY_SORT 0
WRITE_SHADER_PREVIEW_LOG 0
PREVIEW_TEXTURE_SIZE 512 Render settings \ Preview \ Texture Display
PREVIEW_OGL_OBJECT_BBOXPICKING 0
PREVIEW_OGL_PRELITEORDER_NEW 0
PREVIEW_OGL_HWSHADING_INTRACKING 1
PREVIEW_TRANSPARENCY_LIMIT 1 Render settings \ Preview \ Transparency Display
PREVIEW_TRANSPARENCY_LIMIT_TO 90.000000 Render settings \ Preview \ Transparency Display
CACHED_COMMANDS_MAX 100 General prefernces \ Document \ Undo-Redo
RENDER_IN_SEPARATE_PROCESS 1 General Preferences \ Render \ Render process
FFRENDER_PROCESS_PORT 4414 Communication Poser ó FFRender process
RENDER_THREADS 12 General Preferences \ Render \ Render process
FILE_SEARCH_POLICY 2 General preferences \ Library \ File Search
TEMP_PATH B:\Appdata\Temp\Poser Pro\9 General Preferences \ Misc \ Temp files
LIB_POPUP_TIMEOUT 90
SPACE_MOUSE_AXES 0
SPACE_MOUSE_SENSITIVITY 1.000000
MAT_WACROS_ON 1
ALLOW_FFRENDER64 1
FLEX_LIB_PORT 11530
FLEX_LIB_ASYNC_XML_PORT 11630
LIB_INDEXED_SEARCH 1
WRITE_LIBRARY_SERVER_LOG 0
WRITE_LIBRARY_SEARCH_LOG 0
LIB_ITEMS_SHOW_LITERAL_FILENAME 0
LIB_ITEMS_HIDE_LEADING_EXCLAMATION 0
LIBRARY_IS_AIR 1 0 for Flash, 1 for Air when available
NO_LIBRARY 0 General preferences \ Library \ Launch behavior
FOREGROUND_POSER_ON_LIB_LOAD 1 General preferences \ Library \ Launch behavior
MULTITHREADED_BENDING 1 General Preferences \ Document \ Optimizations
WANTS_FAST_PRELITE 1
WANTS_FRAMEBUFFER_PRELITE 1
CONTENT_INSTALL_TYPE 0
CONTENT_INSTALL_RUNTIME D:\Content\PPro2012\Downloads\Runtime\libraries
CONTENT_INSTALL_CUSTOM_PATH
SHOW_PARSED_UNSUPPORTED_WARNING 1
SHOW_PMD_LOSS_WARNINGS 0
RENDER_PROCESS_PRIORITY 1
CAM_ORBIT_SELECTED 1
UI_COLOR_SCHEME standard.xml
TEXTURE_DISK_CACHE_SIZE 500 General preferences \ Render \ Texture caching
CACHE_TEXTURES_IN_BACKGROUND 1 General preferences \ Render \ Texture caching
ACTOR_POPUP_HIER_THRESHOLD 20
NUM_CLOTH_THREADS 0
MAX_LIBRARY_SERVER_THREADS 100
FIG_LIB_FORCE_LEG_IK_ON 0
KEEP_OGL_TEXTURES_LOADED 1


Breaking the 2Gb Barrier? (1 Introduction)

Enough physical RAM for all your simultaneous programs, and enough user memory for one single program, really are separate things. Solving one will not solve the other.

Download the LaaTiDo service program discussed in this tutorial, as well as this tutorial in PDF format (4Mb).

Running out of Memory

When you’re running a 32-bit program (note 1), you might experience “running out of memory” events (note 2). It can happen especially when rendering 3D scenes, or rendering media output for video or music. This can make the program crash, it can make it loose functionality, or it can cripple the results. You may overcome this problem to some extent (note 3), by adjusting the program itself (note 4).

Notes:

  • 1. when you’re not sure that your program is 64-bit, then it’s most probably 32-bit
  • 2. see the Monitoring User Memory section in this tutorial
  • 3. by default, each 32-bit program is granted 2Gb User Memory. This can be increased up to 3Gb. That’s it. In case you need more, you’ve got to go for 64-bit programs and thus a 64-bit Operating System as well.
  • 4. see the Raising Large Address Awareness section in this tutorial.

Note that Poser 8, Daz Studio 3, Carrara 7 and up might have their Large Address Awareness already raised by the supplier and do not require further enhancement. Vue has not raised LAA and does need your attention.

When you’re running the program in a 32-bit Windows environment (note 5), you will have to adjust the Windows system settings as well (note 6). This comes at a price. By assigning more memory to user programs, there is less available for system routines. This may slow down some operations, like massive data transfers between disks, or over the network. When you’re running a 32-bit program in a 64-bit environment, only the program itself might need an adjustment (note 7).

Notes:

  • 5. when you’re not sure that your Windows is 64-bit, then it’s most probably 32-bit. 64-bit Windows versions exist for: XP Pro, Vista and Win7 Home Premium, Professional and Ultimate
  • 6. see the Enabling Large Address Usage section in this tutorial. Note that Mac, Linux, and 64-bit Windows environments do have Large Address Usage enabled by default, so it’s a 32-bit Windows thing only.
  • 7. see the Raising Large Address Awareness section in this tutorial

The important thing in this is that’s all about program and system settings. Running out of memory has NOTHING to do with the amount of physical RAM in your box, so increasing or decreasing RAM might bring performance effects (note 8), but will NOT affect the issue above.

Notes:

Next >

Breaking the 2Gb Barrier? (2 Monitoring)

Monitoring User Memory

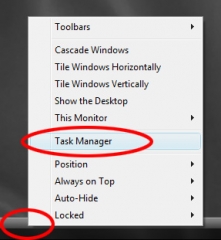
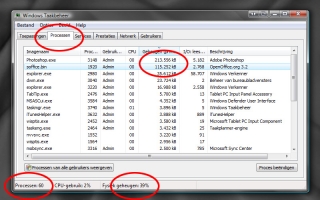
With a Right-click of your mouse on the Taskbar, you can open Taskmanager.

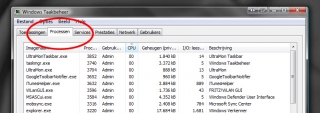
The Processes tab will show CPU- and memory usage, amongst others.

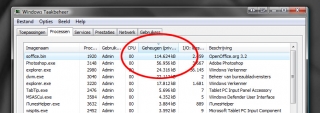
Click twice on the Memory bar on top to get the most hungry program on top.

The memory shown is the User Memory, which for 32-bit programs should not exceed 2Gb unless the measures are taken which are described in this tutorial.

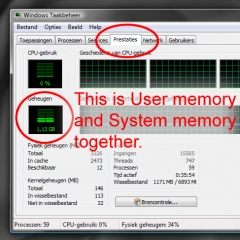
Next to User Memory, there is something like System Memory. Those taken together make up the total memory usage, as shown in the Performance tab of Taskmanager.

Since the Taskmanager tends to stay on top of all windows, you can see whether the occurrence of some program issues coincide with exceeding the 2Gb boundary. If so, you might profit from the measures described in this tutorial. If not, there is no need to mess around with program and system settings.

Minimizing the Taskmanager will give you some CPU-indicator on the Taskbar. A double click on this icon reopens the Taskmanager. This way, you can work on and have Taskmanager at hand when required.

Next >

Breaking the 2Gb Barrier? (3 Awareness)

Raising Large Address Awareness

Each individual program in a Windows environment (and in other environments as well) can access two kinds of memory; System Memory and User Memory.

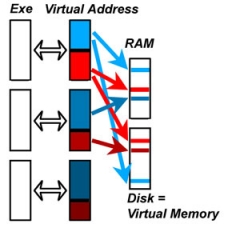
System Memory (red in schema) contains the program code and various settings and tables handled by Windows. In this memory area, only Windows can read as well as write (to load the program), while the program itself in that area can read only. This is to protect systems against viruses, against self-modifying code and against other potential threatening program behavior.

User Memory (blue in schema) is the area where the program itself is allowed to read and write, to store and retrieve it’s intermediate values and results from user actions. When the program is up to something massive, this area is blown to pieces.

While each 32-bit program – without any exception – can deal with a maximum 4Gb of memory in total, most programs are created in such a way that 2Gb is the maximum amount of user memory they can handle, even when they are assigned more bij Windows. See the top Exe in the schema, blue and red areas equal in size.

Unless the program is made “Large Address Aware” (or: LAA) in which case those kinds of limits are off. see the bottom two programs in the schema, the blue is larger than the red one.  This can be done at creation time, by the supplier, and happens more and more. It can also be done at production time, by you on your PC, and requires a special piece of software, like “LaaTiDo”.

This program makes slight changes to your software. As this has some risks involved, you make copies of the original first, of course. An issue is, that each time a new version (update, service pack, …) of that software is installed (from upgrading or whatever), you have to deal with the new executable all over again.

The following programs

  • Poser 8
  • Daz Studio 3
  • Carrara 7 and 8
  • all Adobe Elements 9 and CS5

are known to be LAA, and do not require further treatment, while

  • Bryce 7 and earlier
  • all 32-bit Vue variations
  • Photoshop 7
  • Paintshop Pro X2 and earlier

and known NOT to be LAA and do require this enhancement. I’ve no knowledge yet on Poser 7 and before, Daz Studio 2, Photoshop CS4 / Elements 8 and before and the latest PaintShopPro X3. Anyway, for Poser, Daz Studio and Carrara upgrading is a recommended alternative for fiddling with the program’s executable.

How to proceed?

First of all, you have to make sure you need this kind of solution. Is the problem you’re facing caused by the 2Gb User Memory boundary indeed? Read the previous Monitoring User Memory section about it.

To continue, you’ll need the LaaToDo program. Download the LaaTiDo service program discussed in this tutorial, as well as this tutorial in PDF format (4Mb).

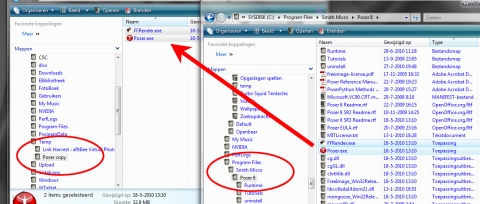
Second, you’ve to locate all the relevant executables in your Program Files folder, and copy (not move!) them to a place to work them, like a new folder in your Temp directory.

This is because you (and Windows) don’t want LaaTiDo or any other application to write in your Program Files directly.

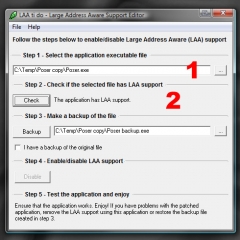
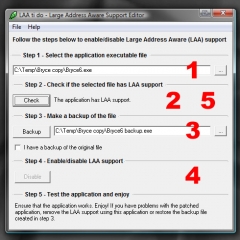
Third, start LaaTiDo and open one of those executables for inspection (1), then click the [Check] button (2). Is it Large Address Aware (LAA)?

If so, you’re done, just test other executables. You may find that when a supplier made the program LAA, all relevant executables are so already. When the supplier did not, non of those are and you have to make them so.

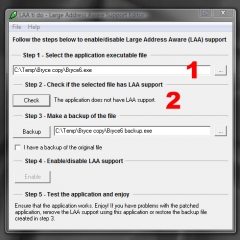
Forth, for non-LAA executables (1), you [Check] (2), then [backup] (3) and then click the [Enable] button 94). That’s it, and you’re almost done. Repeating the previous Check (5) will show you that the new executable is LAA aware indeed now.

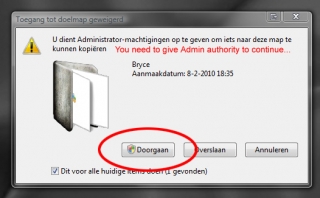
Finally, you move the adjusted executables AND their respective unchanged copies (!) back to the Program Files environment, overwriting the existing ones. This is manual action, and Windows will ask you for confirmation.

Now you can test your adjusted program, in simple conditions. Does it seem to work? Then you’re fine. Does it fall apart instantly? Then you have to step back, and transfer your backed up unaltered copies onto the altered ones or so, as the LAA progress is not working for them. That means end of the road indeed, stepping towards all 64-bit software is the only way to go now.

When is does seem to work, and you’re in a 64-bit Windows environment, or a 32-bit environment which is set ready before, then you’re done indeed. If not, then all you’ve got to do is to adjust your 32-bit Windows as well. The next section tells you how.

Next >

Breaking the 2Gb Barrier? (4 Enabling)

Enabling Large Address Usage

While each 64-bit operating system is enabled to support Large Address by definition, and various 32-bit operating systems (like most Unix/Linux variants) are enabled by default too, Windows is not.

Not being enabled implies that the halfway split of 2Gb System Memory and 2Gb User Memory still holds even for LAA (Large Address Aware) programs. Non-LAA programs will fall over when requesting more than the 2Gb maximum, LAA-programs will fall over as the non-enabled 32-bit Windows will not fulfill their request. You won’t know the difference. So besides the program being made LAA, you’ll need to enable Large Address Usage in Windows.

This is how, in Vista and up (Win7, …).

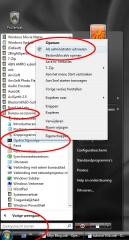
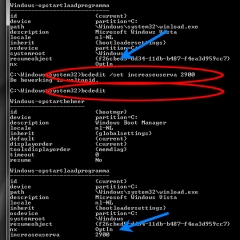
Go to Accessories, and open the CommandPromp with Admin rights.

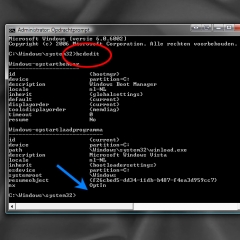
Then you type: bcdedit

and {Enter}. This presents just a readout of your Windows settings. Note the blue arrow, there is no additional info below OptIn.

Then you type: bcdedit /set increaseuserva 2900

and {Enter}.

You can check the result by typing bcdedit {Enter}, this presents just a readout and you’ll find the variable increaseuserva (NB: Increase User Virtual Address) with the 2900 value. You did do the readout first, to check whether there is something set already.

2900 means 2900MB, or almost 3Gb. The value 3072 (MB, or 3Gb exactly) is the maximum to use, but you can go lower as well. The value chosen is your new User Memory limit, MicroSoft disadvices against values below 2800. This is why I pick the middle route. Higher values leave less memory for Systems use, and might effect your systems performance in bulky operations. Note that non-LAA programs will not be effected by any of those adjustments to your Windows environment.

You can use the same bcdedit /set increaseuserva … command for changing values, or use bcdedit /deletevalue increaseuserva to return to the original, nonmodified situation. In which case even LAA-programs will obey the 2Gb limit again.

The Command prompt can be quit with the exit {Enter} command, and the new windows setting will be effective after a restart (!) of your PC.

This is how, in Windows NT (up till XP)

Win7 and Vista offer a startup regime which is an enhancement over the original Windows NT one. Here is the original approach. Enabling LAA is the same for Win NT and above, like Win 2000 and Win XP. The images and code examples below were made from my XP system.

Essentially, you have to extent the Windows startup command by adding /userva=2900 /3gb switches at the end. The /userva switch is optional, when leaving it out, the value defaults to 3072. The /3gb switch is mandatory, and it should be at the end.

You may add a second startup command line, which enables you to select whether or not to run in the extended addressing mode. This gives you an escape route as well: when issues occur, you just restart Windows using the first, original command line.

How to do it:

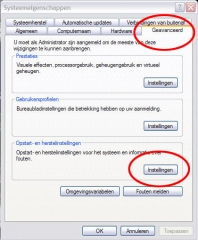
  • Rightclick My Computer on your desktop, and select Properties.
  • Choose the Advanced tab, and click the third button, about (Re)Startoptions
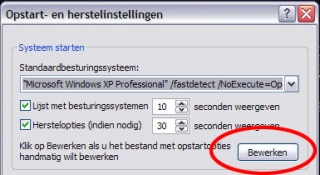
  • In the options window, click the Edit button
  • This opens the text editor on the startup file (boot.ini), which might read something like

[boot loader]
timeout=10
default=multi(0)disk(0)rdisk(0)partition(2)\WINDOWS
[operating systems]
multi(0)disk(0)rdisk(0)partition(2)\WINDOWS="Microsoft Windows XP Professional" /fastdetect /NoExecute=OptIn

  • Now just add a copy the last line, change the name between the quotes, and add the extra options. So now you have:

[boot loader]
timeout=10
default=multi(0)disk(0)rdisk(0)partition(2)\WINDOWS
[operating systems]
multi(0)disk(0)rdisk(0)partition(2)\WINDOWS="Microsoft Windows XP Professional" /fastdetect /NoExecute=OptIn
multi(0)disk(0)rdisk(0)partition(2)\WINDOWS="With 3Gb memory limit" /fastdetect /NoExecute=OptIn /userva=2900 /3gb

  • Save and close the text file
  • Then you might choose this new, second option as the startup default, in the options Window. Then click OK. (NB: you might have to click OK first and reopen the options window again, to make it read the edited boot.ini file and discover the second command line).
  • Click OK to close the Properties window too. Note that you have to restart Windows (!) and pick the correct variant to have the 3Gb feature activated.

At startup, you will now see two systems to pick from, for the time as set in the timeout line in the text (10 sec in the example). When issues occur, you might restart Windows and pick the first option. As an alternative, you can delete the first startup option which will make the startup go without offering choices. That’s up to you. When issues occur, you have to re-edit the startup file before restarting, deleting the /userva and /3gb switches.

Again, non-LAA programs will not be effected by any of those adjustments to your Windows environment. Changing either the startup commandline or the boot.ini file back to their original state sets you back to the original, nonmodified situation. In which case even LAA-programs will obey the 2Gb limit again.

Next >

Breaking the 2Gb Barrier? (5 Memory)

Physical and Virtual Memory

In the previous sections, it was discussed how individual programs could use 2, 3 or 4Gb memory. And when you open the Taskmanager, you can see 50 or more programs running at the same time.

So, how much RAM can one have installed to make all things work?

The answer is that 2Gb is a minimum requirement, 4Gb is an absolute maximum for 32-bit Windows anyway (it’s just a non-LAA program itself!) and the 3Gb as in most laptops gives a good price/performance ratio, unless you’re doing the bulky things that made you read this tutorial in the first place.

So, how does it work. I won’t go into details, but every time a program needs memory, it just gets a chunk (or: page) of it assigned by the Windows Memory Manager (WMM). This WMM can move filled but hardly used pages to disk, and back. Effectively, it uses diskspace to fill in enhanced requirements, and this is why you don’t need to have all RAM aboard physically.

The downside of this approach is that when your program needs a lot of RAM actively, the WMM will get very busy by swapping all those memory pages on and off the disk. You will see and hear the rattling of your disks, and you will experience serious performance downgrades. More physical RAM just means: less swapping, and better performances (as long as you have this kind of issue).

For all addressing, programs talk to the WMM. So whether they request up to 2Gb or even up to 3Gb, it might come from either RAM or disk. Actually, adding more physical RAM will not solve any problems coming from crossing the 2Gb User Memory border. On the other hand, when so much memory is actively used it’s likely that you might run into swapping delays as well. Although in my experience those RAM-hungry programs are quite handy in avoiding it.

So, enough physical RAM for all your simultaneous programs, and enough user memory for one single program, really are separate things. Solving one will not solve the other.

Which Vue version?

Except from Vue Frontier which is a cheap and fun way to become somewhat familiar with Digital Landscape Creation, the Vue arena is divided in an Artist and a Pro section.

What’s in the Artist line?

The Artist line consists of the main (and free) Vue Pioneer, plus 12 add-on modules which can be purchased separately or in bundles. With the RenderUP module, Vue uses 2-core (4 threads) on 32-bit systems, and 4-core (8-threads) on 64-bit systems. Which means that some modern CPU’s are not fully utilized. Not too bad, you can do the rendering in the queue manager, and probably work on a second scene (including test renders) or on another program (like Poser) at the same time.

Esprit (+$200) adds to Pioneer:

  • Vue Content
  • $ 70 RenderUP – no more limits to the render size or restrictions to the output
  • $130 3DImport – use OBJ, 3DS and other formats as well

Studio (+$200) adds to Esprit:

  • $ 70 HyperVue – enabling multi-CPU / network rendering
  • $ 40 DeepAccess – for improved management of full scenes
  • $ 40 LightTune – arrange light effects per object
  • $ 40 Botanica plant editor – make your own plants
  • $100 Ecosystem – make your own Eco materials

Complete (+$200) adds to Studio:

  • $150 Exporter – export scenes in 3D format to other software
  • $ 40 KronosFX – add high-end animation to your scenes
  • $ 40 AdvancedGraph – create advanced materials and object interactions
  • $ 40 Zephyr – add wind effects t forests and other vegetation
  • $100 Ecopainter – distribute your Eco material using your mouse or stylus

Conclusions: Esprit is simply the next step up from Pioneer. When you consider the step from Esprit to Studio or from Studio to Complete, you might find yourself In the situation where two modules are attractive, one is / two are just nice and two are / one is not necessary. So this extra bundle price is just, or just not, attractive compared to purchasing separate modules. Well, clever pricing from e-onsoftware.

From Vue 9 to Vue 10?

Upgrading brings us:

  • Improved GI lighting
  • Improved handling of cloud layers and cloud portions
  • Custom star maps
  • Improved EcoSystem distribution and animation
  • Massively improved terrain creation tools, including Road Construction
  • Improved Rock functions in Library and Ecosystem
  • Improved render speed and quality
  • Improved Water and Underwater scene handling
  • Improved texture mapping en interactive (Viewport) handling
  • Render Stack for result comparison, difference calculation and better post-processing
  • Importing and Using splines for terrain creation and ecosystem distribution
  • Multiple UV layouts
  • Guarding against OpenGL failure issues

Upgrading costs $200 ($150 for Studio, $100 for Esprit), or 150% of that when you leapfrog (from 8 to 10). I generally recommend leapfrogging versions to those who are learning the software and don’t work at the edge of the product’s possibilities yet.

However, taking a “subscription” (paying a monthly amount) is cheaper than leapfrogging on the longer term and gives you the most recent version every time. So that would be my recommended strategy for this product.

From the Artist line to the Pro line?

Vue Infinite costs about $1000 but you can hand in your recent Complete for a $400 buy-back. Since it’s a physically different product, there is no such thing as a simple upgrade path. He maintenance contract ($200/year) is cheaper than regularly upgrading and equality expensive as leapfrogging versions, but gives access to intermediate (.5) versions and various forms of support. Recommended when considering the Pro product.

The other Pro product is Vue xStream, which actually is similar to Infinite but completely integrates into the other high-end 3D software like 3DS MAX.

What are the main extras of Infinite 10 over Complete 10?

  • Baking illumination into textures, great for game development
  • Planetary clouds
  • Advanced object mesh subdivision
  • Extensive multi-pass rendering for optimal post processing results
  • Unlimited network rendering (Complete: 5)
  • Higher quality, more realistic camera options
  • Network and render management functions (logging, diagnosis, …)
  • Full gamma control (input, output, display)
  • Advanced handling of mattes and real world footage
  • Camera / light synchronization with Max, Maya, Cinema4D, …
  • Export to After Effects
  • Motion blur on mesh deformations
  • More flexibility in user Interface (to line up with other software), more control over OpenGL viewport handling
  • Python scripting, macro recording, embedded backup tools
  • Object decimation (reduce level of detail)
  • Texture map search
  • Better handling of HDRI and EXE images
  • No limits to threads and CPUs

Personally, I would love the multipass rendering. Vue gamma correction has some flaws (see my article on that) and I don’t have such a current use for the other features to justify this price-doubling. So I stick with Vue Complete, but your considerations might be quite different of course.

Which Poser version?

Although the full details are revealed at the Smith Micro website, I’ll summarize the main differences between the various Poser versions. This might be of help for those who consider an upgrade, or might be of help in the “to Pro or not to Pro” quest. Hence:

  • Upgrading to Poser 9?
  • Upgrading to Poser Pro 2012?
  • Poser or Poser Pro?

Roughly, my advice reads as follows.

  • When you’re relatively new to this software or to this kind of imaging, it’s better to concentrate on learning the main features and on developing the artistic side: camera, light, rendering, post-processing, materials, posing. And hence to leapfrog versions. From Poser 8 to 10 to …, from Pro 2010 to Pro 2014 to … .
    I see no need to rush.
  • When you’re a seasoned user on the edge of the features Poser / Poser Pro offers, then following versions makes sense. From Poser 8 to 9, from Pro 2010 to 2012.
  • When you’re suffering scene-size or render-speed issues, when you’re on 64-bit, when you really want more grip on scene handling, posing detail and render quality, then taking the step from Poser to Poser Pro might be just for you.
  • When upgrading, the preliminary, initial offer from Smith Micro is by far the cheapest. From the moment the new releases are out, prices won’t drop to that level anymore.

Upgrading to Poser 9?

The main features you’ll get when upgrading from Poser 8 to Poser 9 are:

Various former Pro features:

  • The Recent Render palette, so you can easily compare two recent render results
  • Indicator for parameter change, indicator for Joint Strength
  • Full Body Morph import

Plus:

  • Support for scripts in Python 2.7
  • Expanded Context menus
  • Morph brushes are pressure sensitive (handy for Wacom / tablet users)
  • Object grouping and Hierarchical Scene Inventory
  • Camera’s for Frame Object and Rotate Object
  • Full Body Morph deletion
  • Single mesh characters (as derived from Daz Genesis)
  • Using Weight Maps for rigging (making WM’s is a PPro2012 feature)
  • New Subsurface Scattering and Skin materials
  • Improvements on: focal / motion blur, reflection and indirect lighting
  • Realtime (=Viewport) support for soft shadows, ambient occlusion etcetera
  • Some performance improvements
  • More content with the package, and a somewhat improved Library
  • More constraints in Animation

Upgrading to Poser Pro 2012?

The main features you’ll get when upgrading from Poser Pro 2010 to Poser Pro 2012 are:

  • Everything you’ll get from upgrading Poser 8 to 9, except for those features which were already available in Pro 2010

Plus:

  • 64-bit application for the Mac (was: Win only)
  • Weight Map creation tools (as Poser can only use created weight maps)

Poser or Poser Pro?

The main features you’ll get when upgrading from Poser 9 to Poser Pro 2012 are:

  • Interfacing with other software (Photoshop, 3DS MAX), via COLLADA or PoserFusion
  • 64 bit application, 64-bit Firefly rendering, Render queue and network rendering, and background rendering
  • HDRI import/export, PSD export with layers for post-processing
  • Gamma Correction for shadow/highlight strength management,
  • Weight Map creation tools (as Poser can only use created weight maps)

Sticky: What are the Missing Manuals?

In my quest to understand a piece of software, I’ve got to work with Manuals and Tutorials. They do provide some help, but for me they’re not really working out.

Manuals tend to follow the menu structure and screen layout. But they hardly tell me when to use a specific function, and in which case what parameter settings are preferred. The menu structure never is the structure of my workflow. Manuals might help with the work but hardly contribute to the flow.

Tutorials tend to direct me to a specific result, and tell me which buttons to push and which parameters to set. But only in rare cases they tell me why. Tutorials might help with the flow, but hardly contribute to my next piece of work.

I do hope my Missing Manuals are different, and add to both the regular Manuals and Tutorials. I try to present a deeper understanding, to present the “why”. This way, they might contribute to your work and flow as they do to mine.

In order to get where I want, every chapter is an answer to the question raised in the chapters title. Hence, a ‘chapter’, an ‘article’ or a ‘question’ usually are similar pieces of the Missing Manuals. My intention is to present each piece in web-format, as PDF, and in video form. Let’s find out how far I can get.

More…

After half a year of presenting just tutorials I decided to restructure my websites. This included the move of my Links Library and and Magz Reviews right into here to bring all informative posts in one place. So, from then on, there is more than just Missing Manuals alone. Enjoy.

What about Vue?

In 1992 the French student Nicholas Phelps started the creation of Vue d’Esprit, an outdoor scenery generator. Version 1 saw the light in 1994, and after an intermediate version 1.2 (1995) version 2 was released in 1997.

At those days it had a very strong competitor: Bryce, which

  • was based on the fractal algorithms by Ken Musgrave – who was a student of Benoît Mandelbrot, and later founded mojoWorld,
  • was extended by geologist Eric Wrenger – who wanted to create believable rock textures in software, and
  • got its user interface from Kai Krause – who made numerous contributions to the appearance and behaviour of nowadays software like Mac OSX, Windows, Linux, Photoshop and Poser.

Bryce released version 1 in 1994 (Mac only), got available for PC with version 2 (1996) which included lights, atmospherics and Boolean object combination, and introduced animation in version 3 (1997). Vue lagged far behind all that.

While Bryce suffered from departing experts and developers, commercially driven company takeovers and reduced priorities in development programs, Nicholas Phelps moved to the US, founded e-onsoftware and continued the development of his product.

So Vue migrated towards photo-realism, towards the ability to create advanced plant structures, got the ability to cover complete landscapes with eventually complex vegetation patterns (and to handle those in high end rendering results) , started real integration with high end tools (the xStream versions) and finally established a solid position in the big screen industry.
This ranges from animations like Kung Fu Panda to life action scenes in Indiana Jones (Kingdom of the Crystal Skull) and Pirates of the Caribbean (Dead Man’s Chest), and the user base addresses about all major studios around.

In the meantime, the enthusiast’s and hobbyist’s / artist’s user base is far from forgotten. Next to a basic (and free!) Vue Pioneer version, Vue is presented in a modular way: Vue Esprit brings 2 modules, Vue Studio brings 5 while Vue Complete brings all 12 of them to the Vue Pioneer base version, while each module can be purchased separately as well.

As can be expected, the professional versions (xStream and Infinite) add functions that are of main interest to the collaboration and workflows in larger studios while also adding some functions that make the extra mile to the big screen. In addition to that, e-onsoftware has issued some products which makes specific Vue technologies available to other software, like Ozone (atmospherics), Carbon Scatter (Eco-systems) and LumenRT (mixing static rendering with camera animation for Arch-viz works).

The whole range make up a great toolset for Virtual Landscape Photography.