Tag: Vue
Corrections (1 Intro)
Gamma Correction as in Poser Pro 2010 and up differs completely from the traditional approach. Vue follows an intermediate route.
Download this tutorial in PDF format (0.9 Mb)
Introduction
Various 3D software, like Poser and Vue, offers some functions for after-render image adjustment.
Exposure correction is available in Poser and Poser Pro, as well as in the Vue Artist range (Esprit, Studio and Complete) and in the Vue Pro versions xStream and Infinite. Its basic purpose is to adjust the brightness of the image in a way similar to the effect of widening lens diaphragm opening or of prolonged exposure time on classical celluloid film. It helps to make your image look like a photograph.
Gamma Correction is available in Poser Pro, and the in Vue Pro versions, and to a limited extend in the Vue Artist range. Its basic purpose is to adjust the image for better viewing on monitors and in print, to some extent to correct as well for the shortcomings of non-realistic lighting in 3D (more in Poser than Vue) and to make the image a bit more comfortable for the human eye.
Both corrections are somewhat similar, but are independent as well so they can be mixed, or not applied at all. They all are techniques, not religions. Use them knowledgably, with care, and with awareness of artifacts, limitations, pro’s and con’s. This articles aims to help you with that.
At first I’ll discuss the need for corrections at all, and how to make them in post. Then I’ll look in more detail to Exposure Correction as well as Gamma Correction, both to be applied after the rendering process.
At second, I’ll note that Gamma Correction comes with a companion: Anti Gamma Correction, applied before the rendering. This appears to be a tricky process with lots of side effects and artifacts. I’ll discuss these for Poser and for Vue.
Corrections (2 Do I Need …)
Do I need corrections?
Exposure and Gamma Correction, as well as any other correction, can be applied in post using Photoshop or GIMP or alike. You render, export the result and apply the adjustments to your liking. Applying Exposure or Gamma Correction within the Poser, Vue or other 3D application itself is different however, since you render, apply the adjustment and then export after that.
The difference is that the applications internally work in high resolution mode (HDRI, 16 or even 32 bits per color) while most exported results like JPG, PNG etc. use low (8 bits per color) resolution. Therefore, the correction is applied to the high resolution internal result – when the details are still there – instead of to the low resolution – when the details might have gone already, and have nothing left to correct.
So, next to make the image look good, there is a technical reason for applying the corrections within Poser or Vue: saving the details, especially in the dark areas of the image. And then, in post, you can take the corrections out again as the first step, process as if no corrections were applied at all but still with all details available. For this purpose, Gamma Correction is just more powerful then Exposure, and other corrections are just not available within the 3D program. Even Gamma Correction is not always available, like in Poser. Then Exposure Correction is your only option.
Why not?
The argument above also yields a reason NOT to do all this, or even to do the inverse: when saving the details in the darks, you will lose the details in the brights. This is relevant in images with massive cloud nuances in the sky, like in Vue. With respect to that, it has to be considered that our eyes are far more sensitive to details in the dark than to details in the brights. So lack of bright details is less relevant in our appreciation of the image than the presence of dark details.
This of course has a simple evolutionary background: all we can eat, or all which can eat us, was hidden in the woods and in the shades while far less opportunities and threats came from the sky. It’s ancient history especially since we all put a small light in our fridge J to avoid getting our food from the dark places, but it still plays important roles in our abilities to see and to appreciate details in our images. Details in the dark are preferred over details in the bright.
In Photoshop
Whatever your decisions are, it’s good to understand how to perform the corrections in post anyway.
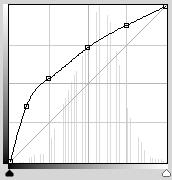
For applying a Gamma=2,2 correction in Photoshop, just perform a Curve adjustment passing through
- (0,0)
- (10%, 35%) = (26,90)
- (25%, 53%) = (63,136)
- (50%,73%) = (127,187)
- (75%, 88%) = (191,224) and
- (100%,100%) = (255,255).
As you can see there is a major effect in the dark areas (left, increased brightness in the first 25%) which is compensated by a reduced contrast (about linear but less slope) in the remaining 75%.
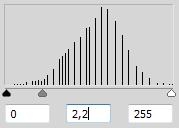
Or you perform a Levels adjustment, and move the middle sliderpointer (to the left) till the midvalue reads 2,20. Or just set the value. This is less accurate, it compares to a curve with only the 50% point set. As a result, it corrects only half as much in the dark areas. Or: it seems more an Exposure Correction to me.
Engineering stuff
For those people who like the juicy details, let’s look at some very dark (and so: very low) brightness levels.
| Brightness (*) | RGB 16bit | RGB 8bit | Gamma Corr | RGB 8bit |
| 0,00% | 0,0,0 | 0,0,0 | 0,00% | 0,0,0 |
| 0,22% | 256,0,0 | 1,0,0 | 6,37% | 28,0,0 |
| 0,32% | 256,256,0 | 1,1,0 | 7,54% | 23,23,0 |
| 0,39% | 256,256,256 | 1,1,1 | 8,24% | 21,21,21 |
| 0,45% | 512,0,0 | 2,0,0 | 8,79% | 39,0,0 |
| (*) there are a lot of definitions for Brightness, based on human eye response, camera / film response, monitor behavior, paint / ink behavior, optical science, fast-to-calculate algorithms etc. In this article I use: B = square root ( (R2 + G2 + B2)/3 ) | ||||
Next to 0% brightness, the 0,22% is the lowest level that can be produced in 8-bit per color RGB using RGB=1,0,0 (same for Green 0,1,0 or Blue 0,0,1), hence this pick.
Within Poser this brightness matches (256,0,0) in the internal 16-bit per color space. That gives plenty of nuances at a lower brightness level, but all those details disappear when this pixel is converted to 8-bit color and (1,0,0) becomes the only choice available.
Now, the pixel is Gamma Corrected first. This will shift its brightness from 0,22% to 6,37% so the export to 8-bit format will result in a pixel reading (28,0,0) which has a decent amount of lower brightness levels to represent the nuances. So, a 16-bit per color image with hundreds of brightness nuances between black and very dark either gets exported to an 8-bit image with only 2 brightness levels available (0 and 1), or – after internal Gamma Correction – to an 8-bit image with tens of nuances available. That’s a gain.
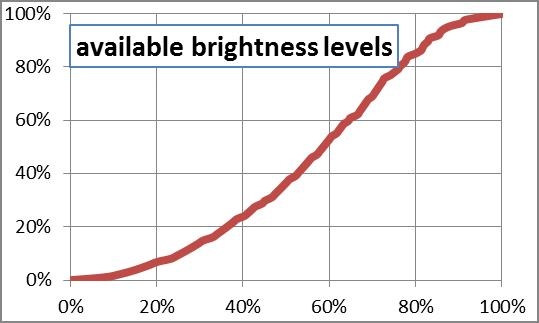
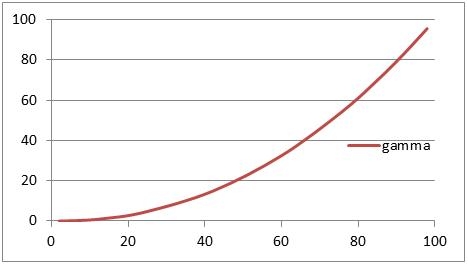
To show that this “quantization”, the effect of expressing color values in numbers only, especially harms the darks, I plotted the brightness itself against the percentage of brightness levels with a lower value:
- At 20% brightness only 6% of the available levels have a lower value, which means that especially the darks have a serious shortage in expressing details.
- At 80% brightness, about 85%% of the available levels have a lower value, hence 15% has a higher value. So for expressing details in the upper 20% of the brights there are 2,5 times as much nuances available as for expressing details in the lower 20% of the darks.
- In the midtones, covering the60% range from 20% to 80% brightness, we’ve got 85% -/- 6% = about 80% of all brightness levels available for expressing nuances. Life isn’t fair.
This again demonstrates that details in the dark are somewhat of an issue in 8 bit per color imaging. One way out is going HDRI all the way. Another way out is applying in-program correction before export. In that case, when there is a choice, the method with the most attention to the darks is preferred. This method is Gamma Correction.
Does it work out?
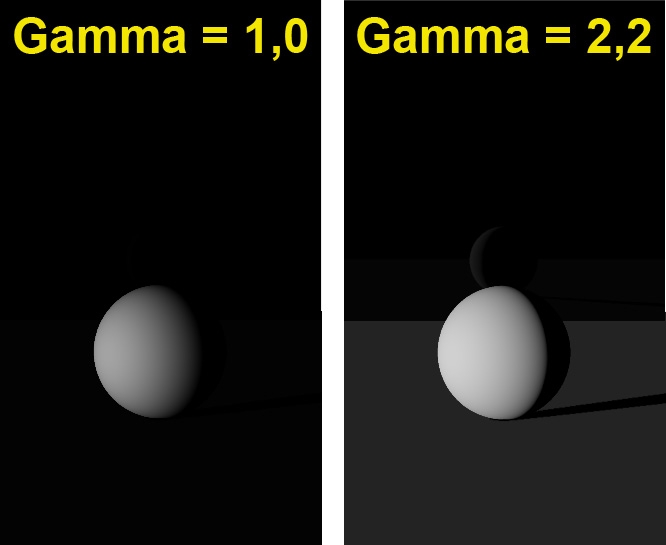
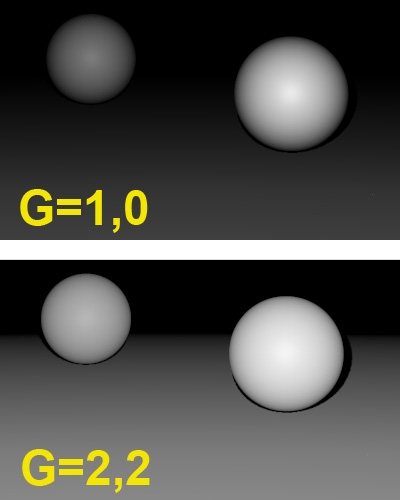
Watch this (scene concept by Bagginsbill):
This scene shows a white ball on a white floor, lit from aside. At the back there is a black plane, which has a 2% reflectivity (is: water). As a result, full 100% white will produce a 2% brightness on reflection but as the backside of the ball is reflected, the mirror image will be an exercise in dark tones.
Without gamma (left) not only the image appears rather dark, but there are no brightness values left for the reflection. The brightness measures will be physically correct aka linear, though. With gamma (right) the image reveals what our eyes would see under those conditions. Although the image is far from linear, having the details at hand will be a great help in further processing.
Pumping up the brightness in especially the very dark levels, right from the original 16 bit-per-color result, is what will save the details. This makes in-program postworking before export superior over postworking after export of the image. This is why we need gamma or exposure correction in-program, whether it results in something pleasing for the eye, or not. We can take care of the latter in Photoshop, but at least we’ve saved the details to do so.
Corrections reconsidered
In my attempt to get an image on my display that resembles the original object and its textures for the best, and to create a believable (photoreal) 3D Poser or Vue render from it, I have to consider various issues.
- Real lights have a volume, and produce light in a spatial distribution. 3D lights are like points and therefor produce harsh shadows. Some renderers can assign spatial light distribution to them, but Poser nor Vue can do so.
- Real light progresses through the atmosphere, though the air we breathe, which is filled with damp and dust. This makes the light scatter all around. Some renderers can handle this, but especially Poser only can approximate those effects by using IDL (Indirect Lighting). In this, objects start acting like a (reflecting) like source, so the effects of walls and ceilings and bright colored objects can be considered. When it comes to the softening of shadows, Poser renderers fall short. Vue does its job somewhat better.
- Real materials behavior is pretty complex. Specular and reflection are different faces of the same coin, diffusion and refraction meet in translucency and transparency, reflection and refraction are closely related phenomena and so on. But in the Poser and Vue materials those aspects are dealt with separately, while something relevant as surface smoothness is left out (at least as a direct controllable parameter).
- And so on
In other words, the renderer is far from perfect, at the gain of speed and reasonable resource requirements. Exposure as well as Gamma Correction, softening the highlights, reducing overlight situations, and (for Gamma: especially) softening the shadows do help us to get a more realistic result.
Corrections (3 Exposure)
Exposure correction
Imagine, you take a picture of something and the “film” (an electronic one in the backplane of your camera nowadays) gets exposed for 1/100 of a second. Some parts of the film remain dark, others become bright already.
Now, let’s double the exposure time to 2/100.
During the first 1/100, in a very dark spot, the film was exposed for say 5%, and was still unexposed for the remaining 95%. That remaining 95% will again be exposed for another 5% in the second 1/100 and it’s quite safe to say that this will result in a 5% existing + 5% added = 10% exposed spot in the film. Hence, in the very dark areas the brightness of the image will be proportional to the exposure.
For a – say 90% exposed – bright spot after the first 1/100, things are different. In the second 1/100 only the remaining 10% will be exposed 90% again, but that will add only 10% x 90% = 9% to the already present 90%, to make 99% after doubling the exposure time.
So by increasing the exposure, the darks are – relatively – far more affected than the brights.
In Poser and Vue
Both programs have the ability to apply Exposure Correction in post. This is to be preferred over a similar action in Photoshop, because in the programs themselves the correction is applied against the internally stored 48-bit (16 red, 16 green, 16 blue) render result, when all details all still available, before exporting it. Especially exporting to a regular 8-bit color image format will lose detail in either the darks (shadows) or the brights (clouds). Exporting to HDR, EXR of 16-bit TIF might save the day. Note that Photoshop opens the Poser EXR images as 32-bit per color files.
In Poser, there is no alternative (except from buying Poser Pro). Check the Render Settings:
My advice is to take a medium value between 2 and 3, because
- A value over 2 brings up enough details in the darks
- A value below 3 prevents losing all details in the brights
Then, after export – in post, you can adjust the difference between your export and the final gamma/exposure correction.
In Vue, you can adjust the Advanced Camera Settings (double-click the camera object). Vue offers Gamma Correction as an alternative.
Exposure value
There are different ways to express Exposure, which leads to different interpretations of values like 2, 4, 0.5, -3 and so on.
One way expresses Exposure as the lengthening (or shortening) of exposure time. The value 2 means: twice as long, two times as much light into the camera. The opposite of 2 is: one half (0.5). The neutral – do-nothing – value is: 1. This is the way exposure is used in Poser.
Another way to express Exposure is in extra diaphragm stops. One extra stop (value: 1) doubles the lens opening, and so the light into the camera. The opposite is: one stop back (or value: -1). The neutral value is: 0, no extra stops. This is the way exposure is used in Vue.
Hence:
| Poser: | 1/16 | 1/8 | 1/4 | 1/2 | 1 | 2 | 4 | 8 | 16 |
| Vue: | -4 | -3 | -2 | -1 | 0 | 1 | 2 | 3 | 4 |
Engineering stuff
Some people like the unambiguity of formulas and graphs over texts and words. So:
After correction = 1 – (1- Before) Exposure
in which the Poser (exposure time) use of Exposure is used, as I will do in this entire article.
Having exposure A followed by exposure B:
After correction = 1 – (1- Before) A*B
which says that exposing something twice as long, followed by exposing three times as long gives the effect of exposing six times as long. No real magic here.
And since exposure = 1 yields the neutral, do-nothing effect,
After correction = 1 – (1- Before) 1/Exposure
is the inverse. It says that exposing something twice as long is the opposite of exposing half as long.
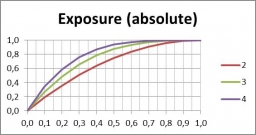
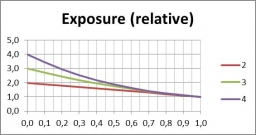
| Plotting the exposure curve as such: | But when plotting the ratio of after/before: |
In which we see that tripling (green line) the exposure time will brighten up the dark areas threefold (0.1 => 0.3 in the left graph) while having hardly any effect on the already bright spots in the image.
Corrections (4 Gamma)
Gamma Correction
Imagine, you shoot a picture with your camera, load it into your PC and – perhaps even as part of your routine, you adjust the whitepoint, the blackpoint and the greypoint. In Photoshop Levels Adjustment or Curves Adjustment there are even straightforward colorpickers to do so. This image can be used for a texture in your 3D program, like Poser of Vue.
Alternatively, you paint a texture image and use the colorpicker values or colorwheel settings to get the right colors. RGB (63,0,0) or HSV (0,100%,25%) for instance might give you the proper dark red.
Now you just view it directly, or view the result your render created with this texture, or send any of it to print. Bets are that you will find the result rather overly dark, especially in the shadowy or low-brightness spots but in the midtones too. This is due to your monitor, which for various technical and historical reasons has an embedded brightness distortion known as the “gamma effect”. Nowadays, almost all displaying and printing equipment shows this distortion in a standardized way. This standard is known as sRGB.
The compensation for this effect is known as “Gamma Correction”. When applied to an image, it especially brightens the darks a lot and the midtones a bit too, and you get the image displayed or printed as it was intended. In order to get the correction out of the image, “Anti Gamma Correction” has to be applied. Actually, this is what your monitor does when displaying. The actual value (gamma) for modern equipment is: 2.2. The neutral – do-nothing – value is 1.
To Gamma or to Expose
When you are concerned about the brights in your image, you want to handle the risk of over-lighting, or you want to emulate natural film response, then Exposure Correction is the proper tool.
When you are concerned about the darks in your image, and want to handle the risk of losing detail and getting overly hard shadows, and/or you want to export the image with a minimum loss of detail, then Gamma Correction is the best pick. That is: when it’s available in the software. And of course you can do a bit of both.
In practice, Gamma Correction is not always available, and when it is, it comes with a stack of side effects. These will be discussed in later chapters in this article. But as discussed in an earlier chapter (Do I Need Corrections), not correcting has its drawbacks as well. Your image, your call.
Engineering stuff
For those who like formulas and curves, the formula for the gamma effect (the behavior of your monitor), and hence for the Anti Gamma Correction, simply reads
After correction = (Before correction) Gamma
And since the neutral – do-nothing – value equals 1, the inverse or Gamma Correction (right image) itself reads
After correction = (Before correction) 1 / Gamma
Formally the sRGB standard which your monitor is supposed to adhere to is slightly different, and especially a bit less aggressive in the very darks. But gamma = 2.2 is a good approximation, and a pure sRGB correction is not available within the software anyway.
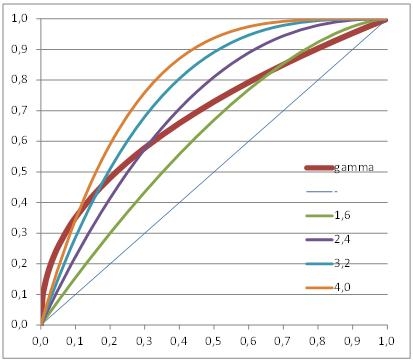
Graphs are a handy way to show the differences between Gamma Correction (set to 2.2) and Exposure Correction (various values).
Exposure Correction (compared to Gamma Correction)
As you can see, the Exposure Correction using 1.6 (Poser very bright part of the image. And Gamma Correction wins from every meaningful Exposure Correction when applied upon the darkest details of the image.
Gamma / Exposure Correction and the Human Eye
The ‘monitor’ which was not discussed yet, is the human eye. Our eye is a dynamic device, which adapts in various ways when looking to dark or bright areas. Varying pupil width is one way, but the light receptors and the signal processing in our brain have some more tools in reserve. Let’s concentrate on scene brightness.
From astronomy, star brightness is divided in classes or magnitudes. This was introduced by the ancient Greek (Hipparchus, 120BC), and refined when Norman Pogson stated that a “first magnitude” star is 100 times as bright as a “sixth magnitude” one. This implies that
Brightness = (2,512) Magnitude
give or take some constants, as 2.512 (6-1) = 100. Now, let’s compare the eye with Gamma or Exposure Correction.
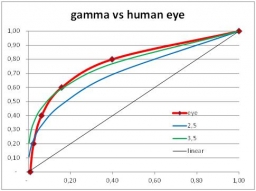
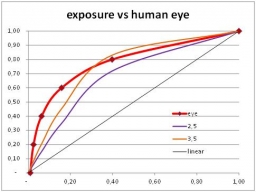
Just from the graphs (next page) we’ll find that Gamma curves (left) are far more comparable to the human eye behavior than exposure curves (right). Why does it matter? Well, when we look into a real scene our pupils adjust when we focus on specific areas. Usually the darker areas are farther away than the bright ones. But when we look at an image of that scene, on display or paper, the dark and bright areas are at the same distance. Focusing will be much harder, and our pupils will not, or far less, respond to brightness differences. Therefore, our eyes appreciate some help.
And as we can see from the graphs, and can experience by experimenting, Exposure Correction is a decent step forward compared to nothing (linear), but Gamma Correction is by far superior as it is more helpful in the darks.
From psychology, or better: from our evolution, humans are more curious about (or afraid for) the darks. This determines the workings of our brain. Each step in brightness magnitude should offer equal amounts of detail, for a comfortable feeling. In other words: overshooting the darks is less troublesome than undershooting, and vice versa for the brights.
This is why gamma correction is more pleasing than exposure correction. See the gamma=3,5 curve (left graph, green line) which offers a minor overshoot in the darks as well as a minor undershoot in the brights. This is what we appreciate. We feel more comfortable with it.
The exposure=3,5 curve (right graph, orange line) on the contrary shows a mild overshoot in the brights against a serious undershoot in the darks. This is what we like less. Exposure corrected imaged show more resemblance to a photograph, as it mimics film behavior. Gamma correction helps the eye and gives a more comfortable feeling. Your image, your call.
Corrections (5 Anti Gamma)
Anti Gamma Correction
Exposure Correction as well as Gamma Correction are straightforward, well defined adjustments of the render result. So far so good. Only … Exposure Correction just comes as such while Gamma Correction (GC) in Poser and Vue is the final part of a tandem. The first part of that tandem is the application of Anti Gamma Correction (AGC) on the definitions of lights, colors and materials before rendering. This part is far less understood, Poser and Vue perform it differently, and it comes with a shipload of artifacts.
The reason for applying AGC at all is the following. First the texture is anti-corrected, then the rendering adds highlights, shading and shadows. Then the result is corrected. In the end, the highlights, shading and shadows come out corrected (that is: softened), while the texture itself remains more or less intact.
But:
- In Vue, external image-maps are anti-corrected but internal color swatches are not. So an object colored from an image-map and an object colored from an internal color that look similar without using GC, come out differently when GC is applied. Of course all internal colors can be adjusted and Vue provides proper tools for that, but then the reverse will happen: they will behave similar under GC but different when GC is not applied.
The details are presented in the Vue chapters (part I, part II). - In Poser, external image-maps and all internal color swatches are anti-corrected, but color values are not. So an object with (50%,0,0) in the colorswatch and 100% in the value will come out different from an object with (100%,0,0) in the colorswatch and 50% in the value, when GC is applied (PoserPro) – and will come out similar when GC is not applied (Poser). And there is more to be concerned about.
The details are presented in the Poser Pro chapters (part I, part II).
Corrections (8 Vue pt I)
Gamma Correction in Vue
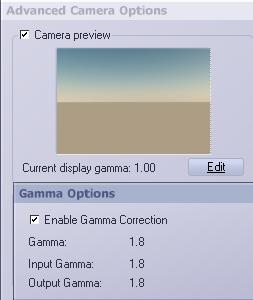
Vue offers Gamma Correction as well. In the Artists products (Esprit, Studio and Compete) it cannot be adjusted, the 1,80 value is the only option and you can either use it, or switch it off. Also, input gamma (anti-correcting the textures) and output gamma (correcting the rendered result) are the same – see image at the right.
Vue will also alter the preview, which turns that part of the display in an almost linear one. But that can be switched off, in Options \ tab Display options:More on the Vue Display Gamma at the end of this chapter.
Note that this affects the preview of Exposure Correction as well.
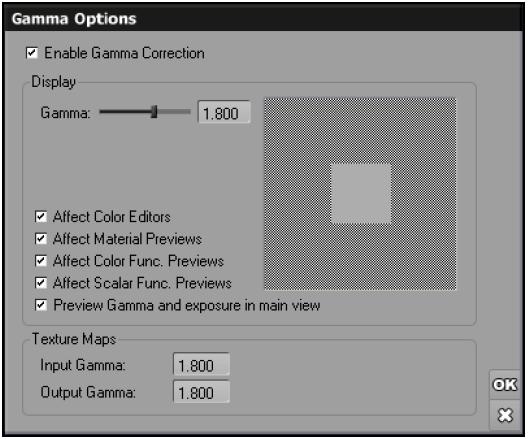
In the Pro products (xStream, Infinite) the display, input and output gamma’s can be set on an individual basis (see image from the manual): And here too we find the option to switch off the Gamma Correction and Exposure in the main OpenGL preview pane itself.
Of course Vue is aware that Bump, Displacement and Transparency textures should not be anti-corrected. By selecting Override gamma, and unchecking Enable, this can be accomplished.
Corrections (9 Vue pt II)
Vue Gamma Correction reconsidered
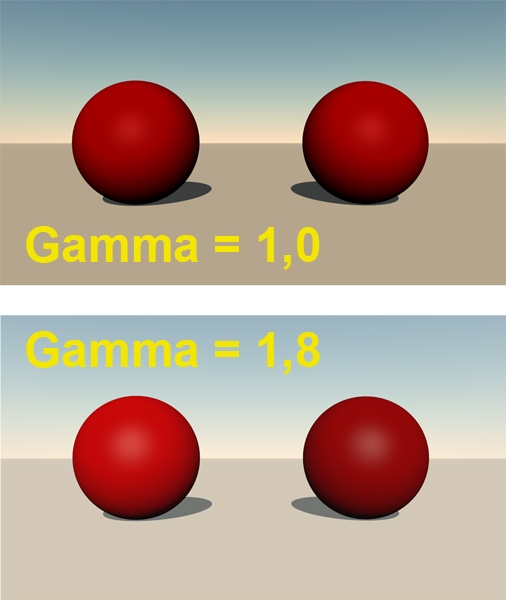
The result of Gamma Correction in Vue is interesting: The ball on the left is painted medium red (RGB=127/0/0) with a Vue internal color swatch. The ball on the right is painted medium red also, but by a texture. You can see that both respond different to the gamma settings. When Gamma Correction is switched on (I’m running Vue Complete so I don’t have the advanced control offered in the Pro software), the sky, the ground and the left ball go brighter. They all are driven by internal color swatches. Shadows and highlights brighten up as well. The ball on the right however hardly changes color. It might look as if it darkens since everything else brightens up, but Photoshop measurements reveal that a spot in the middle, somewhat away from the (brightened) highlight, remains as 50% brightness in both images. It also reveals a small drop in saturation which might be due to gamma correction applied to the atmospherics as well.
From this we can conclude that Vue – like Poser Pro – applies Gamma Correction like a sandwich. You’ll get the full brightening from Gamma Correction but you’ll get the Anti Gamma Correction for textures only. Textures and color swatches are not considered equal, the (anti) gamma correction brings external and internal (procedural) textures out of sync.
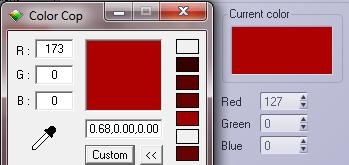
See Color Cop measuring the display while Vue sets the color: To bring those back in sync, all color swatches have to be adjusted manually. When Gamma Correction is switched on, an internal 50% red (127/0/0) translates to 173/0/0 on screen (and in the rendered result). The other way around, an internal 73/0/0 translates to 127/0/0 on screen, and in the render, and in sync with a 50% red texture map.
But you can save yourself the math and trouble. When the Gamma option is switched on, any texture well be darkened by the Input gamma but you won’t see that because the display of it will get brightened by the Display gamma with the same value. Any color swatch however will get brightened only as the Input gamma (the Anti Gamma Correction) is not working on it. By choosing a color with matches the texture you’re essentially darkening, and gamma applying, the color swatch manually. The Display gamma is doing to the preview what the Output gamma will do to the rendered image.
Note: when in Vue xStream / Infinite the option Affect Color Editors is unchecked, you only will not see the brightened color in the swatch. But you still will have it in your render.
When switching and altering gamma values becomes an issue by itself, it might be a way out to create color functions which include a gamma correction node. The color swatches in the atmospherics editor however are not function driven, these are just simple colors to be set or picked.
On the other hand, when gamma brightens the shadows and highlights, it might be reasonable that it brightens the sky as well. So not altering the swatches makes some sense. Your image, your call.
Which Vue version?
Except from Vue Frontier which is a cheap and fun way to become somewhat familiar with Digital Landscape Creation, the Vue arena is divided in an Artist and a Pro section.
What’s in the Artist line?
The Artist line consists of the main (and free) Vue Pioneer, plus 12 add-on modules which can be purchased separately or in bundles. With the RenderUP module, Vue uses 2-core (4 threads) on 32-bit systems, and 4-core (8-threads) on 64-bit systems. Which means that some modern CPU’s are not fully utilized. Not too bad, you can do the rendering in the queue manager, and probably work on a second scene (including test renders) or on another program (like Poser) at the same time.
Esprit (+$200) adds to Pioneer:
- Vue Content
- $ 70 RenderUP – no more limits to the render size or restrictions to the output
- $130 3DImport – use OBJ, 3DS and other formats as well
Studio (+$200) adds to Esprit:
- $ 70 HyperVue – enabling multi-CPU / network rendering
- $ 40 DeepAccess – for improved management of full scenes
- $ 40 LightTune – arrange light effects per object
- $ 40 Botanica plant editor – make your own plants
- $100 Ecosystem – make your own Eco materials
Complete (+$200) adds to Studio:
- $150 Exporter – export scenes in 3D format to other software
- $ 40 KronosFX – add high-end animation to your scenes
- $ 40 AdvancedGraph – create advanced materials and object interactions
- $ 40 Zephyr – add wind effects t forests and other vegetation
- $100 Ecopainter – distribute your Eco material using your mouse or stylus
Conclusions: Esprit is simply the next step up from Pioneer. When you consider the step from Esprit to Studio or from Studio to Complete, you might find yourself In the situation where two modules are attractive, one is / two are just nice and two are / one is not necessary. So this extra bundle price is just, or just not, attractive compared to purchasing separate modules. Well, clever pricing from e-onsoftware.
From Vue 9 to Vue 10?
Upgrading brings us:
- Improved GI lighting
- Improved handling of cloud layers and cloud portions
- Custom star maps
- Improved EcoSystem distribution and animation
- Massively improved terrain creation tools, including Road Construction
- Improved Rock functions in Library and Ecosystem
- Improved render speed and quality
- Improved Water and Underwater scene handling
- Improved texture mapping en interactive (Viewport) handling
- Render Stack for result comparison, difference calculation and better post-processing
- Importing and Using splines for terrain creation and ecosystem distribution
- Multiple UV layouts
- Guarding against OpenGL failure issues
Upgrading costs $200 ($150 for Studio, $100 for Esprit), or 150% of that when you leapfrog (from 8 to 10). I generally recommend leapfrogging versions to those who are learning the software and don’t work at the edge of the product’s possibilities yet.
However, taking a “subscription” (paying a monthly amount) is cheaper than leapfrogging on the longer term and gives you the most recent version every time. So that would be my recommended strategy for this product.
From the Artist line to the Pro line?
Vue Infinite costs about $1000 but you can hand in your recent Complete for a $400 buy-back. Since it’s a physically different product, there is no such thing as a simple upgrade path. He maintenance contract ($200/year) is cheaper than regularly upgrading and equality expensive as leapfrogging versions, but gives access to intermediate (.5) versions and various forms of support. Recommended when considering the Pro product.
The other Pro product is Vue xStream, which actually is similar to Infinite but completely integrates into the other high-end 3D software like 3DS MAX.
What are the main extras of Infinite 10 over Complete 10?
- Baking illumination into textures, great for game development
- Planetary clouds
- Advanced object mesh subdivision
- Extensive multi-pass rendering for optimal post processing results
- Unlimited network rendering (Complete: 5)
- Higher quality, more realistic camera options
- Network and render management functions (logging, diagnosis, …)
- Full gamma control (input, output, display)
- Advanced handling of mattes and real world footage
- Camera / light synchronization with Max, Maya, Cinema4D, …
- Export to After Effects
- Motion blur on mesh deformations
- More flexibility in user Interface (to line up with other software), more control over OpenGL viewport handling
- Python scripting, macro recording, embedded backup tools
- Object decimation (reduce level of detail)
- Texture map search
- Better handling of HDRI and EXE images
- No limits to threads and CPUs
Personally, I would love the multipass rendering. Vue gamma correction has some flaws (see my article on that) and I don’t have such a current use for the other features to justify this price-doubling. So I stick with Vue Complete, but your considerations might be quite different of course.
What about Vue?
In 1992 the French student Nicholas Phelps started the creation of Vue d’Esprit, an outdoor scenery generator. Version 1 saw the light in 1994, and after an intermediate version 1.2 (1995) version 2 was released in 1997.
At those days it had a very strong competitor: Bryce, which
- was based on the fractal algorithms by Ken Musgrave – who was a student of Benoît Mandelbrot, and later founded mojoWorld,
- was extended by geologist Eric Wrenger – who wanted to create believable rock textures in software, and
- got its user interface from Kai Krause – who made numerous contributions to the appearance and behaviour of nowadays software like Mac OSX, Windows, Linux, Photoshop and Poser.
Bryce released version 1 in 1994 (Mac only), got available for PC with version 2 (1996) which included lights, atmospherics and Boolean object combination, and introduced animation in version 3 (1997). Vue lagged far behind all that.
While Bryce suffered from departing experts and developers, commercially driven company takeovers and reduced priorities in development programs, Nicholas Phelps moved to the US, founded e-onsoftware and continued the development of his product.
So Vue migrated towards photo-realism, towards the ability to create advanced plant structures, got the ability to cover complete landscapes with eventually complex vegetation patterns (and to handle those in high end rendering results) , started real integration with high end tools (the xStream versions) and finally established a solid position in the big screen industry.
This ranges from animations like Kung Fu Panda to life action scenes in Indiana Jones (Kingdom of the Crystal Skull) and Pirates of the Caribbean (Dead Man’s Chest), and the user base addresses about all major studios around.
In the meantime, the enthusiast’s and hobbyist’s / artist’s user base is far from forgotten. Next to a basic (and free!) Vue Pioneer version, Vue is presented in a modular way: Vue Esprit brings 2 modules, Vue Studio brings 5 while Vue Complete brings all 12 of them to the Vue Pioneer base version, while each module can be purchased separately as well.
As can be expected, the professional versions (xStream and Infinite) add functions that are of main interest to the collaboration and workflows in larger studios while also adding some functions that make the extra mile to the big screen. In addition to that, e-onsoftware has issued some products which makes specific Vue technologies available to other software, like Ozone (atmospherics), Carbon Scatter (Eco-systems) and LumenRT (mixing static rendering with camera animation for Arch-viz works).
The whole range make up a great toolset for Virtual Landscape Photography.
