Enabling Large Address Usage
While each 64-bit operating system is enabled to support Large Address by definition, and various 32-bit operating systems (like most Unix/Linux variants) are enabled by default too, Windows is not.
Not being enabled implies that the halfway split of 2Gb System Memory and 2Gb User Memory still holds even for LAA (Large Address Aware) programs. Non-LAA programs will fall over when requesting more than the 2Gb maximum, LAA-programs will fall over as the non-enabled 32-bit Windows will not fulfill their request. You won’t know the difference. So besides the program being made LAA, you’ll need to enable Large Address Usage in Windows.
This is how, in Vista and up (Win7, …).
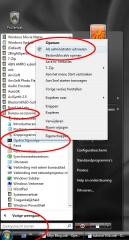
Go to Accessories, and open the CommandPromp with Admin rights.
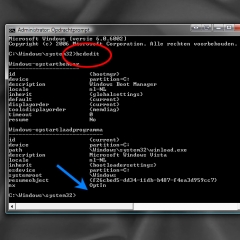
Then you type: bcdedit
and {Enter}. This presents just a readout of your Windows settings. Note the blue arrow, there is no additional info below OptIn.
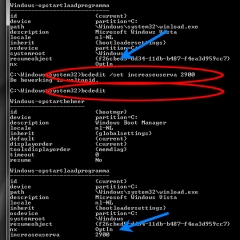
Then you type: bcdedit /set increaseuserva 2900
and {Enter}.
You can check the result by typing bcdedit {Enter}, this presents just a readout and you’ll find the variable increaseuserva (NB: Increase User Virtual Address) with the 2900 value. You did do the readout first, to check whether there is something set already.
2900 means 2900MB, or almost 3Gb. The value 3072 (MB, or 3Gb exactly) is the maximum to use, but you can go lower as well. The value chosen is your new User Memory limit, MicroSoft disadvices against values below 2800. This is why I pick the middle route. Higher values leave less memory for Systems use, and might effect your systems performance in bulky operations. Note that non-LAA programs will not be effected by any of those adjustments to your Windows environment.
You can use the same bcdedit /set increaseuserva … command for changing values, or use bcdedit /deletevalue increaseuserva to return to the original, nonmodified situation. In which case even LAA-programs will obey the 2Gb limit again.
The Command prompt can be quit with the exit {Enter} command, and the new windows setting will be effective after a restart (!) of your PC.
This is how, in Windows NT (up till XP)
Win7 and Vista offer a startup regime which is an enhancement over the original Windows NT one. Here is the original approach. Enabling LAA is the same for Win NT and above, like Win 2000 and Win XP. The images and code examples below were made from my XP system.
Essentially, you have to extent the Windows startup command by adding /userva=2900 /3gb switches at the end. The /userva switch is optional, when leaving it out, the value defaults to 3072. The /3gb switch is mandatory, and it should be at the end.
You may add a second startup command line, which enables you to select whether or not to run in the extended addressing mode. This gives you an escape route as well: when issues occur, you just restart Windows using the first, original command line.
How to do it:
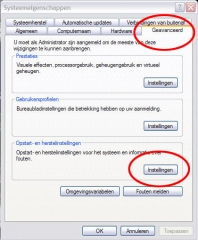
- Rightclick My Computer on your desktop, and select Properties.
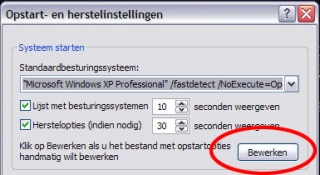
- Choose the Advanced tab, and click the third button, about (Re)Startoptions
- In the options window, click the Edit button
- This opens the text editor on the startup file (boot.ini), which might read something like
[boot loader]

timeout=10

default=multi(0)disk(0)rdisk(0)partition(2)\WINDOWS

[operating systems]

multi(0)disk(0)rdisk(0)partition(2)\WINDOWS="Microsoft Windows XP Professional" /fastdetect /NoExecute=OptIn
- Now just add a copy the last line, change the name between the quotes, and add the extra options. So now you have:
[boot loader]

timeout=10

default=multi(0)disk(0)rdisk(0)partition(2)\WINDOWS

[operating systems]

multi(0)disk(0)rdisk(0)partition(2)\WINDOWS="Microsoft Windows XP Professional" /fastdetect /NoExecute=OptIn

multi(0)disk(0)rdisk(0)partition(2)\WINDOWS="With 3Gb memory limit" /fastdetect /NoExecute=OptIn /userva=2900 /3gb
- Save and close the text file
- Then you might choose this new, second option as the startup default, in the options Window. Then click OK. (NB: you might have to click OK first and reopen the options window again, to make it read the edited boot.ini file and discover the second command line).
- Click OK to close the Properties window too. Note that you have to restart Windows (!) and pick the correct variant to have the 3Gb feature activated.
At startup, you will now see two systems to pick from, for the time as set in the timeout line in the text (10 sec in the example). When issues occur, you might restart Windows and pick the first option. As an alternative, you can delete the first startup option which will make the startup go without offering choices. That’s up to you. When issues occur, you have to re-edit the startup file before restarting, deleting the /userva and /3gb switches.
Again, non-LAA programs will not be effected by any of those adjustments to your Windows environment. Changing either the startup commandline or the boot.ini file back to their original state sets you back to the original, nonmodified situation. In which case even LAA-programs will obey the 2Gb limit again.
