Although various configurations can be setup via Render Settings (Poser 10, Pro 2010 and up), this topic is considered Intermediate – and sometimes Advanced – level.
Intermediate
When it comes down to Gamma Correction, there are a lot of stories. About gamma, images and devices, and on the application of the gamma function in Poser rendering. Some of those are close connected, other stories are hardly related. Unfortunately, all stories tend to get mixed up in forum threads, manuals and alike. Let’s tell them all, in a sort of organized way.

Gamma and Devices
Output devices (at the end of any workflow, step A in the scheme above), like TV sets, PC monitors as well as newspaper pages all have in common that when they display an image, the midtones are darkened, the shadows lose detail while the brights gain some. From electronics, and from image handling as well, this loss of brightness is known as “gamma distortion” of “gamma effect”. Lots of people find this reduction of image brightness rather unpleasant for various reasons, some of which even go back to our natural roots having hunters and prey hidden in the darks.
A way to overcome this is to adjust the image before it gets displayed, by an “inverse gamma” or “gamma correction” effect (start of the workflow, step B in the scheme above). This brightens the midtones, and enhances the details in the darks at the cost of losing some in the brights. When such a corrected image is displayed, the “gamma inversion” embedded into the image and the “gamma distortion” of the device cancel each other out, and the image is displayed as it was intended, and as we are pleased to see it. This is how JPG (for pictures) and MPG (for movie footage) came to life: these formats have the gamma correction embedded as prescribed by their format standard; such in contrast to BMP, and raw image data. And so, this way of work proves fine for newspaper and magazine printers as well as TV sets and movie projectors which don’t have the processing power (‘intelligence’) on board to adjust images or movie frames on the fly.
TV sets etc. have to work with images and frames that have a standardized correction embedded into them. But they only approach that standardized gamma effect themselves. So they only can display the images as being “not too far off”. PC’s and the like have an advantage. They can open the image and correct for the standardized correction before (or when) sending the image data to any user application. This is step D in the scheme, called linearization.
And then the application can send its results to the video driver / video card which then communicate with the monitor. This offers the opportunity to establish correction curves for a specific monitor. Either by loading a brand and type specific profile from the manufacturer or even by measuring the monitors input/output response periodically, to compensate for aging as well. On a multi-monitor system, each one even can have its own profile, so an image keeps its exact appearance when dragged from one device to another. This is step C in the scheme, usually referred to as Color Management.
Summarizing: given the behavior of my monitor (A), image formats (B) are made up to compensate and with a dumb device in the middle, both cancel out to give me the proper image in result. With an intelligent device in the middle, both actions can be compensated for (monitor A by driver C, image format B by image handler D) so also the application in the middle can make proper results based on proper (‘linear’) inputs, and without having to worry about image formats and device characteristics.
So, in my PC, if the operating system / application deals with image formats and if the driver/card deals with monitor profiles, every type of image will behave ‘pure’ from an application input/output point of view. Great! Unfortunately, there are two ifs in this.
On the output side, PC video driver/cards have the profile handling capacity for say 10 years now (from 2005 on), but native (motherboard) video and laptops can only do so for say 5 years (2010 and on), while smartphones and tablets hardly do, and whether my laptop is feeding gamma-corrected streams to my TV-set is quite questionable. So images might look different from my PC monitor.
In cases the output handling abilities fall short, some applications offer the adjustment themselves, while others don’t. Some applications put in some adjustment anyway. In either case, a single image is shown in different ways by different applications onto the same screen. Unfortunately, there is no way to tell which one is right, although Photoshop can come close once I master its Color Management settings. And there are not that many ways for user-adjustment. Poser creates render results in 16-bit per color EXR format, and does quite a nice job in showing it on screen. Anyway, there are no settings or dials to affect that.
On the input side, some versions of operating systems do offer routines for proper image handling, some don’t. Even if they do, it’s up to the application to call for them instead of reading out the image data itself. I don’t have to figure out the details of this, it’s easy to test: make an image, save it in bmp as well as jpg format, and open both in my application at hand (with the same settings etc.). Do both show the same result? Then all is fine. If not, the jpg needs its embedded gamma-correction taken out, or has so but not to the right amount yet. Sometimes I can correct for that, either by opening it with adjusted settings, or by correcting for it in pre-production, with my image editor. This is called: linearizing the workflow. Poser (7 and up) users can rest assured: an image will show the same way whatever format is used.
Some test results, with a BMP and a JPG with an embedded profile:
- In Poser (Pro 2014 SR3.1), Photoshop (CC 14.1), Internet Explorer (11.0) and Windows (7) Photo Viewer both BMP and JPG are the same.
- In Chrome (33.0) and FireFox (27.0), the JPG is slightly darker than the BMP. So these applications seem to take out the gamma correction as well, but take more out than the profile put in in the first place.
Gamma and Poser
Overview
All in all, Poser works fine with all image formats and all output devices. I do not need any adjustments for that, Poser offers a “linear workflow”, especially in the design stage. But the great story is: Poser offers an optional non-linear rendering as well.
In that, it first darkens all images, footage and colors around (step E in the scheme), and then it renders (step R). This will create quite a dark render, including shading and shadows. And with dark highlights as well, with quite a reduced risk on overlighting. Then it un-darkens the render result, step F in the scheme. From that, I can export the image for any further handling as required.
This sandwiched rendering will make all surfaces reappear at about their original colors and brightnesses as steps E and F are intended to cancel out. But all darkening that occurred during the rendering itself, like the shading and shadowing, will be brightened up considerably as these receive the post-render treatment from step F only. Highlights will be brightened a bit as well, but not to an overlighting level. In short: this sandwich process of darkening first and un-darkening later will just soften the darks and highlights, contributing to a more pleasant and more realistically looking image.
So, how to do the (un)darkening? Poser offers the gamma function for this, and that was just an arbitrary choice. They could have used another function as well, like exposure, but they didn’t. That gamma function is driven by a single (“gamma”) parameter. Each value larger than 1 will soften shadows and highlights, but values over 4 will create very artificially looking results. Values around 2 do very well for photorealistic renders. Values smaller than 1 (and preferably larger than 0.25) will have the opposite effect, which might be desired in comic styles.
Note on the method:
This Gamma-sandwiching approach is one of the available strategies. It works about as required for shadows as well as for highlights, and it’s easy to implement as it just adds a pre-render and a post-render step but leaves the rendering itself as is. Other 3D software (like Vue) works likewise. Very recommended, and discussed in various articles on this site. Other ways are:
- Tone mapping. Not available in Poser (yet) but available in external renderers like LuxRender. That way the internal High Definition (HDRI) render result is mapped to the most feasible visual range. It corrects for (too) low lighting levels too, but brighter lights will make darker shadows, so although this method has far less artefacts, shadows are not catered for. PoserPro users can do it manually, by exporting the HDRI result first. Poser (all versions) can adjust Exposure as well, as a substitute.
- Screening. Available in Photoshop and alike, and considered the industry standard in combining the effects of multiple light sources (in post-production). Shadows stay as dark as they were, however, and need additional (manual) adjustment. PoserPro users can do it manually, by exporting the result as a layered PSD file. This is the recommended way of work when integration Poser renders into a larger, professional workflow. Gamma Correction (as well as Exposure correction) should be OFF then.
Note on the Gamma value:
The Gamma value applied in Poser is a trade-off. For scenes with mainly or only direct lighting, a value below but close to 2.0 will produce the best shadow softening but when IDL gets the upper hand, lower values (towards 1.0) will produce better results. This is because the Gamma Correction includes compensation for radiosity of ceilings, walls etc. and with IDL, the lighting itself is catering for that itself. On the other hand, adding up very dissimilar light sources / surface components works best with gamma values just below 2.0 while adding up quite similar lights or about equally bright components works best with values even over 3.0. But… there is only one gamma to serve all. As a result, the industry standard 2.2 for device handling is considered a reasonable trade-off for Poser as well, even though both are completely unrelated.
Gamma and Confusion
So there are two rather unrelated processes. One for putting images onto output devices and for taking their effects out to enable applications to serve normally (represented by steps A, B, C and D in the scheme). And one for softening shadows and highlights in Poser renders to establish a more (photo)realistic look and feel, represented by steps E and F in the scheme.
The first utilizes a “gamma function” with a parameter value around 2 as this represents most output devices quite reasonably. In formal image format standards the value 2.2 is prescribed. The second utilizes the same gamma function, and a parameter value around 2 happens to present a pleasant result, and supports photorealism quite well.
So both processes happen to have the same mathematical function and the same optimal input value for it, in common. That’s their only relationship. Hence, don’t bother about all gamma-fuzz in forums, google, Wikipedia and the like, and don’t bother about monitors, calibration, and other output devices. They address the steps A, B, C and D from the scheme quite well. But I can freely choose whether or not to use the Gamma process in my Poser rendering, and I can freely choose my gamma value with it, as steps E and F in the scheme are separate ones. However, for photoreal’ish results, using the Gamma process with the default 2.2 value is much recommended.
Poser Details
The overview above mentioned the benefits of using the Gamma Mechanism offered from Poser 10 and Poser Pro 2010 up. The mechanism however has some drawbacks as well:
- Greyscale swatches and images which for bump/displacement should be excluded from the mechanism. For images, their gamma should be set to 1.0 explicitly in the Texture Manager. When this can’t be done for whatever reason the Gamma node can be used for additional adjustment.
- The mechanism is applied to all images and color swatches, but not to numericals. So 50% white at 100% value, and 100% white at 50% value do refer to the same shade of grey but will end up differently in the render result when the Gamma Mechanism is applied. For that reason, the various Value slots in PoserSurface should either be 0 or 1, but any intermediate value should be addressed in the accompanying Color slot. At least when Gamma Correction is used for rendering, although it doesn’t harm to turn this into a generic way of work.
- When using the HSV node, be aware that the image inputted into it will get Gamma corrected before the HSV adjustments are applied. You might have to adjust the Texture Manager settings for these.
- Since values are not adjusted by the Gamma mechanism before rendering, the User_Defined node which produces a color on value inputs will not be affected. You might want to add the Gamma node itself for explicit adjustment.
- Various (older) object textures offer a neat balance of color settings and adjustments, which work out nice when used in Poser 9 and earlier. But these produce awful results, when rendered in more recent Poser versions that have the Gamma mechanism enabled. All color settings etc. are distorted, are any balance is completely gone. Those textures have to be re-evaluated (or the mechanism should be turned OFF for those renders). A well-known example is the “smoking zombie” look of the V4 character when rendered with Gamma Correction switched ON. See the next article for details.
- The various blend-nodes, like Edge_Blend, Fresnel_Blend and the Fresnel node itself, but also the Blend option in Color_Math and the ColorRamp node as well present some deviations when rendering under Gamma. Like the previous point, not only brightnesses but also the resulting hues can be affected, reflection-to-refraction rations might get distorted, and the like. For short: they should participate I the Gamma mechanism as least as possible, and bypass it as much as possible. See the next article for details.
- Poser Transparency acts as some kind of ‘super blender’, and may cause a blend of light bouncing from the front of the object (reflection, diffusion), light bouncing from the backside of the object (internal reflections), light from behind the object passing through , and in the meantime it’s casting shadows onto the scene behind the object too. Should transparency itself participate in the Gamma mechanism (like Diffuse etc.), or should it bypass it (like Bump/Displacement?). For short: it should participate as least as possible, and bypass as much as possible. See the next article for details.
For Poser 9 and earlier, the Gamma node is available as well. This is meant for those cases where Poser is not taking any embedded brightness corrections out of the image properly. The node cannot be used to build the Gamma Mechanism myself, as that is a sandwiching process of which the nodes can only affect the input-part. One can however do the output-part of it in post. It’s quite elaborate though, to add the gamma node for every image map and color swatch in all material definitions in the entire scene.
The math of Gamma
Okay, let’s go for it. This is the Advanced part.
Shadows
Say, an object in the scene has a color D. That is, I’m not interested in its hue, but the brightness is its Diffuse_Color or D between 0..100%. Let’s pick 70%.
With the Gamma mechanism enabled, the pre-render pass will turn that into Dg and for g>1, by default g=2.2, that will result in a darkening as for instance 0.72.2 = 0.46. When rendering, shading (like Lambert) darkens the sides of the object with respect to the lights, and any other object standing in the light casts shadows onto my object as well. This shading and shadowing actually multiplies areas of the object with S, between 0..100% also, say 20% at specific points. That turns the brightness of those spots to S*Dg or 0.2*0.46=0.092 in the example. The post-render pass then will turn the final result into (result)1/g which is a brightening, from the formula ( S*Dg )1/g = S1/g *D. The spots on the object without shading and shadow result in 0.460.45=0.70 while the spots with it result in 0.0920.45=0.34. Without the Gamma passes, the spots with shading would have resulted in 70%*20%=0.14 – a much darker result.
So from the formula and the example figures I learn that the object color will go untouched (70% remains 70%) while the shading and shadowing gets brightened (34% instead of 14% in the result, which is like multiplying with 0.485 (=0.200.45) instead of 0.20).
Colors, Images and Values
Now let’s look at the result of a diffuse component, with color D, an image map M attached to it adjusted with “render gamma”, and with value d, having an image map m attached to it adjusted with a custom gamma value h (1 or anything else). Then the final result will be ( S* Dg * Mg * d * mh )1/g = S1/g * D * M * d1/g * mh/g as the shading and shadowing S will get brightened up as required, the value d went untouched by the pre-render pass and hence will appear brightened up in the result as well, and the image m is assigned its own adjustment. So the total effect is different from just having a brightened up shadow on an unaffected object. The color swatch D and its image map M went unharmed, the result for the other image map is my own choice, but the value part results in a brightening up as it was ignored in the pre-render pass. Hence, when rendering with Gamma ON, I’d better set all value parts in PoserSurface to either 0 or 1, or face an additional brightening. This also implies that when I do want a brightness reduction, I have to blend that into the color swatch. For instance, a metal reflects with an orange color RGB (100%, 50%, 0) and reflectivity 80%. Then I should not set the color to the Reflection_Color and the 80% to the Reflection_Value, but I should assign the overall RGB (80%, 40%, 0) to the color swatch instead and set the Value to 1.0. Otherwise, my reflections will be too bright when rendering with Gamma. And without Gamma, it doesn’t matter.
Most components of PoserSurface have a color swatch. Alternate_Diffuse and Alternate_Specular even don’t have a value slot. Bump and Displacement do have a Value only, but anything plugged in those should not have any Gamma mechanism assigned. Bump maps for instance should have their Gamma = 1.0 in Texture Manager.
The only components requiring explicit attention are the ‘blenders’, like Edge_blend, Fresnel, but Transparency too. These components blend colors, images, scene reflections and the like based on a value or image map. Should they participate in the Gamma mechanism (like Diffuse etc.), or should they bypass it (like Bump/Displacement?). For short: they should participate as least as possible, and bypass as much as possible. See the next article for details.
Combining Components
So far so good, for components considered separately, and for the effects on shading and shadows. But what happens when components are combined and added up? That’s like two projectors, each presenting its own image on the wall.
In nature, our eyes will adjust to the increased lighting levels. In image handling such a thing is not possible, and for ages programs like Photoshop blend layers using the Screening method, which mimics the behavior of photographic film or its modern electronic equivalents. Film behaves about as follows: when a ray hits the film, there is a possibility, a change p1, that the film responds to it, and so there is change 1-p1 that the film remains unlit. When a second ray, either from a later moment, or from another source, or from opening the diaphragm further, hits the same spot on the film, there again is a change p2 of lighting the film, provided that it was unlit before that. So the change that the spot on the film is still unlit after two rays is (1-p1)*(1-p2) and hence the formula for light addition is: 1-(1-p1)(1-p2).
This is the way Screening works on PSD image layers: the inverses of the layers are multiplied and inverted again. For instance: one layer represents 30% brightness and the other 80%, then it results in 1- (1-0.3)*(1-0.8)=86% brightness. So lighting levels will increase but will not exceed 100%. Screening is considered the (industrial standard) way of work for adding light to an existing image (as multiplication is considered the right way to apply shadows and the like).
In Poser, without the Gamma mechanism, components will just be added up. In the above case, 30%+80%=110% and overlighting artefacts will ruin the render result. With the Gamma mechanism however, it will brighten the addition of the darkened components, that is: (0.32.2+0.82.2)0.45=0.84.
So, with Gamma about 2.2, the Gamma mechanism not only prevents overlighting and dims the highlights when specularity is added to regular diffuse. It also approximates the industry standard screening method very well, and should be considered the way forward to combine any components in the render result. Whether they are diffuse and specular, diffuse and reflection, reflection and refraction, you name it. So they all have to respond to the Gamma mechanism to enable that. With exceptions for Bump / Displacement, which simulate or realize an alteration of the object geometry and do not “add light” or “subtract shadow” to the resulting render in any way. And with exceptions for the ‘blenders’ (Edge_Blend, Fresnel, Transparency, …) which also should avoid the Gamma mechanism as much as possible.
Next >
 Various causes can cloak my atmospherics:
 or
or 

 Intermediate
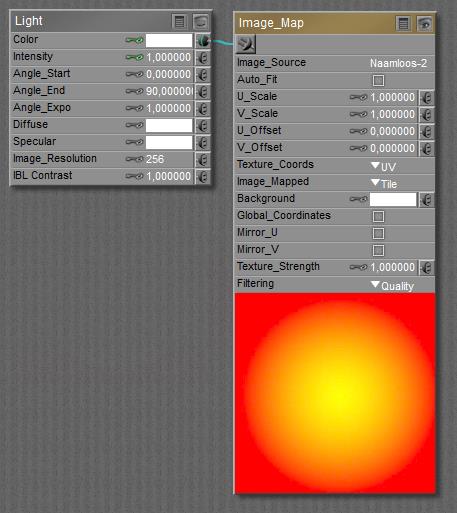 makes
makes 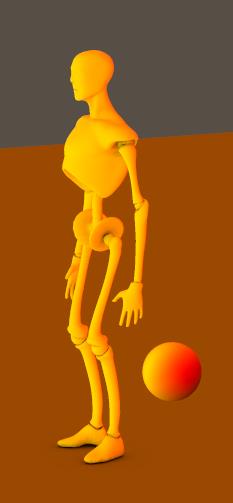
 The ball next to Andy uses the
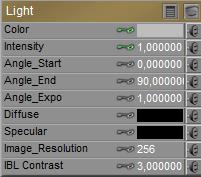
 When I open the properties of a Light in Material Room, I see