Do I need corrections?
Exposure and Gamma Correction, as well as any other correction, can be applied in post using Photoshop or GIMP or alike. You render, export the result and apply the adjustments to your liking. Applying Exposure or Gamma Correction within the Poser, Vue or other 3D application itself is different however, since you render, apply the adjustment and then export after that.
The difference is that the applications internally work in high resolution mode (HDRI, 16 or even 32 bits per color) while most exported results like JPG, PNG etc. use low (8 bits per color) resolution. Therefore, the correction is applied to the high resolution internal result – when the details are still there – instead of to the low resolution – when the details might have gone already, and have nothing left to correct.
So, next to make the image look good, there is a technical reason for applying the corrections within Poser or Vue: saving the details, especially in the dark areas of the image. And then, in post, you can take the corrections out again as the first step, process as if no corrections were applied at all but still with all details available. For this purpose, Gamma Correction is just more powerful then Exposure, and other corrections are just not available within the 3D program. Even Gamma Correction is not always available, like in Poser. Then Exposure Correction is your only option.
Why not?
The argument above also yields a reason NOT to do all this, or even to do the inverse: when saving the details in the darks, you will lose the details in the brights. This is relevant in images with massive cloud nuances in the sky, like in Vue. With respect to that, it has to be considered that our eyes are far more sensitive to details in the dark than to details in the brights. So lack of bright details is less relevant in our appreciation of the image than the presence of dark details.
This of course has a simple evolutionary background: all we can eat, or all which can eat us, was hidden in the woods and in the shades while far less opportunities and threats came from the sky. It’s ancient history especially since we all put a small light in our fridge J to avoid getting our food from the dark places, but it still plays important roles in our abilities to see and to appreciate details in our images. Details in the dark are preferred over details in the bright.
In Photoshop
Whatever your decisions are, it’s good to understand how to perform the corrections in post anyway.
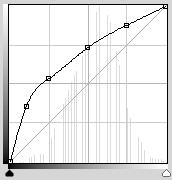
For applying a Gamma=2,2 correction in Photoshop, just perform a Curve adjustment passing through
- (0,0)
- (10%, 35%) = (26,90)
- (25%, 53%) = (63,136)
- (50%,73%) = (127,187)
- (75%, 88%) = (191,224) and
- (100%,100%) = (255,255).
As you can see there is a major effect in the dark areas (left, increased brightness in the first 25%) which is compensated by a reduced contrast (about linear but less slope) in the remaining 75%.
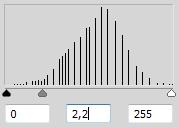
Or you perform a Levels adjustment, and move the middle sliderpointer (to the left) till the midvalue reads 2,20. Or just set the value. This is less accurate, it compares to a curve with only the 50% point set. As a result, it corrects only half as much in the dark areas. Or: it seems more an Exposure Correction to me.
Engineering stuff
For those people who like the juicy details, let’s look at some very dark (and so: very low) brightness levels.
| Brightness (*) | RGB 16bit | RGB 8bit | Gamma Corr | RGB 8bit |
| 0,00% | 0,0,0 | 0,0,0 | 0,00% | 0,0,0 |
| 0,22% | 256,0,0 | 1,0,0 | 6,37% | 28,0,0 |
| 0,32% | 256,256,0 | 1,1,0 | 7,54% | 23,23,0 |
| 0,39% | 256,256,256 | 1,1,1 | 8,24% | 21,21,21 |
| 0,45% | 512,0,0 | 2,0,0 | 8,79% | 39,0,0 |
| (*) there are a lot of definitions for Brightness, based on human eye response, camera / film response, monitor behavior, paint / ink behavior, optical science, fast-to-calculate algorithms etc. In this article I use: B = square root ( (R2 + G2 + B2)/3 ) | ||||
Next to 0% brightness, the 0,22% is the lowest level that can be produced in 8-bit per color RGB using RGB=1,0,0 (same for Green 0,1,0 or Blue 0,0,1), hence this pick.
Within Poser this brightness matches (256,0,0) in the internal 16-bit per color space. That gives plenty of nuances at a lower brightness level, but all those details disappear when this pixel is converted to 8-bit color and (1,0,0) becomes the only choice available.
Now, the pixel is Gamma Corrected first. This will shift its brightness from 0,22% to 6,37% so the export to 8-bit format will result in a pixel reading (28,0,0) which has a decent amount of lower brightness levels to represent the nuances. So, a 16-bit per color image with hundreds of brightness nuances between black and very dark either gets exported to an 8-bit image with only 2 brightness levels available (0 and 1), or – after internal Gamma Correction – to an 8-bit image with tens of nuances available. That’s a gain.
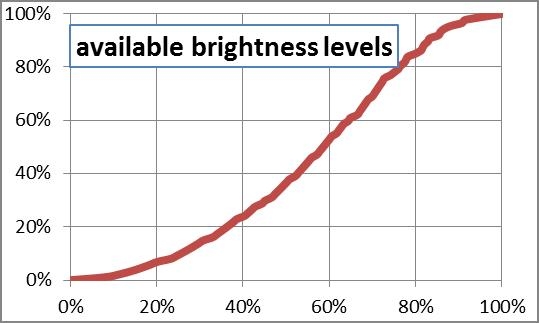
To show that this “quantization”, the effect of expressing color values in numbers only, especially harms the darks, I plotted the brightness itself against the percentage of brightness levels with a lower value:
- At 20% brightness only 6% of the available levels have a lower value, which means that especially the darks have a serious shortage in expressing details.
- At 80% brightness, about 85%% of the available levels have a lower value, hence 15% has a higher value. So for expressing details in the upper 20% of the brights there are 2,5 times as much nuances available as for expressing details in the lower 20% of the darks.
- In the midtones, covering the60% range from 20% to 80% brightness, we’ve got 85% -/- 6% = about 80% of all brightness levels available for expressing nuances. Life isn’t fair.
This again demonstrates that details in the dark are somewhat of an issue in 8 bit per color imaging. One way out is going HDRI all the way. Another way out is applying in-program correction before export. In that case, when there is a choice, the method with the most attention to the darks is preferred. This method is Gamma Correction.
Does it work out?
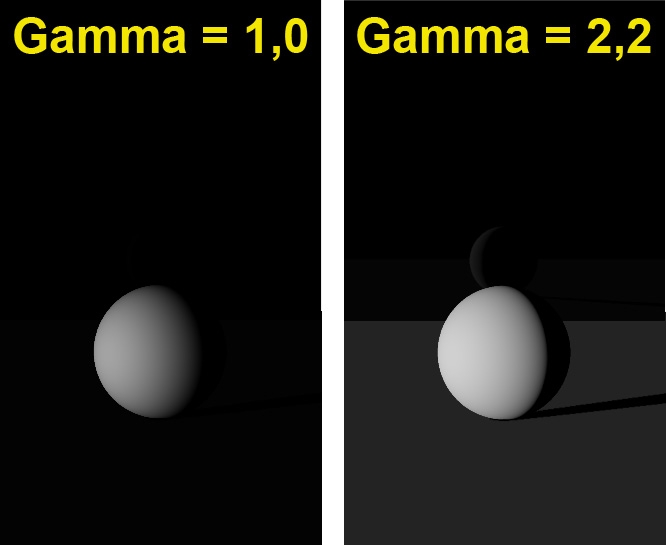
Watch this (scene concept by Bagginsbill):
This scene shows a white ball on a white floor, lit from aside. At the back there is a black plane, which has a 2% reflectivity (is: water). As a result, full 100% white will produce a 2% brightness on reflection but as the backside of the ball is reflected, the mirror image will be an exercise in dark tones.
Without gamma (left) not only the image appears rather dark, but there are no brightness values left for the reflection. The brightness measures will be physically correct aka linear, though. With gamma (right) the image reveals what our eyes would see under those conditions. Although the image is far from linear, having the details at hand will be a great help in further processing.
Pumping up the brightness in especially the very dark levels, right from the original 16 bit-per-color result, is what will save the details. This makes in-program postworking before export superior over postworking after export of the image. This is why we need gamma or exposure correction in-program, whether it results in something pleasing for the eye, or not. We can take care of the latter in Photoshop, but at least we’ve saved the details to do so.
Corrections reconsidered
In my attempt to get an image on my display that resembles the original object and its textures for the best, and to create a believable (photoreal) 3D Poser or Vue render from it, I have to consider various issues.
- Real lights have a volume, and produce light in a spatial distribution. 3D lights are like points and therefor produce harsh shadows. Some renderers can assign spatial light distribution to them, but Poser nor Vue can do so.
- Real light progresses through the atmosphere, though the air we breathe, which is filled with damp and dust. This makes the light scatter all around. Some renderers can handle this, but especially Poser only can approximate those effects by using IDL (Indirect Lighting). In this, objects start acting like a (reflecting) like source, so the effects of walls and ceilings and bright colored objects can be considered. When it comes to the softening of shadows, Poser renderers fall short. Vue does its job somewhat better.
- Real materials behavior is pretty complex. Specular and reflection are different faces of the same coin, diffusion and refraction meet in translucency and transparency, reflection and refraction are closely related phenomena and so on. But in the Poser and Vue materials those aspects are dealt with separately, while something relevant as surface smoothness is left out (at least as a direct controllable parameter).
- And so on
In other words, the renderer is far from perfect, at the gain of speed and reasonable resource requirements. Exposure as well as Gamma Correction, softening the highlights, reducing overlight situations, and (for Gamma: especially) softening the shadows do help us to get a more realistic result.


