Vue Gamma Correction reconsidered
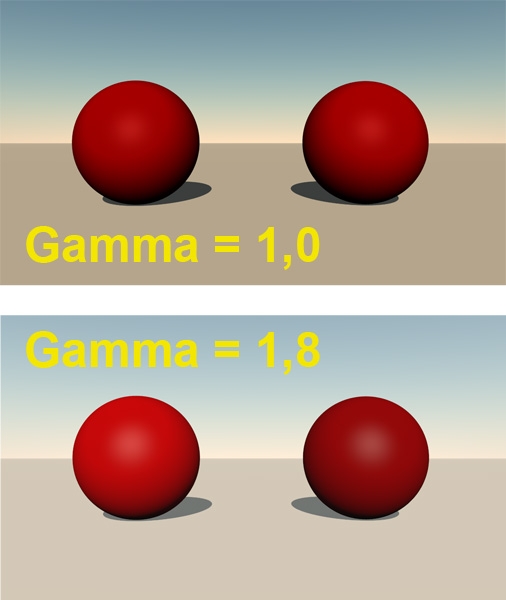
The result of Gamma Correction in Vue is interesting: The ball on the left is painted medium red (RGB=127/0/0) with a Vue internal color swatch. The ball on the right is painted medium red also, but by a texture. You can see that both respond different to the gamma settings. When Gamma Correction is switched on (I’m running Vue Complete so I don’t have the advanced control offered in the Pro software), the sky, the ground and the left ball go brighter. They all are driven by internal color swatches. Shadows and highlights brighten up as well. The ball on the right however hardly changes color. It might look as if it darkens since everything else brightens up, but Photoshop measurements reveal that a spot in the middle, somewhat away from the (brightened) highlight, remains as 50% brightness in both images. It also reveals a small drop in saturation which might be due to gamma correction applied to the atmospherics as well.
From this we can conclude that Vue – like Poser Pro – applies Gamma Correction like a sandwich. You’ll get the full brightening from Gamma Correction but you’ll get the Anti Gamma Correction for textures only. Textures and color swatches are not considered equal, the (anti) gamma correction brings external and internal (procedural) textures out of sync.
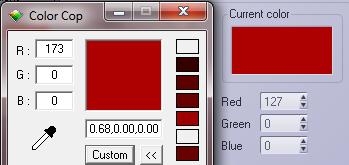
See Color Cop measuring the display while Vue sets the color: To bring those back in sync, all color swatches have to be adjusted manually. When Gamma Correction is switched on, an internal 50% red (127/0/0) translates to 173/0/0 on screen (and in the rendered result). The other way around, an internal 73/0/0 translates to 127/0/0 on screen, and in the render, and in sync with a 50% red texture map.
But you can save yourself the math and trouble. When the Gamma option is switched on, any texture well be darkened by the Input gamma but you won’t see that because the display of it will get brightened by the Display gamma with the same value. Any color swatch however will get brightened only as the Input gamma (the Anti Gamma Correction) is not working on it. By choosing a color with matches the texture you’re essentially darkening, and gamma applying, the color swatch manually. The Display gamma is doing to the preview what the Output gamma will do to the rendered image.
Note: when in Vue xStream / Infinite the option Affect Color Editors is unchecked, you only will not see the brightened color in the swatch. But you still will have it in your render.
When switching and altering gamma values becomes an issue by itself, it might be a way out to create color functions which include a gamma correction node. The color swatches in the atmospherics editor however are not function driven, these are just simple colors to be set or picked.
On the other hand, when gamma brightens the shadows and highlights, it might be reasonable that it brightens the sky as well. So not altering the swatches makes some sense. Your image, your call.

