Exposure correction
Imagine, you take a picture of something and the “film” (an electronic one in the backplane of your camera nowadays) gets exposed for 1/100 of a second. Some parts of the film remain dark, others become bright already.
Now, let’s double the exposure time to 2/100.
During the first 1/100, in a very dark spot, the film was exposed for say 5%, and was still unexposed for the remaining 95%. That remaining 95% will again be exposed for another 5% in the second 1/100 and it’s quite safe to say that this will result in a 5% existing + 5% added = 10% exposed spot in the film. Hence, in the very dark areas the brightness of the image will be proportional to the exposure.
For a – say 90% exposed – bright spot after the first 1/100, things are different. In the second 1/100 only the remaining 10% will be exposed 90% again, but that will add only 10% x 90% = 9% to the already present 90%, to make 99% after doubling the exposure time.
So by increasing the exposure, the darks are – relatively – far more affected than the brights.
In Poser and Vue
Both programs have the ability to apply Exposure Correction in post. This is to be preferred over a similar action in Photoshop, because in the programs themselves the correction is applied against the internally stored 48-bit (16 red, 16 green, 16 blue) render result, when all details all still available, before exporting it. Especially exporting to a regular 8-bit color image format will lose detail in either the darks (shadows) or the brights (clouds). Exporting to HDR, EXR of 16-bit TIF might save the day. Note that Photoshop opens the Poser EXR images as 32-bit per color files.
In Poser, there is no alternative (except from buying Poser Pro). Check the Render Settings:
My advice is to take a medium value between 2 and 3, because
- A value over 2 brings up enough details in the darks
- A value below 3 prevents losing all details in the brights
Then, after export – in post, you can adjust the difference between your export and the final gamma/exposure correction.
In Vue, you can adjust the Advanced Camera Settings (double-click the camera object). Vue offers Gamma Correction as an alternative.
Exposure value
There are different ways to express Exposure, which leads to different interpretations of values like 2, 4, 0.5, -3 and so on.
One way expresses Exposure as the lengthening (or shortening) of exposure time. The value 2 means: twice as long, two times as much light into the camera. The opposite of 2 is: one half (0.5). The neutral – do-nothing – value is: 1. This is the way exposure is used in Poser.
Another way to express Exposure is in extra diaphragm stops. One extra stop (value: 1) doubles the lens opening, and so the light into the camera. The opposite is: one stop back (or value: -1). The neutral value is: 0, no extra stops. This is the way exposure is used in Vue.
Hence:
| Poser: | 1/16 | 1/8 | 1/4 | 1/2 | 1 | 2 | 4 | 8 | 16 |
| Vue: | -4 | -3 | -2 | -1 | 0 | 1 | 2 | 3 | 4 |
Engineering stuff
Some people like the unambiguity of formulas and graphs over texts and words. So:
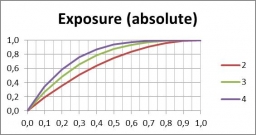
After correction = 1 – (1- Before) Exposure
in which the Poser (exposure time) use of Exposure is used, as I will do in this entire article.
Having exposure A followed by exposure B:
After correction = 1 – (1- Before) A*B
which says that exposing something twice as long, followed by exposing three times as long gives the effect of exposing six times as long. No real magic here.
And since exposure = 1 yields the neutral, do-nothing effect,
After correction = 1 – (1- Before) 1/Exposure
is the inverse. It says that exposing something twice as long is the opposite of exposing half as long.
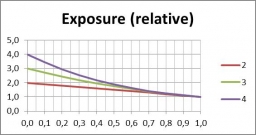
| Plotting the exposure curve as such: | But when plotting the ratio of after/before: |
In which we see that tripling (green line) the exposure time will brighten up the dark areas threefold (0.1 => 0.3 in the left graph) while having hardly any effect on the already bright spots in the image.


