Poser nodes / settings and versions

This article presents lists the Material Room nodes as well as various Render Settings, and their availability in recent Poser versions.

Nodes

Group Node In P7 In P8/Pro2010 In P9/Pro2012 In P10/Pro2014
Math Blender Yes Yes Yes Yes
Edge_Blend Yes Yes Yes Yes
Fresnel_Blend No No Yes Yes
Component Yes Yes Yes Yes
Math_Functions Yes Yes Yes Yes
Color_Math Yes Yes Yes Yes
User_Defined Yes Yes Yes Yes
Simple_Color Yes Yes Yes Yes
Colorramp Yes Yes Yes Yes
HSV Yes Yes Yes Yes
Gamma No Yes Yes Yes
Lighting \Specular Anisotropic Yes Yes Yes Yes
Phong Yes Yes Yes Yes
Glossy Yes Yes Yes Yes
Blinn Yes Yes Yes Yes
Specular Yes Yes Yes Yes
Ks_Microfacet No No Yes Yes
Lighting \ Diffuse Clay Yes Yes Yes Yes
Diffuse Yes Yes Yes Yes
ProbeLight Yes Yes Yes Yes
Toon Yes Yes Yes Yes
Lighting \ Special Skin Yes Yes Yes Yes
Subsurface Skin No No Yes Yes
Velvet Yes Yes Yes Yes
Hair Yes Yes Yes Yes
Scatter No No Yes Yes
Custom Scatter No No Yes Yes
Fastscatter Yes Yes Yes Yes
Lighting \ Raytrace Reflect Yes Yes Yes Yes
Refract Yes Yes Yes Yes
Ambient Occlusion Yes Yes Yes Yes
Gather Yes Yes Yes Yes
Fresnel Yes Yes Yes Yes
Lighting \ Env Map Sphere Map Yes Yes Yes Yes
Variables N, P Yes Yes Yes Yes
Framenumber Yes Yes Yes Yes
U,V Yes Yes Yes Yes
Du, Dv Yes Yes Yes Yes
dPdu, dPdv Yes Yes Yes Yes
dNdu, dNdv Yes Yes Yes Yes
3D textures Fractal Sum Yes Yes Yes Yes
fBm Yes Yes Yes Yes
Turbulence Yes Yes Yes Yes
Noise Yes Yes Yes Yes
Cellular Yes Yes Yes Yes
Clouds Yes Yes Yes Yes
Spots Yes Yes Yes Yes
Marble Yes Yes Yes Yes
Granite Yes Yes Yes Yes
Wood Yes Yes Yes Yes
Wave3D Yes Yes Yes Yes
2D textures Wave 2D Yes Yes Yes Yes
Image Map Yes Yes Yes Yes
Brick Yes Yes Yes Yes
Tile Yes Yes Yes Yes
Weave Yes Yes Yes Yes
Movie Yes Yes Yes Yes
Compound Compound No No No Yes

Render Settings

  In P7 In P8/Pro2010 In P9/Pro2012 In P10/Pro2014
Subsurface Scattering No No Yes Yes
Raytracing Yes Yes Yes Yes
Irradiance Caching Yes Yes Yes Yes
Indirect Light No Yes Yes Yes
Post filter Yes Yes Yes Yes
Tone Mapping No Yes Yes Yes
HDRI opt output No Pro only Pro only Pro only
Gamma Correction No Pro only Pro only Yes
Aux render data No Pro only Pro only Pro only


Gamma, Transparency and Blends

In the previous article it’s discussed how the Poser Gamma mechanism not only brightens up shadows and shades to compensate for the lack of radiosity and atmospheric scattering as can be found in real-life scenes, but also helps to add up lighting components like diffuse, specular, reflection and the like, especially when such components can be considered rather independent.

In some cases however, such components come to us in a ‘’ blend’, that is: more of one implies less of the other, which makes them far from independent. For example:

  • I use a blending node which, from a value or image brightness, blends x% of one input with (as a consequence)  1-x% of the other input.
  • I apply Transparency, which blends reflections and diffuse from the front of the object with the scene behind the object shining through. The more of the first, the less of the latter.
  • By manual action: I take some red out of Diffuse and put that amount of red back in via Ambient.

In those cases, the Gamma mechanism turns into a burden, instead of a benefit, when it includes the blending itself. I went through all the math (see last part of this chapter), and through a load of test renders, and my findings are:

  • If possible, the best solution is to revert the Gamma mechanism for the blend. That is: get the Gamma out of all inputs including the blending, apply the blend, and put the Gamma back into the result. This will apply the proper blending to the proper colors, so to say. This works for nodes.
  • Else, accept the Gamma mechanism for the inputs but avoid any Gamma effects on the blending itself. This will distort the proportions that the inputs contribute to the result, and always brightens up the object somewhat compared to the previous way of work. It applies the proper blending to the adjusted colors. This works for Transparency.
  • Else, accept the Gamma mechanism but compensate for it where possible. This can be tedious but might solve the remaining cases, like the blending invoked manually.
  • As said, having Gamma to affect the blending itself is to be avoided, as it applies an adjusted blending to adjusted colors. The results will be off again, but far more (as least twice as much) as in the method mentioned above, and in either direction: too dark or too bright, depending on the lighting balances in the scene itself.

Reverting the Gamma Sandwich

Just like this:

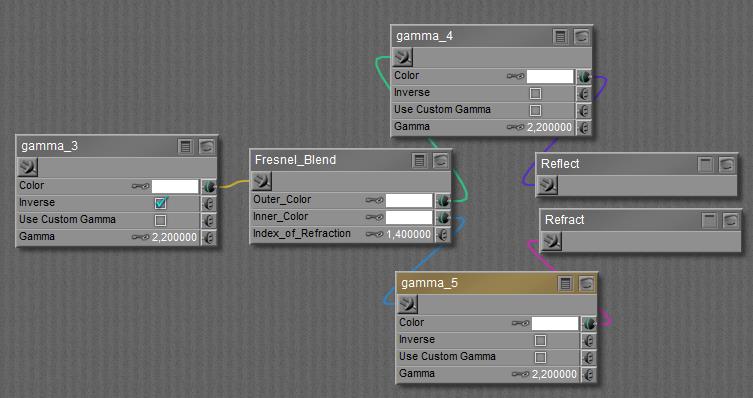
The Fresnel_Blend is packed between two Gamma’s at the input side to take the effect out of the Reflect and Refract, and an inverse Gamma at the output side to put the effect back in again. Note that the Gamma node is not applying Gamma (darkening), but its inverse: Gamma Correction (brightening). This can be applied to all kinds of blending nodes: Fresnel_Blend, Edge_Blend, Color_Math (Blend), ColorRamp, you name it. It cannot be applied to the Fresnel node itself, as one cannot take the Gamma out of the reflections / refractions before they get blended.

Just leave Gamma out

The second best option, it distorts but not that much. Just apply the mentioned nodes as they come, apply transparency as it comes, it feels like “doing nothing”. But it also means: use Values for blending amounts and transparency, avoid using Color-swatches at any cost, and when using image-maps do set their Gamma values to 1.0 to bypass the mechanism.

This is the method followed automatically when the Fresnel node is used.

The use of Gamma = 1.0 for Transparency in all PoserSurface definitions in the scene can be enforced with the changeGamma scripts.

Manual adjustment

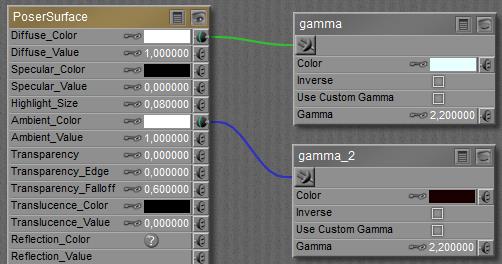
Older textures for characters offered a way to mimic advanced skin effects, like translucency and scattering. A small portion of red was removed from Diffuse (turning white into (245,255,255) a very mild cyan) and put back in again in the Ambient slot (turning black into (10,0,0) a very deep red). When rendering without Gamma, as was common in those days (Poser before version 10) this resulted in white (multiplied by any image map) plus a mild reddish glow.

However, when Gamma is turned on, the ratio gets distorted, the brightest component – the cyan in here – gets the upper hand, and all characters got the “smoking zombie look”.

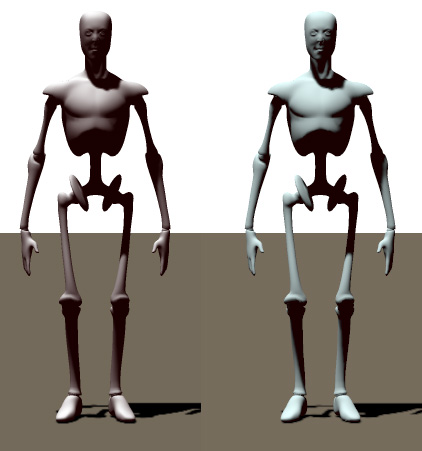
Like this, left Andy without Gamma, right Andy with Gamma, same material and lighting:

Solutions:

  • Rebuild the material completely and switch to modern alternatives applying scattering and the like. Set the Diffuse slot to white and remove all Ambient from the PoserSurface definition. This however will not work for early Poser versions not supporting those modern features.
  • Set the color swatches apart, and get the Gamma out:

    It will, by the way, increase the reddish glow so some additional adjustment might be required. This is the most flexible solution, leaving all other settings intact, and works in all Poser versions for all Gamma settings, including none at all.
  • Correct the swatches in PoserSurface manually. Instead of taking out 5% red, take out just 1%, and instead of adding 5% Ambient, add 10%. These adjustments however will vary with different settings for the Render Gamma. It leaves the structure of all PoserSurface definitions intact, but it’s the least flexible and most tedious of all.

A closer look at Transparency

Consider an object, having a (surface) transparency of T=90%. When a direct (say 100%, white, point) light is illuminating the scene, this object will show the following behavior:

  • The light is passing through a surface twice, object-front and back, and so it produces a shadow of intensity T2 (90%x90%=81%) assuming Gamma is not applied to the transparency itself. Then this shadow is brightened up in the post-render pass, to T2/g (=0.810.45 = 91%) like all other shadows in the scene. When Gamma is applied to transparency too, it gets reduced to Tg ( 0.92.2= 79% ) in the pre-render pass, then it casts shadows T2g, and then these get brightened to T2g/g=T2=81%. In other words: when I include transparency into the Gamma mechanism, the shadows from the object will be darker related to other shadows in the scene, as if the Gamma mechanism was not applied but to those shadows specifically.
  • However, the scene behind the object shining through will follow the same logic. When no Gamma is applied to transparency, that scene will get dimmed to 81% and brightened up in the post-render pass to 91%, while applying Gamma to transparency will produce a neat 81% result.

So at first sight I’ve got a choice: either the object is too bright and the shadows are right (no Gamma to transparency), or the object is fine and the shadows are too dark (Gamma on transparency too). At second sight, more effects have to be considered:

  • Since the object is only partially transparent, a portion of the (light of the) scene in front of the object will bounce as well, as diffuse or reflection. At a surface transparency of 90%, this will put 10% into the mix. When Gamma is allowed to reduce the transparency (from 90% to 79% as calculated above) this frontal portion will increase to 100-79=21%.
  • When the surface transparency is 90%, then that amount of light will pass the frontal surface (10% bounces as discussed above), and at the backend surface again 90% of that will pass, and 10% will bounce. The latter implies that 10% of 90% = 9% starts to participate in an internal bouncing around, and each time a surface is hit some light passes through and some bounces again. When Gamma is allowed to reduce the transparency, more bouncing will occur and actually the 9% mentioned will rise to 17%.
  • That light bouncing around will not only leave the object at the front, a part of it leaves the object at the back instead. But… from the light from the scene behind the object, some portion bounces around internally as well, leaving the object at the front, and to some extent at the back instead.

Actually, all the four elements mentioned above (all except the shadow mentioned first) add up to make one result. So how can be predict what happens when a gamma sandwich is applied to all that? We can be sure something gets distorted, as it would be a miracle when all things turned out equal. I do need math, figures and a lot of tests to get it sorted.

That’s for the next part of this chapter. For short: the Gamma mechanism, even when not applied to transparency itself, will produce a somewhat distorted result as it alters the balance between the ‘front’ and ‘behind’ scenes in the result. But when transparency itself is excluded from Gamma, then 1) I’ll get the best shadows which behave in sync with the other shadows in the scene and 2) I’ll get the least (and eventually most manageable) distortion, compared to when Gamma is included into the transparency.

So, I consider it best to treat Transparency as a value ‘thing’, I’ll avoid using color swatches to determine it, any image map involved will get Gamma=1.0, and I’ll use the various scripts to enforce that all over my scene materials.

The math and the figures

For those who want to check out on my findings themselves.

Plain Blending

Consider two inputs, A and B, blended together in an x-to-(1-x) ratio. More of A implies less of B and vice versa. For instance, reflection blended with diffuse (a shiny surface), of with refraction (Fresnel).

  • I   without gamma: A*x + B*(1-x)
  • II  with Gamma on A and B only: { Ag*x + Bg*(1-x) } 1/g
  • III with Gamma on all: { Ag*xg + Bg*(1-xg) } 1/g

Some results, for Gamma 2.2 and blend ratio x set to 70%:

A B   I II III
80% 80% 80% 80% 80%
80% 60% 74% 75% 70%
80% 40% 68% 71% 62%
80% 20% 62% 69% 57%
60% 80% 66% 67% 72%
60% 60% 60% 60% 60%
60% 40% 54% 55% 50%
60% 20% 48% 52% 44%
40% 80% 52% 56% 65%
40% 60% 46% 47% 52%
40% 40% 40% 40% 40%
40% 20% 34% 35% 31%
20% 80% 38% 49% 62%
20% 60% 32% 38% 47%
20% 40% 26% 28% 33%
20% 20% 20% 20% 20%


Transparency

Consider A the lighting level in front of the transparent object, B behind it, for transparency T. More transparency means more of B (transmission/refraction), less transparency means more of A (diffuse/reflection). Transparency induces internal reflection/diffusion within the object. For a simple illustration: at transparency 90%, 10% with be reflected/diffused from the front while 90%x90%=81% shines through, passing front and back surfaces. The remaining 100-10-81=9% results from internal reflection / diffusion, leaving the object while bouncing around.

  • I   without Gamma: A*(1-T)*(1+T/(2-T)) + B*T*(T+(1-T)^2/(2-T))
  • II  with G on A and B only: { Ag*(1-T)*(1+T/(2-T)) + Bg*T*(T+(1-T) 2/(2-T)) } 1/g
  • III with G on all: { Ag*(1-Tg)*(1+Tg/(2-Tg)) + Bg*Tg*(Tg+(1-Tg) 2/(2-Tg)) } 1/g

Some results, for Gamma 2.2 and Transparency set to 70%:

A B   I II III
80% 80% 80% 80% 80%
60% 80% 71% 72% 67%
40% 80% 62% 65% 56%
20% 80% 52% 61% 48%
80% 60% 69% 70% 75%
60% 60% 60% 60% 60%
40% 60% 51% 52% 47%
20% 60% 42% 47% 38%
80% 40% 58% 62% 71%
60% 40% 49% 50% 55%
40% 40% 40% 40% 40%
20% 40% 31% 33% 28%
80% 20% 48% 58% 69%
60% 20% 38% 44% 52%
40% 20% 29% 31% 35%
20% 20% 20% 20% 20%


Conclusions:

  • When A and B are about equivalent, the method does not really matter, and distortions from Gamma Correction are minimum in any way. This situation occurs for instance when a semi-transparent object resides in a quite homogeneously (say IDL) lit environment.
  • In all cases, the difference between method III (all gamma) and method I (no gamma) is at least at large, and in varying directions, compared to the difference between method II (no gamma on blending /transparency) and method I. Therefore, I prefer method II over method III as presenting the least distortions, when method I is not available.

So in case of blending / transparency, I prefer values, I avoid color swatches, and when applying images I set their Gamma to 1.0.

Next >

What’s the fuzz about Gamma Correction?

Although various configurations can be setup via Render Settings (Poser 10, Pro 2010 and up), this topic is considered Intermediate – and sometimes Advanced – level.

Intermediate

When it comes down to Gamma Correction, there are a lot of stories. About gamma, images and devices, and on the application of the gamma function in Poser rendering. Some of those are close connected, other stories are hardly related. Unfortunately, all stories tend to get mixed up in forum threads, manuals and alike. Let’s tell them all, in a sort of organized way.

Gamma and Devices

Output devices (at the end of any workflow, step A in the scheme above), like TV sets, PC monitors as well as newspaper pages all have in common that when they display an image, the midtones are darkened, the shadows lose detail while the brights gain some. From electronics, and from image handling as well, this loss of brightness is known as “gamma distortion” of “gamma effect”. Lots of people find this reduction of image brightness rather unpleasant for various reasons, some of which even go back to our natural roots having hunters and prey hidden in the darks.

A way to overcome this is to adjust the image before it gets displayed, by an “inverse gamma” or “gamma correction” effect (start of the workflow, step B in the scheme above). This brightens the midtones, and enhances the details in the darks at the cost of losing some in the brights. When such a corrected image is displayed, the “gamma inversion” embedded into the image and the “gamma distortion” of the device cancel each other out, and the image is displayed as it was intended, and as we are pleased to see it. This is how JPG (for pictures) and MPG (for movie footage) came to life: these formats have the gamma correction embedded as prescribed by their format standard; such in contrast to BMP, and raw image data. And so, this way of work proves fine for newspaper and magazine printers as well as TV sets and movie projectors which don’t have the processing power (‘intelligence’) on board to adjust images or movie frames on the fly.

TV sets etc. have to work with images and frames that have a standardized correction embedded into them. But they only approach that standardized gamma effect themselves. So they only can display the images as being “not too far off”. PC’s and the like have an advantage. They can open the image and correct for the standardized correction before (or when) sending the image data to any user application. This is step D in the scheme, called linearization.

And then the application can send its results to the video driver / video card which then communicate with the monitor. This offers the opportunity to establish correction curves for a specific monitor. Either by loading a brand and type specific profile from the manufacturer or even by measuring the monitors input/output response periodically, to compensate for aging as well. On a multi-monitor system, each one even can have its own profile, so an image keeps its exact appearance when dragged from one device to another. This is step C in the scheme, usually referred to as Color Management.

Summarizing: given the behavior of my monitor (A), image formats (B) are made up to compensate and with a dumb device in the middle, both cancel out to give me the proper image in result. With an intelligent device in the middle, both actions can be compensated for (monitor A by driver C, image format B by image handler D) so also the application in the middle can make proper results based on proper (‘linear’) inputs, and without having to worry about image formats and device characteristics.

So, in my PC, if the operating system / application deals with image formats and if the driver/card deals with monitor profiles, every type of image will behave ‘pure’ from an application input/output point of view. Great! Unfortunately, there are two ifs in this.

On the output side, PC video driver/cards have the profile handling capacity for say 10 years now (from 2005 on), but native (motherboard) video and laptops can only do so for say 5 years (2010 and on), while smartphones and tablets hardly do, and whether my laptop is feeding gamma-corrected streams to my TV-set is quite questionable. So images might look different from my PC monitor.

In cases the output handling abilities fall short, some applications offer the adjustment themselves, while others don’t. Some applications put in some adjustment anyway. In either case, a single image is shown in different ways by different applications onto the same screen. Unfortunately, there is no way to tell which one is right, although Photoshop can come close once I master its Color Management settings. And there are not that many ways for user-adjustment. Poser creates render results in 16-bit per color EXR format, and does quite a nice job in showing it on screen. Anyway, there are no settings or dials to affect that.

On the input side, some versions of operating systems do offer routines for proper image handling, some don’t. Even if they do, it’s up to the application to call for them instead of reading out the image data itself. I don’t have to figure out the details of this, it’s easy to test: make an image, save it in bmp as well as jpg format, and open both in my application at hand (with the same settings etc.). Do both show the same result? Then all is fine. If not, the jpg needs its embedded gamma-correction taken out, or has so but not to the right amount yet. Sometimes I can correct for that, either by opening it with adjusted settings, or by correcting for it in pre-production, with my image editor. This is called: linearizing the workflow. Poser (7 and up) users can rest assured: an image will show the same way whatever format is used.

Some test results, with a BMP and a JPG with an embedded profile:

  • In Poser (Pro 2014 SR3.1), Photoshop (CC 14.1), Internet Explorer (11.0) and Windows (7) Photo Viewer both BMP and JPG are the same.
  • In Chrome (33.0) and FireFox (27.0), the JPG is slightly darker than the BMP. So these applications seem to take out the gamma correction as well, but take more out than the profile put in in the first place.

Gamma and Poser

Overview

All in all, Poser works fine with all image formats and all output devices. I do not need any adjustments for that, Poser offers a “linear workflow”, especially in the design stage. But the great story is: Poser offers an optional non-linear rendering as well.

In that, it first darkens all images, footage and colors around (step E in the scheme), and then it renders (step R). This will create quite a dark render, including shading and shadows. And with dark highlights as well, with quite a reduced risk on overlighting. Then it un-darkens the render result, step F in the scheme. From that, I can export the image for any further handling as required.

This sandwiched rendering will make all surfaces reappear at about their original colors and brightnesses as steps E and F are intended to cancel out. But all darkening that occurred during the rendering itself, like the shading and shadowing, will be brightened up considerably as these receive the post-render treatment from step F only. Highlights will be brightened a bit as well, but not to an overlighting level. In short: this sandwich process of darkening first and un-darkening later will just soften the darks and highlights, contributing to a more pleasant and more realistically looking image.

So, how to do the (un)darkening? Poser offers the gamma function for this, and that was just an arbitrary choice. They could have used another function as well, like exposure, but they didn’t. That gamma function is driven by a single (“gamma”) parameter. Each value larger than 1 will soften shadows and highlights, but values over 4 will create very artificially looking results. Values around 2 do very well for photorealistic renders. Values smaller than 1 (and preferably larger than 0.25) will have the opposite effect, which might be desired in comic styles.

Note on the method:

This Gamma-sandwiching approach is one of the available strategies. It works about as required for shadows as well as for highlights, and it’s easy to implement as it just adds a pre-render and a post-render step but leaves the rendering itself as is. Other 3D software (like Vue) works likewise. Very recommended, and discussed in various articles on this site. Other ways are:

  • Tone mapping. Not available in Poser (yet) but available in external renderers like LuxRender. That way the internal High Definition (HDRI) render result is mapped to the most feasible visual range. It corrects for (too) low lighting levels too, but brighter lights will make darker shadows, so although this method has far less artefacts, shadows are not catered for. PoserPro users can do it manually, by exporting the HDRI result first. Poser (all versions) can adjust Exposure as well, as a substitute.
  • Screening. Available in Photoshop and alike, and considered the industry standard in combining the effects of multiple light sources (in post-production). Shadows stay as dark as they were, however, and need additional (manual) adjustment. PoserPro users can do it manually, by exporting the result as a layered PSD file. This is the recommended way of work when integration Poser renders into a larger, professional workflow. Gamma Correction (as well as Exposure correction) should be OFF then.

Note on the Gamma value:

The Gamma value applied in Poser is a trade-off. For scenes with mainly or only direct lighting, a value below but close to 2.0 will produce the best shadow softening but when IDL gets the upper hand, lower values (towards 1.0) will produce better results. This is because the Gamma Correction includes compensation for radiosity of ceilings, walls etc. and with IDL, the lighting itself is catering for that itself. On the other hand, adding up very dissimilar light sources / surface components works best with gamma values just below 2.0 while adding up quite similar lights or about equally bright components works best with values even over 3.0. But… there is only one gamma to serve all. As a result, the industry standard 2.2 for device handling is considered a reasonable trade-off for Poser as well, even though both are completely unrelated.

Gamma and Confusion

So there are two rather unrelated processes. One for putting images onto output devices and for taking their effects out to enable applications to serve normally (represented by steps A, B, C and D in the scheme). And one for softening shadows and highlights in Poser renders to establish a more (photo)realistic look and feel, represented by steps E and F in the scheme.

The first utilizes a “gamma function” with a parameter value around 2 as this represents most output devices quite reasonably. In formal image format standards the value 2.2 is prescribed. The second utilizes the same gamma function, and a parameter value around 2 happens to present a pleasant result, and supports photorealism quite well.

So both processes happen to have the same mathematical function and the same optimal input value for it, in common. That’s their only relationship. Hence, don’t bother about all gamma-fuzz in forums, google, Wikipedia and the like, and don’t bother about monitors, calibration, and other output devices. They address the steps A, B, C and D from the scheme quite well. But I can freely choose whether or not to use the Gamma process in my Poser rendering, and I can freely choose my gamma value with it, as steps E and F in the scheme are separate ones. However, for photoreal’ish results, using the Gamma process with the default 2.2 value is much recommended.

Poser Details

The overview above mentioned the benefits of using the Gamma Mechanism offered from Poser 10 and Poser Pro 2010 up. The mechanism however has some drawbacks as well:

  • Greyscale swatches and images which for bump/displacement should be excluded from the mechanism. For images, their gamma should be set to 1.0 explicitly in the Texture Manager. When this can’t be done for whatever reason the Gamma node can be used for additional adjustment.
  • The mechanism is applied to all images and color swatches, but not to numericals. So 50% white at 100% value, and 100% white at 50% value do refer to the same shade of grey but will end up differently in the render result when the Gamma Mechanism is applied. For that reason, the various Value slots in PoserSurface should either be 0 or 1, but any intermediate value should be addressed in the accompanying Color slot. At least when Gamma Correction is used for rendering, although it doesn’t harm to turn this into a generic way of work.
  • When using the HSV node, be aware that the image inputted into it will get Gamma corrected before the HSV adjustments are applied. You might have to adjust the Texture Manager settings for these.
  • Since values are not adjusted by the Gamma mechanism before rendering, the User_Defined node which produces a color on value inputs will not be affected. You might want to add the Gamma node itself for explicit adjustment.
  • Various (older) object textures offer a neat balance of color settings and adjustments, which work out nice when used in Poser 9 and earlier. But these produce awful results, when rendered in more recent Poser versions that have the Gamma mechanism enabled. All  color settings etc. are distorted, are any balance is completely gone. Those textures have to be re-evaluated (or the mechanism should be turned OFF for those renders). A well-known example is the “smoking zombie” look of the V4 character when rendered with Gamma Correction switched ON. See the next article for details.
  • The various blend-nodes, like Edge_Blend, Fresnel_Blend and the Fresnel node itself, but also the Blend option in Color_Math and the ColorRamp node as well present some deviations when rendering under Gamma. Like the previous point, not only brightnesses but also the resulting hues can be affected, reflection-to-refraction rations might get distorted, and the like. For short: they should participate I the Gamma mechanism as least as possible, and bypass it as much as possible. See the next article for details.
  • Poser Transparency acts as some kind of ‘super blender’, and may cause a blend of light bouncing from the front of the object (reflection, diffusion), light bouncing from the backside of the object (internal reflections), light from behind the object passing through , and in the meantime it’s casting shadows onto the scene behind the object too. Should transparency itself participate in the Gamma mechanism (like Diffuse etc.), or should it bypass it (like Bump/Displacement?). For short: it should participate as least as possible, and bypass as much as possible. See the next article for details.

For Poser 9 and earlier, the Gamma node is available as well. This is meant for those cases where Poser is not taking any embedded brightness corrections out of the image properly. The node cannot be used to build the Gamma Mechanism myself, as that is a sandwiching process of which the nodes can only affect the input-part. One can however do the output-part of it in post. It’s quite elaborate though, to add the gamma node for every image map and color swatch in all material definitions in the entire scene.

The math of Gamma

Okay, let’s go for it. This is the Advanced part.

Shadows

Say, an object in the scene has a color D. That is, I’m not interested in its hue, but the brightness is its Diffuse_Color or D between 0..100%. Let’s pick 70%.

With the Gamma mechanism enabled, the pre-render pass will turn that into Dg and for g>1, by default g=2.2, that will result in a darkening as for instance 0.72.2 = 0.46. When rendering, shading (like Lambert) darkens the sides of the object with respect to the lights, and any other object standing in the light casts shadows onto my object as well. This shading and shadowing actually multiplies areas of the object with S, between 0..100% also, say 20% at specific points. That turns the brightness of those spots to S*Dg or 0.2*0.46=0.092 in the example. The post-render pass then will turn the final result into (result)1/g which is a brightening, from the formula ( S*Dg )1/g = S1/g *D. The spots on the object without shading and shadow result in 0.460.45=0.70 while the spots with it result in 0.0920.45=0.34. Without the Gamma passes, the spots with shading would have resulted in 70%*20%=0.14 – a much darker result.

So from the formula and the example figures I learn that the object color will go untouched (70% remains 70%) while the shading and shadowing gets brightened (34% instead of 14% in the result, which is like multiplying with 0.485 (=0.200.45) instead of 0.20).

Colors, Images and Values

Now let’s look at the result of a diffuse component, with color D, an image map M attached to it adjusted with “render gamma”, and with value d, having an image map m attached to it adjusted with a custom gamma value h (1 or anything else). Then the final result will be ( S* Dg * Mg * d * mh )1/g = S1/g * D * M * d1/g * mh/g as the shading and shadowing S will get brightened up as required, the value d went untouched by the pre-render pass and hence will appear brightened up in the result as well, and the image m is assigned its own adjustment. So the total effect is different from just having a brightened up shadow on an unaffected object. The color swatch D and its image map M went unharmed, the result for the other image map is my own choice, but the value part results in a brightening up as it was ignored in the pre-render pass. Hence, when rendering with Gamma ON, I’d better set all value parts in PoserSurface to either 0 or 1, or face an additional brightening. This also implies that when I do want a brightness reduction, I have to blend that into the color swatch. For instance, a metal reflects with an orange color RGB (100%, 50%, 0) and reflectivity 80%. Then I should not set the color to the Reflection_Color and the 80% to the Reflection_Value, but I should assign the overall RGB (80%, 40%, 0) to the color swatch instead and set the Value to 1.0. Otherwise, my reflections will be too bright when rendering with Gamma. And without Gamma, it doesn’t matter.

Most components of PoserSurface have a color swatch. Alternate_Diffuse and Alternate_Specular even don’t have a value slot. Bump and Displacement do have a Value only, but anything plugged in those should not have any Gamma mechanism assigned. Bump maps for instance should have their Gamma = 1.0 in Texture Manager.

The only components requiring explicit attention are the ‘blenders’, like Edge_blend, Fresnel, but Transparency too. These components blend colors, images, scene reflections and the like based on a value or image map. Should they participate in the Gamma mechanism (like Diffuse etc.), or should they bypass it (like Bump/Displacement?). For short: they should participate as least as possible, and bypass as much as possible. See the next article for details.

Combining Components

So far so good, for components considered separately, and for the effects on shading and shadows. But what happens when components are combined and added up? That’s like two projectors, each presenting its own image on the wall.

In nature, our eyes will adjust to the increased lighting levels. In image handling such a thing is not possible, and for ages programs like Photoshop blend layers using the Screening method, which mimics the behavior of photographic film or its modern electronic equivalents. Film behaves about as follows: when a ray hits the film, there is a possibility, a change p1, that the film responds to it, and so there is change 1-p1 that the film remains unlit. When a second ray, either from a later moment, or from another source, or from opening the diaphragm further, hits the same spot on the film, there again is a change p2 of lighting the film, provided that it was unlit before that. So the change that the spot on the film is still unlit after two rays is (1-p1)*(1-p2) and hence the formula for light addition is: 1-(1-p1)(1-p2).

This is the way Screening works on PSD image layers: the inverses of the layers are multiplied and inverted again. For instance: one layer represents 30% brightness and the other 80%, then it results in 1- (1-0.3)*(1-0.8)=86% brightness. So lighting levels will increase but will not exceed 100%. Screening is considered the (industrial standard) way of work for adding light to an existing image (as multiplication is considered the right way to apply shadows and the like).

In Poser, without the Gamma mechanism, components will just be added up. In the above case, 30%+80%=110% and overlighting artefacts will ruin the render result. With the Gamma mechanism however, it will brighten the addition of the darkened components, that is: (0.32.2+0.82.2)0.45=0.84.

So, with Gamma about 2.2, the Gamma mechanism not only prevents overlighting and dims the highlights when specularity is added to regular diffuse. It also approximates the industry standard screening method very well, and should be considered the way forward to combine any components in the render result.  Whether they are diffuse and specular, diffuse and reflection, reflection and refraction, you name it. So they all have to respond to the Gamma mechanism to enable that. With exceptions for Bump / Displacement, which simulate or realize an alteration of the object geometry and do not “add light” or “subtract shadow” to the resulting render in any way. And with exceptions for the ‘blenders’ (Edge_Blend, Fresnel, Transparency, …) which also should avoid the Gamma mechanism as much as possible.

Next >
How are Image Based Lighting, probeLight objects and IDL Sky Domes related?

Although various configurations can be setup via Material Room menus, and can be managed through the Simple interface, this topic is considered Intermediate level.

Intermediate

Most scenes require some kind of environmental lighting, and Poser offers various ways to establish that.

One (recent) way is to enable InDirect Lighting (IDL) and to encapsulate the entire scene by a huge Sky Dome object, with an image mapped onto it, and having its surface normal pointing inward. This method uses extensive raytracing, and is resource intensive (memory, CPU power, render time, user patience). The dome sends its light rays inward into the scene, and from there the light gets bounced all around.

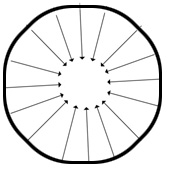
Another way is to put an Image Based Light (IBL) in the scene. An IBL is a kind of point light, with an image (frontally) mapped onto it, but with its light rays traveling inward towards the lamp position. What does that mean? Well,

makes

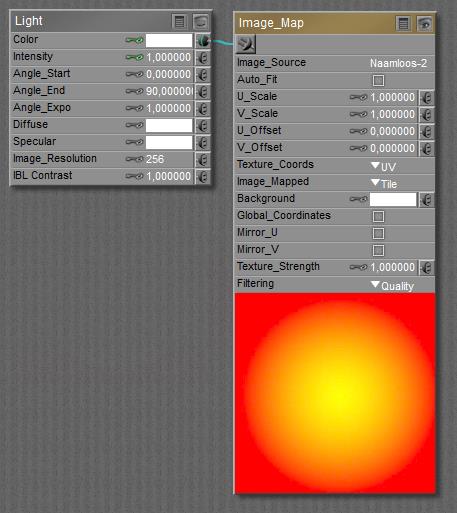
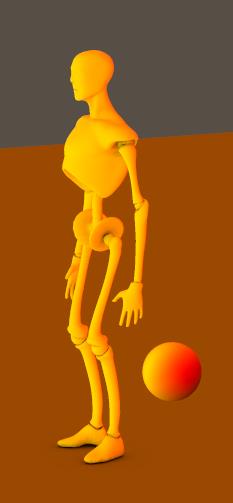
So the image is wrapped around the point light, and the bright yellow midsection is related to the mid-frontal part of the light. The red edges of the image all fold onto the mid-back side of the light, and all areas top side and bottom get the orange taint. That’s: frontally mapped.

See http://www.book.artbeeweb.nl/?p=3090 for details on translating the environment to IBL images.

In the image above, the IBL light resides at 0,0,0 between Andy’s feet. And the light rays are coming in, so Andy is colored yellow at its front, red at its back and orange at his top, sides and bottom.

Tip: for IBL lights, shadows should be OFF. As those lights cannot be placed but can be rotated (directed) only, and because light rays are considered coming in towards that point of interest, shadows from IBL lights tend to get somewhat unnatural, to say the least.

The ball next to Andy uses the probeLight image mapping which offers the same mapping and image as used for the IBL, so the IBL effect is exaggerated in this scene, to illustrate the effects of mapping and of the lighting direction. As far as mapping is concerned, probeLight works well on a basic Poser Ball, and just offers some extras for tuning image appearance and some squeezing and stretching compared to just plugging in the image_map itself. The Hires ball however turns out quite hard to orient properly which becomes apparent when an image is applied to it.

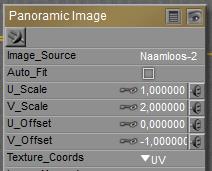
As IBL serves either as an extra or as a replacement of an IDL sky dome, the remaining question is: can the IBL-image be mapped onto such a dome. Yes it can, and it works immediately on the geosphere and hemisphere from the regular Poser content, and on Bagginsbill’s EnvSphere and EnvHemisphere. Bagginsbill’s EnvDome offers a slight shift in mapping, which has to be compensated for. (V_Scale is doubled, and V_Offset is set to -1).

Next >


Can I use a light for a specific object only?

No, Poser does not support selective lighting.

Advanced

However, Poser does support rendering on a per-light basis (menu Scripts > RenderControl > RenderPasses)

and on a per-object basis. (menu Scripts > Partners > Dimension3D > Render Content)

This way one can obtain a lot of half-products (“render passes”) which in turn can be combined in post. Usually, stacking the images as layers in an image-handling program like Photoshop, with the layers set to Screen mode, is the way forward. A tutorial on Poser Render Passes can be found at http://www.book.artbeeweb.nl/?p=388 .

Next >

Can I use a light for preview only?

In various cases, it might become handy to have lights that shine in preview only and do not affect de render result. This can be done easily, but requires the use of the Advanced interface to the Material Room. The options required are not available through the Simple interface.

Intermediate

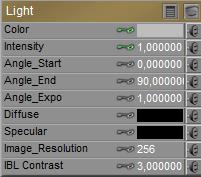
Open de Light features in Material Room, and black out the Diffuse and Specular entries.

Note: under IDL (InDirect Lighting) rendering conditions, all objects in the scene behave as a light, but diffuse only (no highlights). IDL lighting does not show in preview. But IBL (image based, direct) lights do show in preview, producing the appropriate local colors as well. So, in order to approximate IDL conditions – like a sky dome – in preview: add an IBL with the same dome image, and have its Diffuse channel blacked out (to have it switched OFF at render time).

Do pay attention to the appropriate orientation of the image, though!

Next >

Can I use a light for diffuse or specular lighting only?

In various cases, it might become handy to have lights that produce highlights only, or just no highlights at all. This can be done easily, but requires the use of the Advanced interface to the Material Room. The options described below are not available through the Simple interface.

Intermediate

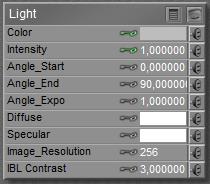
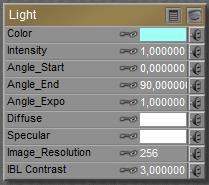
When I open the properties of a Light in Material Room, I see
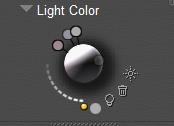
  • A generic Color and Intensity
  • A Diffuse (color swatch)
  • A Specular (color swatch)

The generic Color and Intensity are multiplied to one result as any regular Color/Value pair in the material definitions, and used in preview. The two latter ones are used in the Poser render only, multiplied by the generic Color and Intensity. So:

  • When I black out the Diffuse, I’ll have a Specular only light in my render.
  • When I black out the Specular, I’ll have a Diffuse light only in my render
  • When I black out both, I’ll have no light in my render, but still one in preview.

The first is a necessity in IBL or IDL lit scenes, as these do not produce any specularity themselves (but diffuse light only). Usually, I don’t need the extra diffuse part.

The latter is a handy tool in scenes with IDL lighting only. This lighting does not show in preview, so for building the scene I need some lights which won’t show at render time.

How the aspects work together:

when the Diffuse is 80% Green, Specular is 60% Blue, Color is 40% Grey and Intensity is 50% than

  • When rendering, the light produces a 50% (Intensity) x 40% (Grey) x 80% (=16%) Green diffuse light, plus a 50% (Intensity) x 40% (Grey) x 60% (=12%) Blue specular light
  • When previewing, the light produces a 50% (Intensity) x 40% (=20%, Grey) light

Notes:

  • IBL Lights are supposed to have an image map attached, and do NOT produce any specular lighting despite my settings. IBL lights do show in preview.
  • Under IDL (InDirect Lighting) rendering conditions, all objects in the scene behave as a light, but diffuse only. IDL lighting does not show in preview.

Next >

How do I set the color and intensity of my light(s)?

Poser lights can be controlled at various places.

In the Light Controls panel, the dots (bottom left) indicate intensity, I can drag the yellow knob for adjustment. Next to it, mid bottom, is the color indicator. Click it to adjust the color.
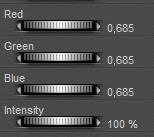
In the properties / parameters of the light, the color and intensity can be adjusted numerically. Red, Green and Blue take values 0..1, but Intensity also takes negative numbers (color inverts the light) and values over 100%.
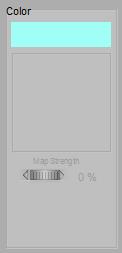
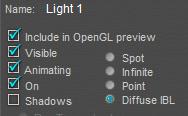


From Material Room, Simple interface, a color can be assigned, as well as an eventual image-map. The latter is not available in the ways mentioned above. Intensity is not available.

Intermediate

From Material Room, Advanced interface, both Color and Intensity are available and image-maps as well as other kinds of nodes can be attached. Intensity again takes negative numbers and values over 100%.

As usual with all Color/Value pairs in Poser materials definitions, the result is the multiplication (filtering) of both, and their respective inputs:

Color * Image-map * Intensity * Intensity (greyscale) map
The Angle-parameters are obsolete, and might serve some compatibility with (very old) Poser versions. The use of the Diffuse and Specular swatches is discussed in the next article, they affect the render result only, not the preview. The last two, Image_Resolution and IBL_Contrast, manage the quality of the IBL (Image Based Lighting) when the light is used as an IBL source, set so in its properties.

Next >

Poser Materials V3 Lights

The third group of articles is on Lights, which also can have some of their properties managed in Material Room. And next to that, renders result from light interacting with surface material definitions. I can’t master the latter without a proper understanding of the other two.

Rendering is not managed from Material Room. Hence it’s discussed in the separate Tips and Techniques section. That leaves light, as far as color and intensity are concerned.

And then Image based Lighting (IBL) and InDirect Lighting (IDL) kick in:

An Overview on Backgrounds

Although various configurations can be setup via Material Room menus, and can be managed through the Simple interface, this topic is considered Intermediate level.

Intermediate

When the renderer cannot fill a pixel of the result due to the lack of light from any objects into the camera, as if the camera is looking into a void, then that pixel is filled with “background” (color, picture, movie frame). When exporting to a format which supports transparency, such pixels are left transparent. When using a sky dome in IDL lighting conditions, or when using a plane (billboard) -like object with an image assigned to it, then there is always an object in view of the camera, and no background or transparency will be produced.
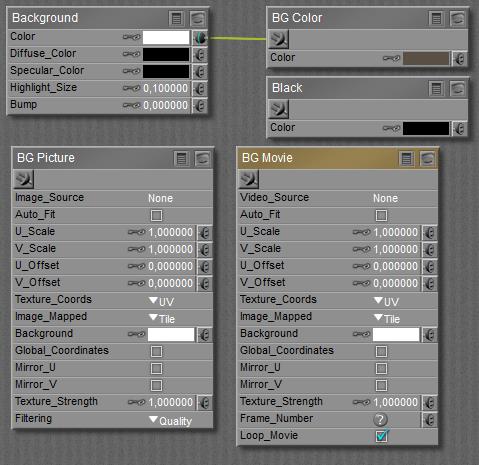
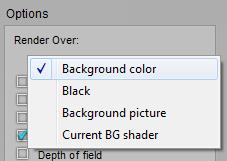
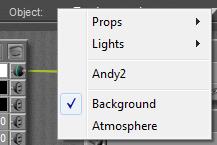
When selecting Background in Material Room, various nodes are presented:

There are various ways to use those nodes in the Render Settings:

And there are various ways to fill those nodes

  • Document Picker ,
  • File > Import menu

So, how do all these relate?

The Document Picker has entries for Foreground, Background, Shadow and Ground. The latter fills the Diffuse Color for the Ground object in the scene, Foreground and Shadow are relevant for Preview only. The 2nd from left, Background Color, fills the BG Color node:

makes

Importing a Background Picture loads the selected image into the BG Picture node, AND connects that node with the Background node, AND sets Render Settings to (Render Over:) Background Picture. This displays the picture in preview, and in the render.

Importing a Background Footage loads the selected image into the BG Movie node, AND connects that node with the Background node, AND sets Render Settings to (Render Over:) Background Picture. This displays the correct frame in the render, but it’s not that good in showing the right frame in Preview, and in adjusting it when stepping through the frames with the animation controls.

Render Settings:

  • Background Color and Black picks whatever is produced by the BG Color node or Black node respectively. They do not need to be connected to the Background node. I can set the nodes to any color, and/or attach a complete texture defining node-tree to them.
  • Background Picture takes whatever is in BG Picture or BG Movie, whichever is connected to the Background node. If none of them is connected the Color from the Background node is used. If any of them is connected, any further content of the Background node is ignored. E.g. color filtering will not take place.
  • Current BG Shader picks whatever is connected to the Background node, and includes the color filtering through the Color swatch of the node.

Handling the nodes directly

I’m free to fill the BG Color and/or the Black node with anything, and attach a complete node-tree to them as well. Any of them can be picked in Render Settings directly. The result of the BG Color node will show in Preview, unless… either BG Picture or BG Movie is attached to the Background node.

I can assign an image to the BG Picture node, it’s completely compatible to the regular image_map node. It will show in Preview when connected to the Color slot of the Background node. It will show unmodified when selected as Background picture in Render Settings, and it will show color-filtered through the Background nodes Color swatch when the Current BG shader option is used.

I can assign an animation to the BG Movie node, it’s completely compatible to the regular movie node. It will show in Preview when connected to the Color slot of the Background node. It will show unmodified when selected as Background picture in Render Settings, and it will show color-filtered through the Background nodes Color swatch when the Current BG shader option is used.

Notes:

  • When playing the animation in preview, Poser tries hard to show to proper frames for background. When stepping through the animation manually however, the background frames are not (always) updated. It’s improved in the most recent versions, though.
  • I first have to connect BG Movie to the Background node, and then I select the video. When any video is already selected before the connection is made, then that selection will get lost and has to be re-established again. This also is the case when BG Movie is setup properly, gets disconnected for any reason, and is re-connected again.
  • Both cases are not bugs but features, aimed at saving resources (computing power, responsiveness, disk space) at caching the individual movie frames during scene development.

The Background node at last offers various slots, but after a lot of test renders the conclusion must be that only Color offers a well understood and well determined contribution to the result. The other slots do affect the result somewhat in some way, but are recommended to be left at their default (0 or black) value. The Color slot, eventually filtering anything which is plugged into it, is shown in the render when Current BG shader is selected in Render Settings. The node does not show in preview, nor do any regular nodes attached to it. However BG Picture or BG Movie do show when plugged into Color, but without any filtering by the swatch.

Next >