In the previous article it’s discussed how the Poser Gamma mechanism not only brightens up shadows and shades to compensate for the lack of radiosity and atmospheric scattering as can be found in real-life scenes, but also helps to add up lighting components like diffuse, specular, reflection and the like, especially when such components can be considered rather independent.
In some cases however, such components come to us in a ‘’ blend’, that is: more of one implies less of the other, which makes them far from independent. For example:
- I use a blending node which, from a value or image brightness, blends x% of one input with (as a consequence) 1-x% of the other input.
- I apply Transparency, which blends reflections and diffuse from the front of the object with the scene behind the object shining through. The more of the first, the less of the latter.
- By manual action: I take some red out of Diffuse and put that amount of red back in via Ambient.
In those cases, the Gamma mechanism turns into a burden, instead of a benefit, when it includes the blending itself. I went through all the math (see last part of this chapter), and through a load of test renders, and my findings are:
- If possible, the best solution is to revert the Gamma mechanism for the blend. That is: get the Gamma out of all inputs including the blending, apply the blend, and put the Gamma back into the result. This will apply the proper blending to the proper colors, so to say. This works for nodes.
- Else, accept the Gamma mechanism for the inputs but avoid any Gamma effects on the blending itself. This will distort the proportions that the inputs contribute to the result, and always brightens up the object somewhat compared to the previous way of work. It applies the proper blending to the adjusted colors. This works for Transparency.
- Else, accept the Gamma mechanism but compensate for it where possible. This can be tedious but might solve the remaining cases, like the blending invoked manually.
- As said, having Gamma to affect the blending itself is to be avoided, as it applies an adjusted blending to adjusted colors. The results will be off again, but far more (as least twice as much) as in the method mentioned above, and in either direction: too dark or too bright, depending on the lighting balances in the scene itself.
Reverting the Gamma Sandwich
Just like this:
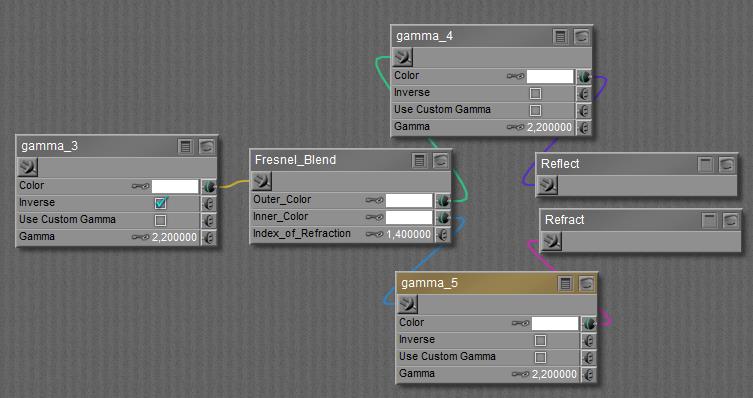
The Fresnel_Blend is packed between two Gamma’s at the input side to take the effect out of the Reflect and Refract, and an inverse Gamma at the output side to put the effect back in again. Note that the Gamma node is not applying Gamma (darkening), but its inverse: Gamma Correction (brightening). This can be applied to all kinds of blending nodes: Fresnel_Blend, Edge_Blend, Color_Math (Blend), ColorRamp, you name it. It cannot be applied to the Fresnel node itself, as one cannot take the Gamma out of the reflections / refractions before they get blended.
Just leave Gamma out
The second best option, it distorts but not that much. Just apply the mentioned nodes as they come, apply transparency as it comes, it feels like “doing nothing”. But it also means: use Values for blending amounts and transparency, avoid using Color-swatches at any cost, and when using image-maps do set their Gamma values to 1.0 to bypass the mechanism.
This is the method followed automatically when the Fresnel node is used.
The use of Gamma = 1.0 for Transparency in all PoserSurface definitions in the scene can be enforced with the changeGamma scripts.
Manual adjustment
Older textures for characters offered a way to mimic advanced skin effects, like translucency and scattering. A small portion of red was removed from Diffuse (turning white into (245,255,255) a very mild cyan) and put back in again in the Ambient slot (turning black into (10,0,0) a very deep red). When rendering without Gamma, as was common in those days (Poser before version 10) this resulted in white (multiplied by any image map) plus a mild reddish glow.
However, when Gamma is turned on, the ratio gets distorted, the brightest component – the cyan in here – gets the upper hand, and all characters got the “smoking zombie look”.
Like this, left Andy without Gamma, right Andy with Gamma, same material and lighting:

Solutions:
- Rebuild the material completely and switch to modern alternatives applying scattering and the like. Set the Diffuse slot to white and remove all Ambient from the PoserSurface definition. This however will not work for early Poser versions not supporting those modern features.
- Set the color swatches apart, and get the Gamma out:
It will, by the way, increase the reddish glow so some additional adjustment might be required. This is the most flexible solution, leaving all other settings intact, and works in all Poser versions for all Gamma settings, including none at all. - Correct the swatches in PoserSurface manually. Instead of taking out 5% red, take out just 1%, and instead of adding 5% Ambient, add 10%. These adjustments however will vary with different settings for the Render Gamma. It leaves the structure of all PoserSurface definitions intact, but it’s the least flexible and most tedious of all.
A closer look at Transparency
Consider an object, having a (surface) transparency of T=90%. When a direct (say 100%, white, point) light is illuminating the scene, this object will show the following behavior:
- The light is passing through a surface twice, object-front and back, and so it produces a shadow of intensity T2 (90%x90%=81%) assuming Gamma is not applied to the transparency itself. Then this shadow is brightened up in the post-render pass, to T2/g (=0.810.45 = 91%) like all other shadows in the scene. When Gamma is applied to transparency too, it gets reduced to Tg ( 0.92.2= 79% ) in the pre-render pass, then it casts shadows T2g, and then these get brightened to T2g/g=T2=81%. In other words: when I include transparency into the Gamma mechanism, the shadows from the object will be darker related to other shadows in the scene, as if the Gamma mechanism was not applied but to those shadows specifically.
- However, the scene behind the object shining through will follow the same logic. When no Gamma is applied to transparency, that scene will get dimmed to 81% and brightened up in the post-render pass to 91%, while applying Gamma to transparency will produce a neat 81% result.
So at first sight I’ve got a choice: either the object is too bright and the shadows are right (no Gamma to transparency), or the object is fine and the shadows are too dark (Gamma on transparency too). At second sight, more effects have to be considered:
- Since the object is only partially transparent, a portion of the (light of the) scene in front of the object will bounce as well, as diffuse or reflection. At a surface transparency of 90%, this will put 10% into the mix. When Gamma is allowed to reduce the transparency (from 90% to 79% as calculated above) this frontal portion will increase to 100-79=21%.
- When the surface transparency is 90%, then that amount of light will pass the frontal surface (10% bounces as discussed above), and at the backend surface again 90% of that will pass, and 10% will bounce. The latter implies that 10% of 90% = 9% starts to participate in an internal bouncing around, and each time a surface is hit some light passes through and some bounces again. When Gamma is allowed to reduce the transparency, more bouncing will occur and actually the 9% mentioned will rise to 17%.
- That light bouncing around will not only leave the object at the front, a part of it leaves the object at the back instead. But… from the light from the scene behind the object, some portion bounces around internally as well, leaving the object at the front, and to some extent at the back instead.
Actually, all the four elements mentioned above (all except the shadow mentioned first) add up to make one result. So how can be predict what happens when a gamma sandwich is applied to all that? We can be sure something gets distorted, as it would be a miracle when all things turned out equal. I do need math, figures and a lot of tests to get it sorted.
That’s for the next part of this chapter. For short: the Gamma mechanism, even when not applied to transparency itself, will produce a somewhat distorted result as it alters the balance between the ‘front’ and ‘behind’ scenes in the result. But when transparency itself is excluded from Gamma, then 1) I’ll get the best shadows which behave in sync with the other shadows in the scene and 2) I’ll get the least (and eventually most manageable) distortion, compared to when Gamma is included into the transparency.
So, I consider it best to treat Transparency as a value ‘thing’, I’ll avoid using color swatches to determine it, any image map involved will get Gamma=1.0, and I’ll use the various scripts to enforce that all over my scene materials.
The math and the figures
For those who want to check out on my findings themselves.
Plain Blending
Consider two inputs, A and B, blended together in an x-to-(1-x) ratio. More of A implies less of B and vice versa. For instance, reflection blended with diffuse (a shiny surface), of with refraction (Fresnel).
- I without gamma: A*x + B*(1-x)
- II with Gamma on A and B only: { Ag*x + Bg*(1-x) } 1/g
- III with Gamma on all: { Ag*xg + Bg*(1-xg) } 1/g
Some results, for Gamma 2.2 and blend ratio x set to 70%:
| A | B | I | II | III | |
| 80% | 80% | 80% | 80% | 80% | |
| 80% | 60% | 74% | 75% | 70% | |
| 80% | 40% | 68% | 71% | 62% | |
| 80% | 20% | 62% | 69% | 57% | |
| 60% | 80% | 66% | 67% | 72% | |
| 60% | 60% | 60% | 60% | 60% | |
| 60% | 40% | 54% | 55% | 50% | |
| 60% | 20% | 48% | 52% | 44% | |
| 40% | 80% | 52% | 56% | 65% | |
| 40% | 60% | 46% | 47% | 52% | |
| 40% | 40% | 40% | 40% | 40% | |
| 40% | 20% | 34% | 35% | 31% | |
| 20% | 80% | 38% | 49% | 62% | |
| 20% | 60% | 32% | 38% | 47% | |
| 20% | 40% | 26% | 28% | 33% | |
| 20% | 20% | 20% | 20% | 20% |
Transparency
Consider A the lighting level in front of the transparent object, B behind it, for transparency T. More transparency means more of B (transmission/refraction), less transparency means more of A (diffuse/reflection). Transparency induces internal reflection/diffusion within the object. For a simple illustration: at transparency 90%, 10% with be reflected/diffused from the front while 90%x90%=81% shines through, passing front and back surfaces. The remaining 100-10-81=9% results from internal reflection / diffusion, leaving the object while bouncing around.
- I without Gamma: A*(1-T)*(1+T/(2-T)) + B*T*(T+(1-T)^2/(2-T))
- II with G on A and B only: { Ag*(1-T)*(1+T/(2-T)) + Bg*T*(T+(1-T) 2/(2-T)) } 1/g
- III with G on all: { Ag*(1-Tg)*(1+Tg/(2-Tg)) + Bg*Tg*(Tg+(1-Tg) 2/(2-Tg)) } 1/g
Some results, for Gamma 2.2 and Transparency set to 70%:
| A | B | I | II | III | |
| 80% | 80% | 80% | 80% | 80% | |
| 60% | 80% | 71% | 72% | 67% | |
| 40% | 80% | 62% | 65% | 56% | |
| 20% | 80% | 52% | 61% | 48% | |
| 80% | 60% | 69% | 70% | 75% | |
| 60% | 60% | 60% | 60% | 60% | |
| 40% | 60% | 51% | 52% | 47% | |
| 20% | 60% | 42% | 47% | 38% | |
| 80% | 40% | 58% | 62% | 71% | |
| 60% | 40% | 49% | 50% | 55% | |
| 40% | 40% | 40% | 40% | 40% | |
| 20% | 40% | 31% | 33% | 28% | |
| 80% | 20% | 48% | 58% | 69% | |
| 60% | 20% | 38% | 44% | 52% | |
| 40% | 20% | 29% | 31% | 35% | |
| 20% | 20% | 20% | 20% | 20% |
Conclusions:
- When A and B are about equivalent, the method does not really matter, and distortions from Gamma Correction are minimum in any way. This situation occurs for instance when a semi-transparent object resides in a quite homogeneously (say IDL) lit environment.
- In all cases, the difference between method III (all gamma) and method I (no gamma) is at least at large, and in varying directions, compared to the difference between method II (no gamma on blending /transparency) and method I. Therefore, I prefer method II over method III as presenting the least distortions, when method I is not available.
So in case of blending / transparency, I prefer values, I avoid color swatches, and when applying images I set their Gamma to 1.0.