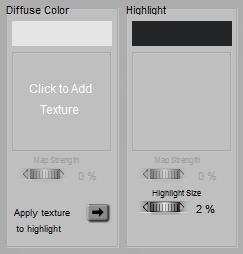
Assigning an (external) image to a material is quite a common action, whether it’s for light gels, background, or object surfaces. In Material Room, the Simple interface requires one click to open the Texture Manager window
 =>
=> 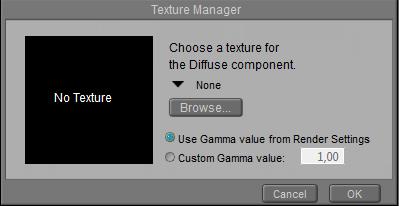
which lets me pick an image file (many formats supported) and (for Poser 10 / Pro 2010 and up) a Gamma value. As a rule of thumb:
- When the component represents some kind of light towards the camera, which has to be added up to the light from other components, then the first (default) option is the right one. Think: (Alternate_)Diffuse, (Alternate_)Specular, Ambient and Translucence, Reflection and Refraction.
- When the image represents just an amount of something and color is far from relevant (think: Bump/Displacement, Transparency, Highlight Size, …), then the second option should be selected with 1.0 as the right value.
Just a brief explanation for this: Gamma Correction, darkens the image before it’s applied and brightens the final render result for compensation. This brightens up the shadows to mimic the effects of radiosity from floors, walls , ceilings and the like, and from the scattering of light in a real, somewhat dusty atmosphere; effects which are hardly available in a Poser render. This Gamma mechanism also reduces the (risk of) overlighting when multiple sources of light (diffuse, specular, reflection, …) from a surface towards the camera are combined. Poser just adds them up and clips at 100%, while in real life our eyes adjust to the increased light levels.
But for the greyscale image-driven amounts, the render consequences suffer from the distortion: reduced displacements for instance cannot be compensated for in the final brightening pass. So, for these effects, the Gamma Correction has to be disabled by overriding the default value with a neutral 1.0.
Image management
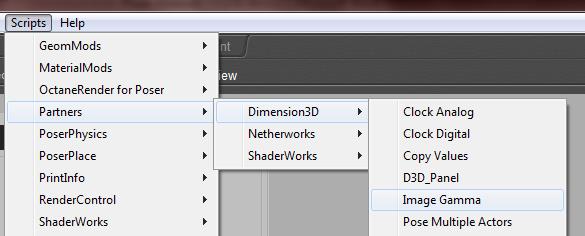
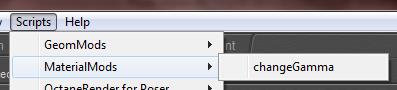 When I already have various images in my scene, and when I do not want to recheck and reset all of them, Poser can help me with various scripts:
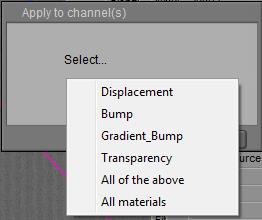
This leads me to …
where “All of the above” is the recommended option.
Note that images driving Edge_Blend and nodes alike have to be dealt with manually; these also should have their Gamma value set to 1.0.
And also (Poser 10 / Pro 2014 and up):
which presents:

Warning: when a single image file is referred to in multiple places, for multiple material definition components, and/or for various objects, then the image is imported and handled into Poser only ONCE. It’s this single instance which gets a Gamma value assigned, whatever way I choose. Changing the value at one place alters it in all other places, for that image.
Intermediate
 In the Advanced interface to the Poser Material Room, nodes are the essential building blocks. They are the graphical representation of mathematical function calls, calculation procedures turning parameters (inputs) to a result (output).
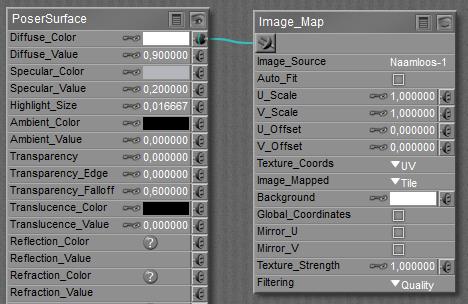
For applying images, the Image_map node can be found in the 2D Textures group, and reads like …
Clicking Image_Source opens the Texture Manager as discussed above, and enables me to assign an image file and a Gamma value. As said, addressing the same file in multiple nodes will still associate ONE gamma value to that value. When I use various values in the nodes, then the last one entered is the final value for all of them.
The next set of parameters (U/V_Scale, U/V_Offset, Texture_Coords, Image_Mapped plus the Global_Coordinates checkbox) all affect the mapping of the image onto the object surface. Just consult the manual for the meaning of the various options. Checking Global_Coordinates is meaningful in combination with the XY, XZ, YZ options of Texture_Coords, while the Mirror_U/V options are meaningful in combination with the Tile option from Image_Mapped: the images is tiled and the tiles are flipped successively.
For all places where no image pixel is available (due to the mapping parameters), the Background will be used instead. When Image_Mapped is set to Alpha then any transparency information from the image itself is used for this too, and Background might fill in some spots within the textured area as well.
Texture Strength works as follows: say the image map is connected to a color-swatch in PoserSurface. Then first the image is merged with white: Strength 100% means full image, 0% means no image at all. Second the result is filtered by the color-swatch, as usual. In other words, for an 80% Texture Strength, the final result consists of 80% color-filtered image, and for the remaining 20% of the color from the swatch itself.
Filtering comes into play at render time, when (usually) multiple pixels from the images become associated with a single pixel in the render result, especially when the rendering uses anti-aliasing itself (that’s Pixel Samples in the Render Settings). Or the other way around, and a single pixel in the image is used to fill multiple pixels in the result. Just that image pixel can be used (‘None’ for filtering) or info from its direct neighbors can be used as well (‘Fast’). The latter is fine for test renders, and for small sized animations for the web (say 640×480, regular YouTube). Looking one step further (‘Quality’) is the default, and recommended for larger animations (HD, DVD quality) and still images for the web. Looking another step further (‘Crisp’) takes even more pixels from the image into consideration, and might be of use for large scale, print-oriented render results. As usual, the higher the setting, the more memory and render time are required to finish the process.