The Library
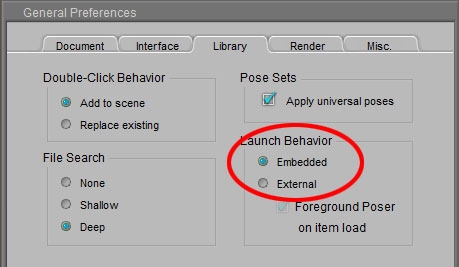
Depending on the Poser version I use, the Library can come as “internal” (or: embedded, as a regular Poser pane) or “external” (as a separate application). In the latter case, it might or might not be convenient when selecting an object brings Poser to the foreground or keeps the Library upfront. Poser to foreground means that I can quickly continue with my scene but also that for picking another object or pose or something I’ve got to bring up the Library again.
The Poser window presents a small button in the upper right corner to do so quickly.Relevant options for Library behavior like this can be found in the Library tab in General Preferences.
When I choose “embedded” (or when running the Library separately is not an option), I’ve got the choice between a docked and a floating form, like all other Poser panes. I found that the official manual is not always entirely correct in this, so I just try for myself what works out. (Note: see the Corrections and Additions post).
The structure of the library is quite straightforward from a technical point of view, but quite cumbersome from a user point of view: within each <base folder> I’ve got a folder called Runtime, containing subfolders Geometries (hosting the .obj object meshes), Textures (hosting the image maps), a lot more, and the Libraries folder which is addressed by the Library itself.
This Libraries folder contains (category) subfolders Camera, Character, and so on, and each of them contains files in specific formats, and thumbnail images in .png. The Library application (or pane) gives me access to the library (= the <base folder>) and the specific category (= subfolder in Runtime\Libraries) of my choice.
So if my selected Library is “Poser Pro 2010” and my selected category is “character” then I’ll see all subfolders within Poser Pro 2010 \ Runtime \ Libraries \ Character and only the .cr2 files within these. (Note: see the Corrections and Additions post).
| Folder \ category | File | |
| Camera | .cm2, .cmz | These cannot be used in Daz Studio and alike |
| Character | .cr2, .crz but also .pmd, .obj, .obz | For poseable figures and conforming clothes, with an internal “bone structure” |
| Face | .fc2, fcz | Expressions, essentially these are morph targets and settings |
| Hair | .hr2, .hrz | Hair might be a sort of conforming clothes (cr2), or a prop (pp2), but stored as hr2. Or dynamic hair, which requires an object to set the hair roots. Usually a skull cap is used for this. |
| Hand | .hd2, .hdz | Poses. Note that a hand contains as much components as the rest of a body. |
| Light | .lt2, .ltz | These cannot be used in Daz Studio and alike |
| Materials | .mc6, .mcz (mat collections), .mt5 (single mat) | A mat collection maps a series of single mat defs onto a series of mat zones of an object. Include references to texture files / image maps. |
| Pose | .pz2, .p2z | Body pose, usually without the hands. Unfortunately, a remapping of a mat collection with just other image maps and mat def settings is a “Mat Pose” and lands in this section as well. |
| Props | .pp2, .ppz | Non-poseable objects, without an internal bone structure. This includes clothes which are not meant for conforming but are for dynamic use only. |
| Scene | .pz3, .pzz | Full scenes, as I create and render. |
The result of the way of working of the Library is a well understood confusion for users. The files for a figure, with expressions, poses, hair and a set of skin variations, are scattered around the Library. Some people therefore create a separate Runtime for every figure, but with a growing wardrobe a separate closet for each robe becomes impractical.
This is where the Favorites kick in: I can define my own structure and put say a dress and all its mat files, accompanying jewelry and more, all in one place. These places are subfolders in Runtime \ Libraries \ Collections, and they host just shortcuts to the mentioned files, plus a copy of their thumbnail image.
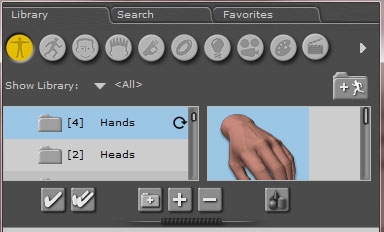
At the top-right of the Library window you might have noticed a “+ Runtime-folder” button, this one adds extra (external) runtimes to the selection, and adds an entry line in the LibraryPrefs.xml settings. In order to remove a Runtime from the collection, I have to select that one first using the Show Library list. Just clicking it in the list is not enough. After selection only the contents of that Runtime are shown, but also a “- Runtime-folder” button appears. That is, if it concerns a Runtime I’ve added myself earlier, I cannot delete the Runtimes which came at install time. And… I don’t delete anything except the reference to the content, not any content itself.
At the bottom of the Library panel I’ve got
- Buttons for adding content to my scene. Either just adding, or replacing a selected object. This latter option is quite relevant in a stepwise refinement approach to scene development. I can have a low resolution character taking a pose etcetera, and after all preliminary tests are done I replace this mannequin with a full blown dressed up and detailed textured character for my final renders. This approach might speed up my development process, especially on low-end computer systems.
Details on this depend on the category: figures can add or replace, poses only can replace existing poses, and so on.
Tip: be sure to read the Reference Manual on replacing figures (chapter 7), and on the options in the Replace Figure dialog which appears when doing so. - Buttons for adding folders, and for adding and deleting content itself. This concerns actual files in the Runtime and in the category I selected. So when I select a character, and a Runtime “A” and say category Pose, and I’m looking at a subfolder “B” thereof, then the body pose of that character is saved into …\A\Runtime\Libraries\Pose\B.
And please note: it really deletes content when asked to!! - An “Add to Favorites” button, and then I can tell where.
When I’m in the Favorites tab, I’ll have the add-to-scene, the “add folder to favorites” and the “delete item from favorites” buttons. The latter only deletes the shortcut and thumbnail in the Collections, the original content itself remains untouched.
The behavior of the Library utility is managed at two places:
-
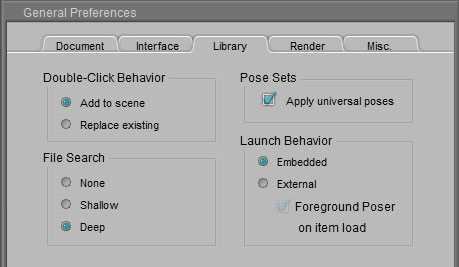
- Double Click behavior, by default (Add to Scene), the double click acts like the double-check add button. The safe way, as replacing is destructive in my scene: I lose the original figure when doing so.
But if I want my double-click to match the single-check replace button, I can have it my way. - Poses that came with figures from Poser 6 or earlier applied properly to those figures only. Poses that came with Poser 7 and later can be applied universally. When the box is checked, poses added to the library will be saved as universal poses. So in order to apply Kate’s pose to James: apply the pose to Kate, save Kate’s pose, this will turn it into a universal pose, which then can be applied to James. Applying Kate’s pose directly to James might not work out well.
- Next to Library and Favorites, the Library offers a Search function. This can find figures, poses, and whatever. And I can do a search in one specific category in all Runtimes, which might be pretty handy.
When loading any file which references to other files (like a character is referencing the .obj mesh definition, and a material is referencing an image file), Poser itself performs a search for those referenced files.
The File Search option tells Poser what to do: just look at the defined places or just next to the selected library item (“None”), or look through the entire set of all libraries (“Deep”), or something in-between to save search time (“Shallow”). Actually, Deep is recommended for scene building except for very large libraries on low-end machines, None is recommended for content developer to check whether all paths are properly defined.
Anyway, if I load a scene or element which references to mesh definitions or textures which are only available in a Runtime which is not attached to the Library yet, Poser cannot find that mesh or texture. But also, when I load a Poser scene which contains such an element into Vue, then again all questions on file location will be asked again. Vue asks Poser for the file and Poser will check the Runtimes which are attached to the Library. Typical example: I’ve build a scene in Poser 8, I upgrade to Poser 9 (or just to a new Service Pack) and load the scene back in to find out about the new program. Lots of file warnings. I just haven’t attached the external runtimes to the new Library yet. Happens to me all the time.
- Double Click behavior, by default (Add to Scene), the double click acts like the double-check add button. The safe way, as replacing is destructive in my scene: I lose the original figure when doing so.
- The Library settings themselves.
The Library Window itself contains a shipload of possibilities to adjust the way it presents my content. These are revealed (and hidden again) when clicking the separator bar underneath the Library panes.
The General section manages the behavior of the Library Window, the Display section manages which panes are displayed, and the first three of them have their further details set in the remaining three sections.
Just see for yourself whether you need the Extended Details. The Breadcrumb bar might be handy for maneuvering around, and the Ticker brings us to various sections of the Smith Micro website.
The various options are well described in the Reference Manual (chapter 7).


