Each object surface – except for the hard and smooth ones – has some irregularities, like pores in the skin. On a large distance, these details don’t show in the render at all, or can be embedded as shady areas in the color texture at most. At a somewhat shorter distance, but still away from the camera, those regularities can be faked, saving a lot of render time and memory resources. That is what Bump is for. The magic is done by the texture (Bump-map) alone; no surface elements are actually moved.
When the object surface comes closer to the camera, surface elements actually do have to move a bit in order to make believable results. Those displacements still can be image driven, which is where the Displacement-map kicks in. This way of work actually saves a lot of detailed modeling. For instance, terrains are generated this way. But again, its effects are limited, so when the object surface comes really close to the camera, it pays off to actually adjust the object mesh actually, and to model in the details themselves.
So, the other way around: I can either put the details into the object mesh which takes a lot of my modeling time, or I can apply a displacement map which requires memory and render time, or I can apply a bump map faking the displacements, or I can leave it the way it is. The best choice depends on the distance of the object to the camera. Additional considerations on this are required in animations, where this distance can vary over time. In general, a serious difference between Bump and Displacement is that Bump does not distort the object itself, and hence leaves the edges intact. So a bumped ball still will be a perfectly round object in the render. A displaced ball will not.
 makes
makes 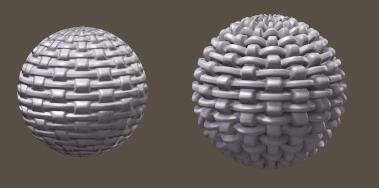
And notice the difference between Bump (left) and Displacement (right). Not only the bumped one still is a perfectly round object while the displaced one has got a roughed up edge, the bumped one also is smaller, for the same amount used. This is why:
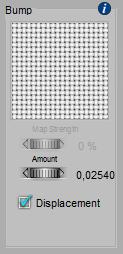
- In Bump, white gives maximum effect outward, while black gives maximum effect inward, so 50% grey is the neutral / no effect value. The Amount indicates the total difference between black and white, so the effect is half of the amount outward, and half the amount inward. Using a negative amount will reverse the effect: black will simulate an outward effect, while white will dent inward. And… bump is not modifying the object mesh, and hence cannot alter its size.
- In Displacement, white gives full outward growth of the object while black gives no growth at all. So, for displacement, black is the neutral / no effect value, and any displacement will grow the ball. When displacements should be made inward, then negative amounts must be used. Hence, displacement will actually grow the ball, and its visual effect is twice as strong as for bump.
Notes:
- Via the Simple interface, using the Displacement option one can choose between Bump and Displacement, it’s either the one or the other. Via the Advanced interface, one can have both. For instance to drive large adjustment by a displacement, and small details by a bump.
- The Amount is measured in the unit I’ve set in my Global Preferences. The screen grab above was made on a system using Meters, so 0.0254 indicates 2.54 cm. Which by the way is about 10% of the balls diameter; quite a lot. When the units are changed to inches, that value will change to 1.0. I have to take this into account when using data from examples. (And… python scripts have to use inches by all means). This 1” value is the default, which actually is quite a lot for say skin details, but quite small for outdoor terrain surfaces.
Intermediate
The PoserSurface material definition offers a few additional options for compatibility:
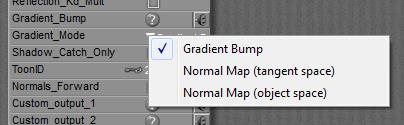
- Gradient_Mode = Gradient Bump offers compatibility with old Poser versions, I can plug the existing *.bum file into the Gradient_Bump slot, as an image
- Gradient_Mode = Normal Map offers compatibility with Game Characters. If my figure comes with normal maps instead of bump/displacement maps, I can select the correct type, and plug the map into the Gradient_Bump slot as an image.
Important note: in Poser Pro and Poser 10 and up, when using image maps for Bump and/or Displacement, these should have the Gamma set to 1.0 explicitly. Otherwise, the images will get dimmed considerably before application, especially in the mid-grey areas. This will result in dimming the Bumps / Displacements themselves as well, which is wrong.