 For short: specularity makes highlights on an object surface, representing the (blurred) reflections of the direct lights (infinite, spot, point) in the scene. Although color and an eventual image map both work as an extra filter, such a coloring filter should be applied to make believable metallic surfaces only (metallic car paint included). In the vast majority of cases, the color swatch should be a shade of grey. Small highlight sizes represent hard, smooth surfaces.
Note that in Poser IBL (image based lights) and IDL (indirect lighting) cannot make highlights themselves, I do need regular direct lights in my scene to do so.
More in detail
When light hits an object surface, some portion of it might get reflected. In the good old days, when computers were short of raw CPU power, this handling of reflecting light rays was something to be avoided in order to get industrial render projects done in due time.
Faking reflections by using images of the surrounding scene (‘reflection maps’) was one way to get out, and another one was to concentrate on the – usually blurred – highlight producing reflections of the direct lights in the scene only. The latter is referred to as specularity.
In nature, as well in modern ray-tracing based renderers like LuxRender or Octane, there is reflection only, handling all sorts of light. But Poser supports the easy to calculate Specularity for direct lights, and the more computational intense Reflection for the indirect light bouncing (or emitted otherwise) from objects in the scene. Two sides of the same coin, served separately for convenience especially aimed at reducing time and resource requirements at rendering. The downside is that I have to cater for both aspects separately in my material definition.
Intermediate
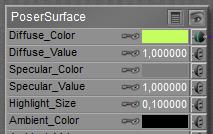
The Advanced interface into Poser Material Room offers a Specular_Color which makes it the equivalent of Simple interface, and offers a Specular_Value next to it which acts as an extra filter. Intensities are reduced with that factor, and it can be driven by a (greyscale) image map as well. This way one can easily make non-reflective stains on a surface. See the various articles on how both Simple and Advanced interfaces relate, and on the way Colors and Values work together.
Recommendations:
- To prevent artefacts in rendering when applying the Gamma mechanism (recommended, available in PoserPro and Poser 10 and up) the Value setting should be kept to 1.0 only (or 0.0 but no intermediate values).
- To prevent overlighting when combined with other aspects of lighting and material definitions, it’s recommended not to exceed a (100% – Diffuse) brightness in the Color-swatch and maps (or in the Value setting when not applying Gamma). So with Diffuse set to 80%, Specularity should not exceed 20%. Click here for details.
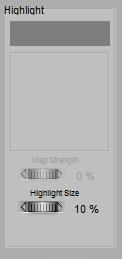
 Highlight_Size, available in Simple as well as in Advanced interface, is a straightforward parameter: small values make small, intense highlights representing hard, smooth, shiny surfaces while larger values make larger, blurred highlights instead. Like for Diffuse, Poser offers a Specular node (Advanced interface only) which offers features similar to the Specular component in the PoserSurface. See the respective acrticles on assigning either an image or a movie respectively to the Specular slots.
Making Highlights
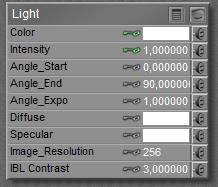
As said, Poser discriminates between Reflecting (diffuse) light from objects, and Specular light from direct light sources in the scene. To do so, direct lights in Poser offer a diffuse as well as an independent specular component. The first component will trigger responses from the Diffuse part in the material definition (and similar parts as well) while the second component of the direct light will trigger responses from the Specular part in the definition.
 <=>
<=> 
The Diffuse and Specular components in the Light relate to the Diffuse and Specular components in the Material definition of an object.
So, in order to get highlights, I need this Specular component in the direct lights in the scene to be available. But I can black out the diffuse component, turning the light into a Specular-only one.
The shape of Highlights
Although Poser is not raytracing to derive the specular highlights, the blurred highlights are still decently described by the “angle in equals angle out” concept as is the case with mirrors. This implies that the outgoing light intensity is highest in a direction determined by the angle of the surface with the incoming light. Around that “angle out” range the intensity drops – depending on the highlight size. Unfortunately, and though it calculates and renders pretty fast, the standard highlighting method produces quite unrealistic results and makes everything look like a bad representation of hard plastic.
This is why Poser offers additional features via the Advanced interface, especially alternatives for the Specular node, like Blinn, or Anisotropic for microscopically grooved surfaces.