Well, I know about reflections in nature, from mirrors, metal balls, glass, and water surfaces. So the answer can’t be that difficult.
Unfortunately, it can be quite complicated in a 3D program, because the proper handling of reflections requires a full fletched use of raytracing, with an infinite number of bounces. In the old days this required so much computing power that rendering took about till infinity. From this recent past, which is just one to two decades away, three approaches remain which are discussed below:
- Reflection maps
- Specularity
- Raytracing
Although most characteristics of these are available through the Simple interface into Material Room, the implementations in Poser are not always the easiest to comprehend. That turns the presentation of this topic into a mixture of Simple and Intermediate elements. Sorry for that.
Reflection Maps
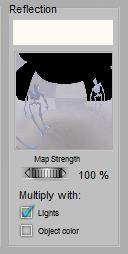
First, the reflections can be faked by assigning just an image to it. For quite blurred reflections and an image which matches the surrounding scene quite well, this might work and will speed up rendering tremendously, which is a serious advantage in lengthy animations. It’s used often on chrome car accessories.
 or
or 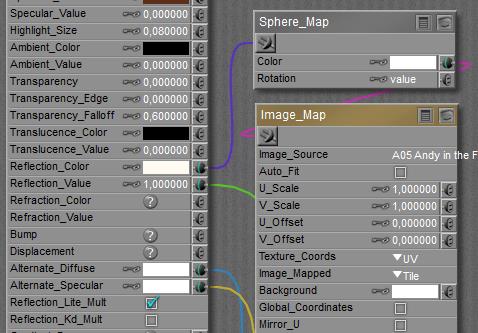
Note however that the brightness of such reflections is autonomous, independent of the surrounding lighting levels. So when the lights dim, or the object resides in a shadowy area, the intensity of this material property should be adjusted accordingly. Poser supports this, by multiplying the reflections by the brightness (and color) of the (diffuse) light on the surface of the object. The Reflection Lite Mult option (or Multiply with Lights in the Simple interface) caters for this, and is ON by default.
So, when I animate a car driving through a sunny lane with shadowy trees, and the shiny chrome wheels are made pseudo-reflective by using just images, then the reflectivity is dimmed when a wheel passes through a shadow.
The option should be OFF however when actual raytracing (see ‘third’ below) is used to handle the reflections because then the amount of reflected light is properly derived from the surroundings themselves.
Specularity
Second, specularity was introduced to create highlights, representing blurred reflections from direct light sources only. In Poser, an active specular channel of a direct spot-, point- or infinite light in combination with an active specular part in the objects material, are both required for getting such highlights. Note that indirect (IDL) lighting schemes as well as image based (IBL) lights deal with diffuse light only, and will not produce any highlights. See this lighting article on details.
Raytracing
Third, real raytracing can be implemented by plugging the raytrace node into the PoserSurface definition. This is directly available in the Advanced interface only. In the Simple interface, just choose the Raytrace option:
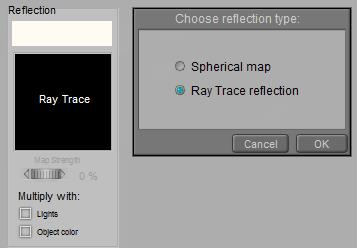 Note that in his case, those ‘real reflections’ will only consider the objects in the scene, and not the direct light sources around. To get the shine of lamps in the render, I either have to include some additional glowing objects in the scene, or I have to use specularity for this purpose. Also note, as said above, that the Reflection Lite Mult option (or: Multiply with Lights in the Simple interface) should be OFF for raytraced reflections as it serves the brightness adjustments of image based reflections (reflection maps). Raytracing makes the adjustments itself automatically, and having the option ON will then enforce the adjustments twice.
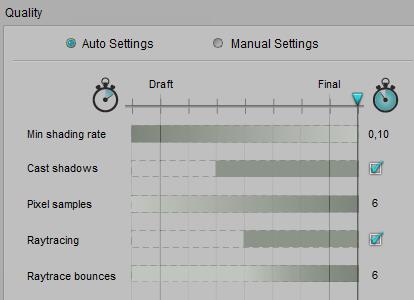
Plus… raytracing has to be enabled in the Render Settings, and the (maximum) amount of raytrace bounces has to be set high enough. That is: the highest value is the best as nature does not have any maximum at all, but some people report that lower values speed up their renders without a recognizable loss of quality. See the notes on Transparency below.
 or
or 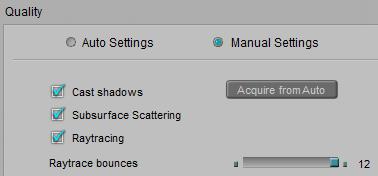
Poser offers Reflection Color, and in the Advanced interface Reflection Value as well. See
- the color of reflections, and the Multiply with Object Color (Kd_Mult) option
- the value of reflections
- Raytrace Bounces
Also see this article on plugging Material Room nodes into the Reflection (and Refraction) slots of a PoserSurface material definition.
Advanced
For short: when I use Gamma Correction for my renders, I leave the Reflection_Value at 1.0 and adjust the color swatch instead. And as discussed below, when I use transparency next to reflection, I use Alternate_Diffuse instead of the Reflection component. This happens to be a color swatch as well and so caters for the GC adjustment too. And when I’m not using GC or transparency, there are no losses in using Alternate_Diffuse anyway. So that is the preferred way of work.
Combining (raytraced) Reflections with Transparency
Most objects which are (semi)transparent, are reflective as well, at least to some extent. When I combine (raytraced) reflections with transparency in one PoserSurface, I have to take notice of various things.
- The combination of raytraced reflections and transparency will generate internal reflections within the object. Poser does a reasonable (*) job handling these, but as the amount of ray bounces is about infinite, render times will go up immensely, and any reduction of Raytrace Bounces in the Render Settings might reduce the quality of the result.
- Light which gets reflected cannot pass the surface, so for reflectivity R (say 80%) the transparency should not exceed 1-R (in this case: 20%) or vice versa. Otherwise, I’ll introduce some magical source of extra light, and things will start looking overly bright. In any case, I should not combine any reflectivity with 100% transparency, or 100% reflectivity with any transparency. Such a surface cannot exist.
- In the Simple interface, and in the Advanced interface with an image_map or Reflect node plugged into the Reflection component, I have to balance transparency and reflectivity manually. Transparency does not reduce the Reflection component as it does with Diffuse. However, Transparency does work on the (Alternate_)Diffuse component so when the Reflect node is plugged into Alternate_Diffuse, the reflection is reduced automatically in a correct proportion. That is: with a 90% surface transparency set, and reflectivity set to 80%, the final reflection will be reduced to 1-90% = 10% of that, making 8% net surface reflectivity. This then is boosted up due to internal reflections.
- (*) due to internal reflections, the final reflectivity goes up to R*[1+T2/(1-R2)] for a surface reflectivity set to R and a surface transparency set to T. This is what Poser does, as it treats transparency as a surface property. With R=80%, T=20% we’ll get 89% final reflectivity. For a semi-transparent solid object however, the final reflectivity should go up to R*[ 1+T2/(1-(RT)2) ] which results in 83% with the same numbers filled in. This refers to only one-third of the earlier derived additional brightening from internal reflections. In the first (surface) model, the light bouncing around within the object is only absorbed when it passes the surface, leaving the object. In the latter (solid object) model, the light becomes absorbed while bouncing around in the object. Therefore, in the latter case internal reflections contribute less to the final result. Poser however does not support the volumetric approach, and so, when its surface transparency actually represents a volumetric effect, the internal reflections are (far) too strong. I can reduce the surface transparency a bit, for compensation.