Separating the lights
In a scene with multiple lights, I’ll have to balance those lights for color and intensity. This too can be done the Render-Pass way, to either achieve the desired result or to achieve the preferred settings for the final render.
The first thing I’ve got to do is to set my Render Settings. In the first run, I uncheck Cast Shadowsand Shadows only to get my shadow-less results. I don’t render, but just Save Settings instead.
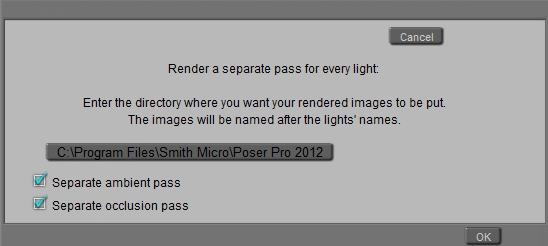
Then my help is in the menu: Scripts \ Rendercontrol \ Renderpasses:
And all I have to do is to click the presented folder path to set a better path for the results. It’s well advised to make an empty folder for each run in order to avoid overwriting files. Then I click [OK] which gives me – for a two light scene and both the extra ambient and occlusion passes checked – with four (PNG) files.
Now I alter the Render Settings, check Cast Shadows and Shadows only, Save Settings, go for the RenderPasses script, select a new “Shadows” folder (which I’ve created first), and click [OK]. Same files, but:
- The files call Light 1 and Light 2 are the shadows of those lights, so I might rename them to Shadow 1 and Shadow 2 respectively and add them to the previous collection with the Light files.
- The Ambient pass and Occlusion pass files can be discarded. Even better, the y can be checked OFF in the dialog box. With shadows only there will be no meaningful Ambient result while the Occlusion result will be the same as in the previous run. I will not use Ambient in this chapter, though.
Notes:
- For all lights, switch OFF their Occlusion settings, and set all of them to 100% intensity, full white, 100% shadow.
I prefer raytraced shadows for better quality and I have raytracing switched ON in the Render Settings. But that’s a personal preference only, shadow maps will work as well. - Following the routine from the chapter on shadows, I perform the shadow-run twice.
First, all my lights have hard shadow setting (radius 2, samples 20).
Second, all my lights have soft shadow setting (radius 20, samples 200).
Next to the Shadow 1 and Shadow 2 files, this gives me Soft Shadows 1 and Soft Shadows 2 as well. - When you’re using Poser Pro, be sure to switch OFF Gamma Correction for the first, shadowless renderpass. Otherwise you’ll end up with a too much bleached result. For the shadow passes, it’s better to leave GC ON.
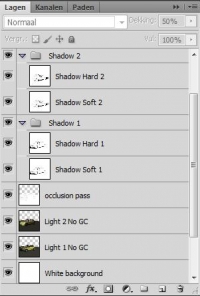
Okay, now I’ll have to combine the intermediate files to Photoshop layers. Like in the previous chapter, I make a white background layer to handle the transparencies from the PNG files, and I bring in both Light layers. The first one is set to normal blending (with the background) and the second is set to Screen blending. This blending mode acts if you’re projecting a slide on a wall, which is exactly what happens when we’re adding lights. To reduce the intensity of the second light relative to the first, I can reduce the opacity of that light-layer. If I want to intensities just the other way around, I have to swap the Light layers (and their blending modes).
Then I add the shadow layers. Occlusion – or: self shadowing – has its own blending mode and opacity, the other Hard- and Soft shadow layers per light can be grouped. Each group has Multiply blending and its own opacity, and within each group hard and soft shadows can be balanced separately.
Now it becomes so easy to play.
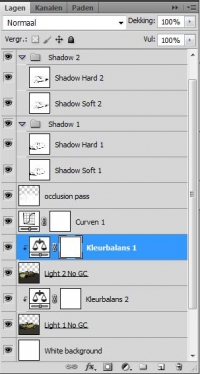
Softer shadows (group opacity to 50%, hard shadows opacity to 15%), a brightness boost using a curves adjustment on the light-layers, and a color balance adjustment to both lights: more green to Light 1 (right/back side), more red to Light 2 (left/front side).


