And more…
Adding shadow or light
Reducing effects was simple, I just had to turn the opacity slider down for a shadow or light, or ambient or reflection or else. But how about enforcing an effect? More light, stronger shadow, more reflection?
Well, each layer or group in screen mode acts like an additional projector beaming an additional image onto the result, and each shadow layer in multiply mode does something similar for the lack of light. So, I only have to add copies of the layers to add an extra light or shadow, or a stronger reflection of something else.
And for creating say 1.5 times the effect? Well, I just add a duplicate layer and set its opacity to 50%, so I’ve got 1.5 layers for that effect. Now, let’s reconsider re-combining the passes to one Photoshop result.
Combining Shadows and Light
It was stated earlier, that adding a shadow to a shadow-less layer required a Multiply blending mode for the overlaying shadow layer. But what to do when there are more of those layers, say on a per-light basis?
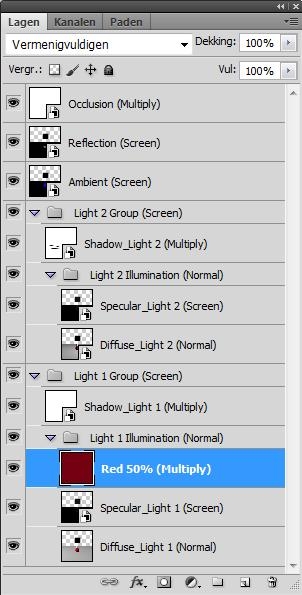
Actually, in that case the relevant sub-passes should be grouped on a per-light basis, having the shadow on top within the layer (multiply mode), and having the group itself in screen mode to blend it properly with the other light-groups. So underneath the shadow sub-pass we’ll find the diffuse, specular, reflection and all other sub-passes for that light. The bottom one in Normal mode, the others in Screen mode.
Now, I’d like to reduce the intensity and alter the color of that light. This should not be done at the group level, as that will alter the shadow as well. And dimmed reddened lights still produce non-dimmed black shadows. But as long as the group really addresses one single light, and don’t include additional IDL from other sources, all the other passes for that light must change. So either I can alter them in sync (tedious), or I can put them in an additional “illumination” subgroup. See the image.
When I want to alter the color and intensity of the light, I can put a filter in front of it. This will make a new layer, on top in the Illumination group. Like I did with a Red, 50% brightness layer. And since it takes light out, it’s set to Multiply blending. Note that reducing the Opacity of this layer just reduces the filtering: the light gets less red and less dark. I also can put in a Red, 100% layer, and reduce the Opacity of the Illumination group. Take your pick.
Some engineering stuff
Let’s look at the Photoshop layering presented in the chapter on Light: the examples put all shadowing at the top and all lighting under them. For total light L, total shadow S, light and shadow L1, S1, L2 and S2 from lights 1 and 2, the math goes:
L * S = S1 * S2 * L thanks to the Multiplying of shadows,
and (1-L) = (1-L1) * (1-L2) or: L = L1 + L2 – L1 * L2 for the Screening.
This combines to : result L * S = S1 * S2 * L1 + S1 * S2 * L2 – S1 * S2 * L1 * L2
Now, let’s look at the layering just presented above.
( 1 – L * S ) = (1 – L1 * S1) * (1 – L2 * S2) so result L * S = S1 * L1 +S2 * L2 – S1 * S2 * L1 * L2
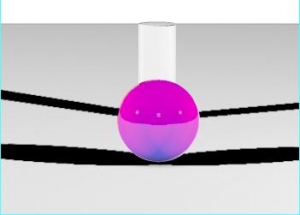
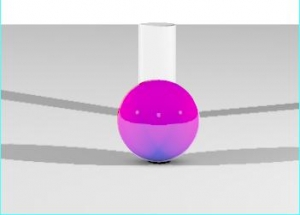
So in the first approach, the contribution S1L1 from light 1 is additionally reduced by S2, and vice versa for the other light. In other words: there is too much shadow in the first approach.
| First approach, one light is not softening the shadow of the other light. |
Second approach, one light is softening the shadow of the other light. |
Breaking combinations
Some render passes or sub-passes give a combined result, like Diffuse + Ambient + Shadows, and a separate Ambient pass, but no separate Diffuse pass. Hence the question: can I create one? Not for the sake of it, but for enhancing that particular aspect of the image.
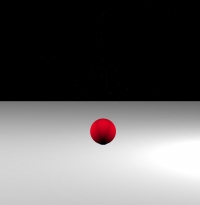
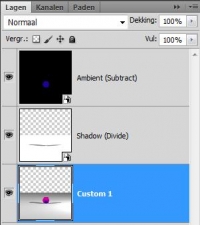
Well, since shadows are added to the result by multiplication, and since Photoshop supports a Divide blending mode, taking shadows out is a no-brainer. Add the shadow layer (B) on top of the compound layer (A), set the shadow layer to Divide blending, and done (D). Unless you’re experiencing edge-effects (C). This indicates that the shadow layer does not line up exactly, and you might move it a pixel vertically and/or horizontally. BTW: this happens all the time to me, I don’t know if its Photoshop or the render pass creation itself but in general, passes move one pixel (to the left and down) when putting them together. Moving them back gives me the desired result.
This intermediate shadow-less result still is the combination of Diffuse and Ambient. Since this combination is made in Poser, it’s the result of a plain addition. And since Photoshop supports a Subtraction blending, this is what I have to do to get the Ambient (E) out to get the required Diffuse-only (F). Again, watch the edges and if necessary, move the layer a bit.
So Multiply and Screen are the ways to combine passes into a result, while Divide and Subtract are the ways to break combined passes into singular ones. Note that Photoshop supports Subtract-blending and Difference-blending. You need the first, not the second.
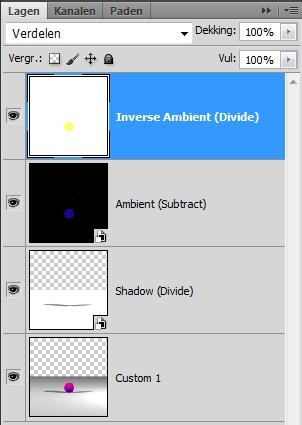
With a remark: Subtracts works well on Poser results because Poser itself uses plain addition (instead of screening) to make its results. When other applications (Vue perhaps) use screening instead, one has to find a way to un-screen. Photoshop does not support this un-screen blending mode directly. The trick: if you want to un-screen Ambient out of a Diffuse & Ambient combination, then you’ve got to Subtract and then to Divide by the inverse of the Ambient layer (in Photoshop: Ctrl+I). So you need the Ambient layer twice, first in Subtract blending, then its inverse in Divide blending.
The math:
- Say, C is the combination of Ambient A and Diffuse D, by Screen blending. That means: ( 1-C ) = ( 1-A) * (1-D ) – multiplication of the inverses, that’s the definition of Screen blending
- So, by rewriting, D = 1 – (1-C)/(1-A) =(*) [ (1-A) – (1-C) ] / (1-A) = (**) [ C-A ] / (1-A) and this last statement says: subtract Ambient from the Combi, and divide the result by the inverse (***) of the Ambient.
(*) substitute the first 1 by (1-A)/(1-A) (**) just rewrite (***) the inverse of A is: 1-A, black turns white, red turns cyan, blue turns yellow, etc on a per-pixel basis. Ctrl+I does the job.
For more perfection: be aware of color bleeding when dealing with images rendered under IDL lighting. When you take the Ambient out, then also the color-bleeding of the Ambient must be taken out so you need to look for a pass that offers the Ambient plus its color-bleeding. In some cases, this pass is available as a Custom1 sub-result of the Occlusion pass from the RenderPasses script when used in PoserPro; it might be required to render that pass without a SkyDome in the scene.
So when you’ve got a combined Specular & Reflection pass, and a separate Reflection Pass, you can separate out a Specular pass as well. Now you know how to do it: when they come from Poser – just Subtract.
Material complexity
Splitting aspects of a scene by considering properties of materials is an almost infinite process, as materials and render technology becomes more and more complex. What happens, for instance, with the Alt_Diffuse and Alt_Specular channels of a Poser surface? What happens when nodes like Velvet are used that combine diffuse, specular and ambient? Or nodes that combine Refraction and Reflection, like Fresnel? Which kind of split occurs with the shader trees generated by EZSkin, VSS or MatMatic? What is the effect of SubSurfaceScattering, as introduced by Poser 9 / PoserPro 2012? Will Smith Micro or Semidieu or anyone else bring us new tools (say, after reading this tutorial J )?
I don’t have the answers to all this, but I keep on experimenting, finding out, telling you and updating this article. Feel encouraged to do the same, and tell me about it. In the meantime, I’ve found out:
- That everything which is put in Alt_Specular ends up in the Specular pass, and that everything that’s put in Alt_Diffuse ends up in the Diffuse pass. In some cases, Advanced Render Settings can do something with its Color and Color_Alt passes, but that seems pretty limited. SubSurface Scattering ends up in the Diffuse pass as well.
- That complex nodes like Velvet are not separated out. Although the node offers ambient (Ka), Specular (Ks) and Diffuse (Kd), when the node ends up in Alt_Diffuse, all the information is presented in the Diffuse pass. At least, as far as Advanced Render Settings and the sub-passes (Custom 1, 2 3 etc) are concerned. The Ambient pass in the RenderPass script however manages to keep some aspects separate.
- That when the contents of a pass are about absent, Advanced Render Settings seems reluctant to perform the pass. For instance, when Ambient color is about black and/or Ambient value is about null, there is no ambient pass, even when there is ambient in the Alt_Diffuse or alike.
- That with respect to all this, complex algorithms like EZSkin, VSS and MatMatic behave conform expectations. But do note that when for instance MatMatic puts the total shader-node-tree construction in Alt_Diffuse, it leaves less aspects to split into separate passes. Every pro has its cons, and this is one of them.
Comparing Post-work to Poser results
In some cases there are differences, in some cases there are not. Shadows in Poser are obtained by a multiplication mechanism similar to Photoshop. But the effects of lights, and the effects of material aspects like Diffuse and Ambient are – in Poser – combined by plain addition instead of screening.
In Poser this generates over-lighting situations quite easily, as a 60% brightness plus another 60% brightness add up to 120%, which then is clipped to 100%.
In post, screening would give: C = 1 – (1-60%)*(1-60%) = 84%, there is no way to over-light a scene. So there will be no clipping either. But this also implies that bright areas in post will look less bright than in Poser. Poser seems to work as a camera which does not adapt itself to higher lighting levels, in post we seem to work with a camera with an automatically reduced film-sensitivity (or shutter time, of diaphragm opening, whatever you prefer).
So post-worked results will differ from Poser. Equally deep in the shadows but softer in the highlights, and without clipping.
Another difference comes with the use of correction methods. Poser supports Exposure Correction, while Poser Pro supports Gamma Correction as well. Those corrections are mainly required to soften the effects of shadows and highlights as well. Deep shadows can hide the nuances of dark textures on objects, which are visible in real life due to the scattering of light in our environment and due to the adaptive working of our eyes when looking into dark places. See the Understanding Corrections tutorial on the details. Strong highlights will cause over-lighting and clipping, as noted already.
When rendering out passes, we do not need those corrections. We’ve got other ways to soften shadows (just blur the shadow layer and reduce its opacity), and over-lighting is almost preventing automatically. So, please, do switch those corrections OFF when rendering out passes for post-production. When you need a generic correction on the image, you can always put one in as a Curves or Levels adjustment. I bet you hardly don’t.
