Nodes are the essential building blocks in the Advanced interface to the Poser Material Room. They are the graphical representation of mathematical function calls, that is: calculation procedures which turn parameters (inputs) to a result (output).
Intermediate
This Reflect node adds accurate, raytraced reflections to the PoserSurface material definition. It requires Raytracing in Render Settings to be switched ON. The quality of the result depends on the ‘Number of Bounces’ set in Render Settings as well. This number is a maximum value, when Poser does not need them it won’t use them, but if the number of bounces for a light ray exceeds this limit, this light ray is killed. This might speed up the rendering while it also might introduce artifacts (black spots) in the result.
Do note that Reflection only handles the light from objects in the surrounding scene. It does not cater for the rays from direct light sources (spot, point, etc. lights). This part is dealt with by Specularity. Reflection and Specularity are two portions of the same natural phenomenon: reflectivity. These two material properties should be balanced with respect to that, but since they have no parameters in common, that’s mainly a matter of taste and intuition. Effectively, I’m balancing the intensities a) of the direct lights and b) of the light bouncing from the objects, with respect to reflection.
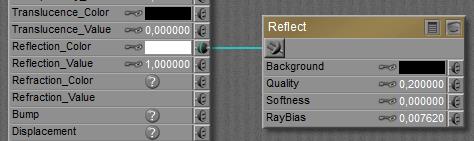
Of course there must be something to reflect in the scene at the first place, and this sort of requires that my scene is build out far beyond and behind the scope of the camera. I probably don’t want to do that, and Background offers to possibility to supply an additional background color or image or texture node instead. In the screen grab above nothing is supplied, but turn the color swatch to white or grey and plug in the appropriate node instead, and the job is done.

The left pawn shows regular diffuse and specularity, the right pawn has reflection added to this.
The Quality parameter offers a tradeoff between speed and result; high values require longer render times but present crispier results. Softness increases the blur of the reflected image, representing irregularities, impurities and even minor movements and vibrations in the reflecting surface.
RayBias is a feature to address a special issue, regarding the reflections on image-based displaced surfaces. RayBias is a distance, in the Poser units as set in my User Interface preferences. The default is 0.3 inches or 0.007620 meters as in the screen grab above. Poser takes the reflecting surface, moves it for this distance outwards from the object, then it calculates the reflections, and then it projects those reflections onto the surface of the object itself.
This way, all irregularities of the reflecting surface which are smaller than this RayBias distance are disregarded; usually these are caused by the details of displacement maps. It speeds up reflection calculations considerably, but it does introduce artifacts and less accurate reflections as a downside. For that reason, one should not have this value larger than the amount of displacement in the same PoserSurface material definition. The 0.3” (0.76cm) default value is quite a lot, actually.
Reflection Color (in the PoserSurface column) usually works with white, unless I’m representing a metal. Metals have colored reflections, like Gold is yellow and Copper is red. The Reflection Value (PoserSurface as well) represents the reflectivity of the surface, and despite my experiences in nature, this value is quite low for most materials, except metals. Other articles on this include detailed colors and reflectivity values for various kinds of real-life stuff.
One note of caution: the final amount of reflectivity will be made up from the combination of Reflection_Color * Reflection_Value. To represent low reflectivity, I can either use a dark color, or a low value. But I should not do both! This is especially relevant for colored metals, where reflectivity becomes somewhat reduced simply but not using white in the color swatch.
Raytraced reflections are realistic, detailed, and therefore time and resource consuming. When I don’t need this level of accuracy, reflections can use a simple image map, or as a compromise, a Spherical Environment Reflection Map.
The raytraced reflections as presented by the Reflect node are not extremely photo-realistically accurate however. In real life, the amount of reflection depends somewhat on the angle the surface is looked at by the camera. Skew angles increase reflectivity. This is known as the “Fresnel effect”. It’s mainly visible for fluids and glasses.