Simply stated, all elements of a surface/light interaction are added up mathematically, on a per light, per channel (like Diffuse, Specular, Ambient, …), color-by-color (Red to Red, Green to Green, Blue to Blue) basis. This may cause overlighting, as components might add up to values over 100%. This can be prevented by reducing the intensities of lights and/or by reducing the brightnesses of the various surface components.
A more detailed answer following below requires determining all the steps from scene to render, which is something for the experienced and curious users, who want to have a better understanding of the way things work.
Intermediate
Say, a portion of the render result is determined by a portion of an object surface (material zones) which is covered by a single material. That material offers various “channels” (like Diffuse, Specular, Ambient, …) and the surface is lit by various light sources in the scene.
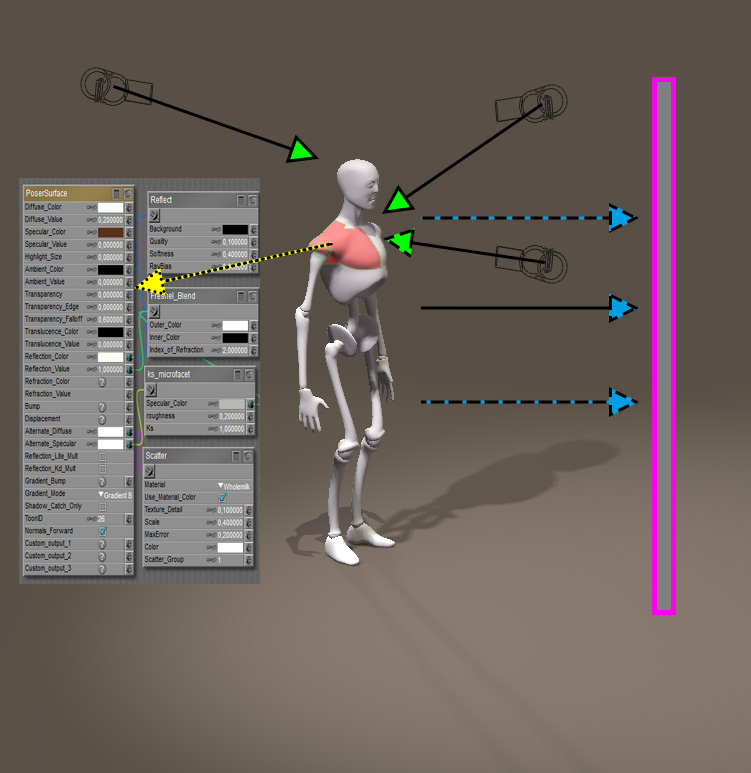
Object mesh (white) consists of various material-zones (red), each catching light rays (green) and using its own surface definition (yellow) to calculate the re-emitted light (blue) towards the camera / render plane (pink).
First, when my Poser version supports gamma correction (GC) and I have enabled it, each channel and light will be adjusted in a way that brightnesses are (or may be) reduced (more precise: pushed away from 100%). When my Poser version does not support GC or I’ve disabled it, this step will be skipped.
Second, for each channel / light combination a render subresult is derived. This will introduce reflections, shadows, highlights, glow and so on, on a per-light basis. By the way: Poser, and especially Poser Pro, offers various scripts and features to export those subresults individually for manual re-combination in postproduction.
Third, all those render sub results are added up, per light, per channel, on a color-by-color basis. So a diffuse result RGB (60%,50%,10%) and a specular result RGB (80%, 60%,15%) on the same spot make RGB (140%, 110%, 25%). Plain simple arithmetic.
Forth, when my Poser version supports gamma correction and I have enabled it, the final result will be adjusted in a way opposite to the first step: brightnesses are increased (more precise: pulled towards 100%). When my Poser version does not support GC or I’ve disabled it, this step will be skipped, as was the first step in the process.
Fifth, but only for showing the resulting image on screen and for exporting it to a standard 8-bit-per-color format (JPG, PNG, …): all colors are clipped to 100% max, which for instance might turn the result (140%, 110%, 25%) into (100%,100%,25%). Internally, and in some export formats as well (HDR, EXR for Poser Pro) the software works in a 16-bit per color format.
A brief elaboration on Poser Gamma Correction(GC)
As a result of the third step, two identical lights will give the same result as a single light with double intensity, that is: when GC is not enabled. The arithmetic then is simple and linear. This is different from adding light effects in nature, like projecting an image on a wall via multiple projectors. In that case, my eyes will adjust to the increased lighting level. But images can’t. Photoshop offers the Screen layers mode for handling this, which is considered the industry standard for handling the addition of light/surface subresults as it’s very close to the behavior of good old film, and its modern electronic equivalent.
Side note:
Screening is defined as “re-inverse the multiplications of the inverses” which for images a and b comes down to : result = 1- (1-a)*(1-b). Applying this to the colors mentioned above, this will result in 1- (1- (60%,50%,10%))*(1- (80%, 60%,15%)) = (92%, 80%, 23.5%)
When applying Poser GC to the colors mentioned above, the result will be RGB (97%, 76%, 11%). This does not need clipping and hence will not present any overlighting artefacts. This is one of the big reasons to enable GC when available. Next to that, the Poser result under GC is somewhat similar to the industry standard. And on top of that, GC will soften shadows and shading as if the scene is filled with air and as if other objects are bouncing light around, as in real life.
When applying GC it’s much recommended to keep all Values at 1.0 (or 0.0) and to define all brightnesses through the Color (swatch). This is because Poser’s GC mechanism treats colors and values differently, so a light with a 50% white (mid gray) and 100% intensity works as required but a light with 100% white and 50% intensity will produce a different (far brighter) result. Bump, Displacement and Transparency should be excluded from the Gamma mechanism. You might like to read more about CG in these articles on GC fundamentals and GC advanced use.