Material Room Simple and Advanced interface – how do these relate?

The Advanced interface to Material Room offers access to some more properties of the same material on one hand, and offers access to far more ways to define the details of all properties in the other hand. Creating and managing materials through the Advanced interface is considered Intermediate to Advanced level. While working from the Simple interface, one might wonder: “what do I miss?”.

Intermediate

The following features are / are not supported in the Simple interface:

  • Supported: Diffuse, Specular and Ambient Color, plus an eventual Image_Map or Movie node from which the Image_Source and the Texture_Strength properties are supported. For Specular, the Highlight_Size property is supported.
    Not supported: Neither the Diffuse/Specular/Ambient-Value properties, nor the Alt_Diffuse/Specular properties, nor any other node beside Image_Map and Movie are supported in the Simple interface. No Clay, no Subsurface Scattering (translucency). Translucency from the Advanced interface is not supported in any way.
    .
  • Supported: For Reflection, the Image_Map node as well as the Reflect (raytrace) node are supported, including the Color. Also the Light color and Object color multiplicators (Reflection Lite Mult and Reflection Kd Mult checkboxes) are supported.
    Not supported: Neither the Reflection Value property nor any other nodes beside Image_Map and Movie are supported.
    .
  • Supported: Transparency, with an eventual Image_Map, and including Edge and Falloff, is supported.
    Not supported: Refraction, Fresnel nodes and similar are not supported.
    .
  • Supported: Bump / Displacement, with a required Image_Map (no map, no effect), plus the Amount option are supported.
    But: the checkbox in the Simple interface forces me to choose between either Bump or Displacement, I cannot have it both.
    .
  • Not supported: Features like Gradient Bump/Mode which give access to Normal maps, and like ToonID and  Custom Output for advanced render pass handling, are not available in the Simple interface. The Custom_Outputs are available in Poser Pro only, by the way.

Next >

Material Room offers a Simple interface. What do I miss?

When using the Simple interface, I miss:

  • About anything more advanced than assigning color and an eventual image map to any feature. As a result, my render will keep that artificial, hard plastic-like feel.
  • The option to have Bump and Displacement both in one surface definition, and the option to use Normal maps. As a result, I cannot distinguish large scale (displacement) from small scale (bump) surface variations. And I can’t use Normal maps, which are common in shading game characters and objects.
  • Access to more real-life optical effects like Translucency and Refraction. As a result, creating believable glass and fluids will remain an issue.
  • Access to the Preview / Diffuse / Specular split in direct light properties As a result, I’ll keep on having issues with handling Indirect Lighting (IDL) in an appropriate way, in preview as well as in rendering.
  • Access to advanced render features (Custom_output) Honestly, these are hardly used anyway and can be considered high-end pro stuff.

Intermediate

Generally, all features which remain unsupported by the Simple interface, will also go unsupported when exporting Poser scenes and objects to other formats or programs. Exporting to OBJ, integrating Poser with LuxRender, Octane, Vue or you name it, all tend to lose the material properties which are not supported in the Simple interface. And even some of those might get lost in translation. In other words: when Poser is just my scene building and posing tool but not my final renderer, I consider the Material Room Simple interface as the recommended one. The question: what do I miss, can be inverted to : what elements from the Advanced interface go (un)supported by the Simple interface. This is addressed in the next article.

Next >

How do I access a Material?

The straightforward way is to use the Material tab to enter the Material Room. An object or part of it already can have been selected, or can be selected from within the room itself. The Material Room offers a Simple User Interface, as well as an Advanced one.

Intermediate

Next to that, there are some additional ways into Material Room, for the ‘material properties’ of Lights, Atmospheres, Backgrounds, and for some specific surface properties:

1)      When a Light is selected, its Properties tab offers an [Advanced material properties] button which brings me into the Material Room, for the coloring properties of that light.

2)      With menus File > Import > Background Picture or … > Background Footage,

and with the Shadow Color picker just right/below the Document window one affects the contents of the background material.

3)      From within Material Room some buttons on the right affect the object surface material at hand:

  • Add Reflection and Add Refraction
  • Add Skin Subsurface Scattering
  • Setup Shadow Catcher and Setup Toon Render

The [Create Atmosphere] button however affects the Atmosphere material, while the next buttons

  • Setup Light Style
  • Setup Ambient Occlusion
  • IBL

affect the various coloring properties for Lights.

Next >

What’s a material, a shader, a texture, a map?

In real life, a material is the stuff something is made of. Rock, brick, sand, knitted red wool, thin leaded glass, anything. Real life materials not only have a look, they also have a feel, a smell, and a response to our actions determined by a weight, flexibility, and the like.

In virtual life, like a Poser scene, a shader refers to a set of object (surface) properties that mimics the looks of a real life material, when rendered. So we can have a rock shader, a knitted red wool shader, etcetera. Shaders do not have a feel, or a smell, they’re inside the computer. But since everyone can tell real life from virtual, the word “material” is also used in these cases, at least in some software communities. So, in Poser one has a Material Room, to make a “brick material” and to assign it to a wall in the Poser scene. In Poser communities, “shader” is rarely used.

In real life, texture relates to the feel of the thing at hand. The surface roughness of the brick when I rub it with my hand, the structure of the fish I feel with my tongue when tasting it. In virtual life however, texture usually refers to the colors of an object surface. A texture then is an image used to assign such colors to elements in my Poser scene. However, since people are somewhat relaxed in their choice of words, they’re happy to assign a “brick texture” to a wall; not only implying color but roughness and reflectivity as well. So in those cases texture means material means shader.

While texture usually refers to an image which is used to assign colors to a surface(property), a map refers to an image which is used to vary the amount of something. A bump map to vary the amount of roughness, a transparency map to vary the opaqueness, and so on. Maps in those cases tend to be black & white, which refer to 0% .. 100% and have greyscales for everything in between.

On the other hand, mapping (as in: UV-mapping) is the term for assigning images in general to an object surface whether it’s for coloring or for determining roughness or reflectivity. So some people might use “map” while referring to the image driving the coloring process too. Fortunately, there is some method in this madness: as shader is hardly used in the Poser community, material or texture is used instead. The people using material for the whole thing tend to use texture for the coloring images. The people using texture for the whole thing tend to use texture-map for the images. But be aware; without context or background info, “brick texture” still might mean either the whole thing or just the color-driving image.

Next >

Poser Materials I – Introduction

The articles in this section discuss some terminology, and the various interfaces to the materials definitions:

Next subsections present articles on defining the surface properties of objects, on a (II) Simple , (III) Intermediate and (IV) Advanced level, as well as on defining the properties of (V) Non-objects (atmosphere, background, lights) as far as these are handled through the Material Room interface. The Appendix lists all Material Room nodes and relevant Render Settings, and their availability in the various Poser versions.

Poser Material Concepts & Elements

The content of this entire section can be downloaded in two versions

  • FULL version, PDF 8.7Mb covering it all
  • BASIC version, PDF 0.8Mb covering only subsections I and II, for starting Poser users

This Concepts & Elements section discusses to some extent the buzzwords, the interactions with Poser Lighting and with the Poser Firefly renderer, and the way things work (together), all as far as the Poser Material Room is concerned. It discusses intensively the technical details of all elements that build the shader definitions within the Material Room.

That’s quite a lot, and for that reason the information is presented in various subsections:

I Introduction

The articles in this section discuss some terminology, and the various interfaces to the materials definitions:

II Simple Surface Definitions

The articles in this section discuss material definitions for object surfaces, which can be handled through the Simple Interface, and do not require a deep understanding of Material Room principles. Each article however also presents the Intermediate approach, using the Advanced interface for the same subject at hand. This is to avoid multiple articles answering the same question.

III Intermediate Surface Definitions

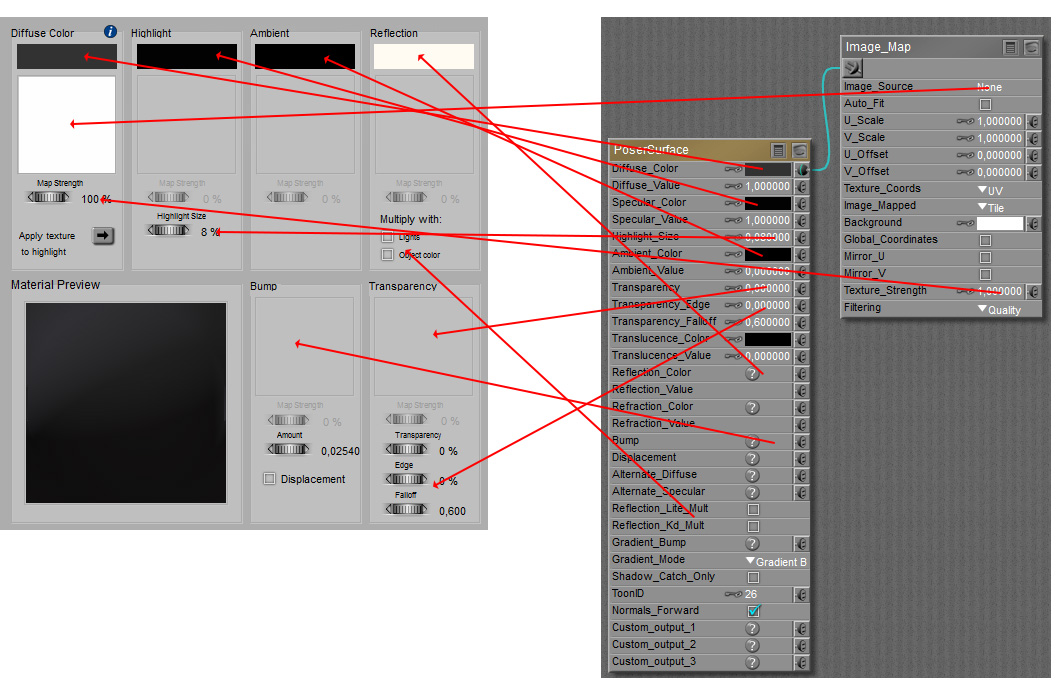
The articles in this section discuss some material definitions for object surfaces (the PoserSurface), which are handled through the Advanced Interface: the nodes from the Lighting group, and the nodes on image-maps and movies. It also discusses some principles on dealing with the PoserSurface root node.

  • From here on, articles discuss the workings of the PoserSurface root node in general.
  • From here on, articles discuss some elaborate details of components available in the Simple interface: diffuse shading, reflection details, render settings.
  • From here on, articles discuss the additional components of the PoserSurface node, like Translucency, Refraction, ToonID and the like.
  • From here on, articles discuss Alternate_Diffuse, Alternate_Specular and all the nodes from the Lighting > Diffuse and Lighting > Specular groups.
  • From here on, articles discuss the nodes from the Lighting > Special group, like Scatter and Hair. In this article the various scatter nodes are compared.
  • From here on, articles discuss the nodes from the Lighting > Raytrace group. In this article their complex relationship with Transparency is dealt with.
  • From here on, articles discuss spherical mapping, image maps and movie-based textures.

IV Advanced Surface Definitions

The articles in this section discuss all Material Room nodes required for either procedural textures, and the ones explicitly aimed at node-tree building.

A procedural texture is not derived from an (eventually color filtered) external image or movie still, but is mathematically generated internally from surface or spatial coordinates. The nodes to accomplish such textures can be found in the 2D Textures and 3D Textures groups.

Materials are applied to objects, objects parts and more precise: to specific Material Zones within those objects and parts. This article discusses the details.

Material Room supports the creation of quite elaborate node-trees, like a programming language into material definitions. This section will not address the art of such programming itself, but will present and discuss the building blocks alone. These can be found in the Variables  and Math groups.

V Materials for Non-Objects

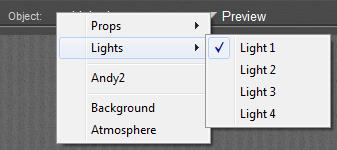
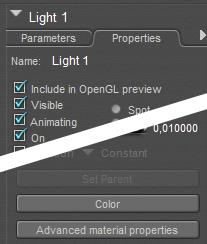
The articles in this section discuss properties for Scene Atmosphere, Scene/render Background and Lights Coloring. These are not objects with a surface, but do have properties which are handled in Material Room. These properties can be accessed via the Object selector.

Most of those topics are considered Intermediate level, although various configurations can be setup via Material Room menus, and can be managed through the Simple interface. On the other hand, managing the details of a scene Atmosphere requires the use of nodes from the 3D Texture group, which by itself is considered Advanced.

This section concludes with some varied, advanced topics like mapping for IBL , Gamma Correction (GC) and GC on Transparency. The Appendix lists all Material Room nodes and relevant Render Settings, and their availability in the various Poser versions.