Raytracing nodes like reflection, refraction and Fresnel work well for fully non-transparent surfaces. Refraction and Fresnel bring in full transparency on their own. As a consequence, those materials behave opaque to direct lighting, and produce dark shadows and block specularity as well. I might not want that.
Throwing in transparency however does have serious pitfalls, especially when combined with raytracing. Pitfalls and some ways to climb out of them are discussed here. Before doing so, it’s worthwhile pointing out that in Poser, transparency might mean:
- Lace-like transparency. The surface has holes where the light shines through completely, and opaque areas with full diffuse, specular, reflective etc. properties. This kind of transparency is not discussed here, just set Poser transparency to 1 and use image maps to define the present and absent areas of the surface; then all will be fine.
- Surface transparency. Imagine the object made of clear glass covered with a layer that absorbs light to a limited extend. This is what Poser has in mind when the material transparency value is reduced. 90% means that 10% of the light is blocked by that surface layer, so 90% x 90% = 81% of the light will pass the object (first object in, then out).
- Volume transparency, the object is made from non-clear glass and light is dimmed and colored when it passes through, making the final result depend on object thickness and shape as well. This is not what Poser has in mind but one can mimic the dimming effect, for instance by translating an object transparency of 81% to a Poser surface transparency value of 90%. That assumes that the object has equal thickness all over. And when that’s not the case, Poser offers Transparency_Edge and Transparency_Falloff to mimic the effects of that.
Advanced
Transparency and Reflection
Poser raytracing does a fine and efficient job, when the scene presents a limited amount of bounces between objects. Parallel mirrors, fields loaded with mutually reflecting Christmas balls and more like that might either take large amounts of render time, or might produce artefacts when the rays are killed too early.
Exactly that happens when an object becomes both transparent and reflective. Light passes the object at the front, bounces at the back, bounces at the front and so on resulting in an infinite amount of internal reflections. This can prolong render times considerably, while reducing those with low(er) values of Raytrace Bounces in Render Settings might cripple the results somewhat. This means that I’ve got a challenge in finding the proper balance between time and quality.
Because light not only bounces from the surface at the first hit, but also gets light added from the bounces following on that, the final brightness of the reflection increases. This is according to real life, but unfortunately the dimming of the light during those internal bounces is not. Transparency in Poser is a surface effect, while it’s something volumetric in nature. The thicker the object, or the more bounces have taken place, the more light is absorbed on the way and the more the light is dimmed.
In math:
- the Poser surface has a transparency T, which means that each time a ray hits the surface, that percentage of the light (say T=30%) will pass through. Then only 1-T (say 1-30% = 70%) remains for initial reflection, and reflectivity R can’t get larger than that. So if the surface is covered with a thin metallic foil which lets 30% of the light pass through, and that metal has a reflectivity by itself of 80%, then the surface will reflect 70% x 80% = 56% of the light initially. Sounds simple, but I have to adjust the reflectivity from 80% down to 56% to cater for the transparency, as Poser is not doing that when I use the Reflection component I in PoserSurface. Plugging the Reflect nod into Alternate_Diffuse however handles this for me, as (only!) Diffuse and Alternate_Diffuse are affected by the Transparency setting. In that case, I can simply use the 80% reflectivity as well.
- Due to the internal reflections, the amount of light that will come out at the front, the final reflection, will be R (1+ T2/(1- R2)) like 0.56 * (1+ 0.32/(1-0.562)) = 0.633 which is a serious increase over the initial 0.56. This implies that there are no simple relationships between lighting levels measured in real life, and the Transparency settings for Poser.
- In real life, the output would have been R (1+ T2/(1-(RT)2)) like 0.56*(1+0,32/(1-(0.56*0.3)2)) = 0.611 which is slightly less. So despite the large render time due to internal reflections, Poser is not doing so bad at all, the difference between the volume-model and the surface-model is something I can live with. Or I could just use a slightly less reflectivity instead (55% instead of 56% might do).
Note: Poser, from version 10 up and in all Pro versions, offers a Gamma Correction mechanism to enhance the photorealism of render results. Very recommended. As reflected light is considered an independent component in the surface definitions, the gamma mechanism should be applied to the Reflect settings. That is: all Values should remain at 1.0 (or 0.0, but no intermediate values), any reduction or coloring in reflectivity should be embedded in color swatches, and any image map involved should have set its Gamma set to Render Gamma or alike. However, Transparency itself is considered a ‘blender’: more of one component (say foreground reflecting) implies less of the other (background shining through). For those elements, the Gamma mechanism should be avoided or bypassed whenever possible. That is: Color swatches should remain white (or black), all intermediate values should be in a Value slot, and any images involved should have their Gamma value set to 1.0 if applicable. See this article for details.
Transparency and Refraction
All raytracing, including the Refraction node does work on indirect light from objects only. Direct light, whether diffuse or specular, is not reflected nor refracted. Such light, passing a refractive object, makes deep shadows and can’t make any highlights behind the object anymore. When I want the proper bright shadows of transparent objects, I need to use Transparency instead.
But now the scene behind the object will shine through twice: once due to transparency and one due to refraction, while I want the latter only since glasseous objects and liquids to refract (bend and shift the scene behind the object), while transparency does not. So I have to take the Indirect Light portion out of the Transparency, and this is the way to do it:
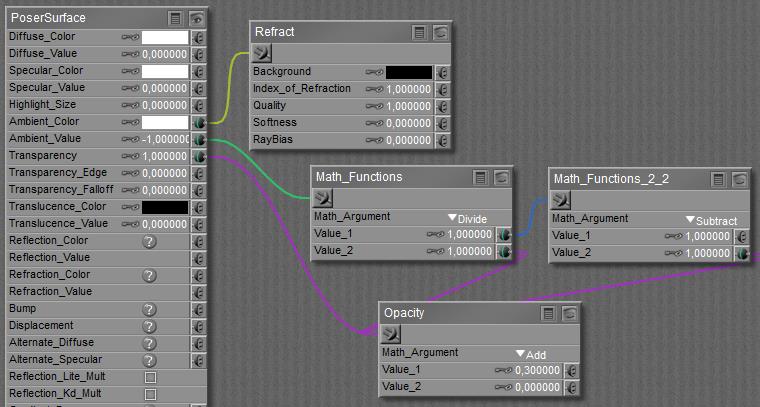
By using an IoR of 1.0 refraction is transparent only, no bending involved, and applies to indirect light only. The transparency itself applies to direct and indirect light, and so the subtraction results in the direct light portion only. The amount of refraction to be used here is proportional to the amount of transparency, but unfortunately the transparency slot turns into Opacity the moment a node gets plugged in. Then, black or low values make transparent and the value 0.3 shown above indicates a 70% transparency.
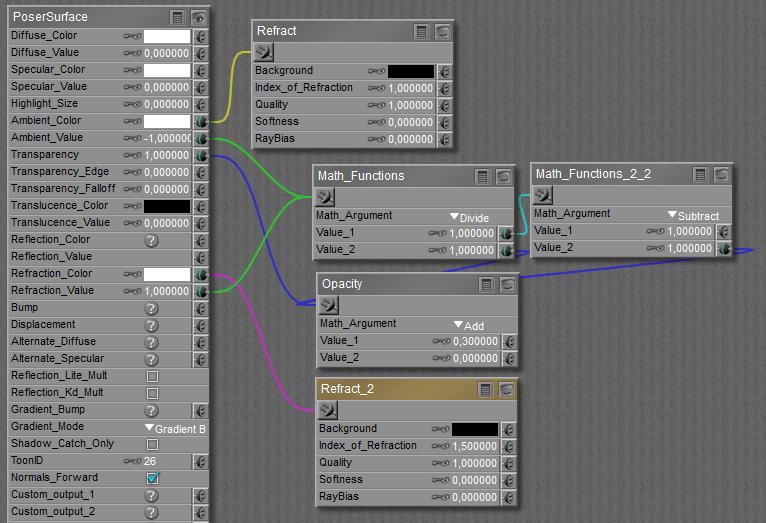
Now I can add in the required refraction (additional Refract node), with an IoR related to the material at hand, say 1.5. Again, the refraction is proportional to the amount of transparency so I can re-use that function outcome:
Transparency and Fresnel
In real life, at skew angles it gets harder for light waves to enter a material. So transparency decreases, and since the energy has to go somewhere, reflectivity increases. This is understood as the Fresnel principle.
The Fresnel node itself, or any simple combination of refraction with Fresnel_Blend, has the same (dis)advantages as a straightforward refraction: it assumes a full transparent clear object, which then behaves as opaque for direct light and produces far too hard shadows. So I’ll elaborate on the previous way of work instead.
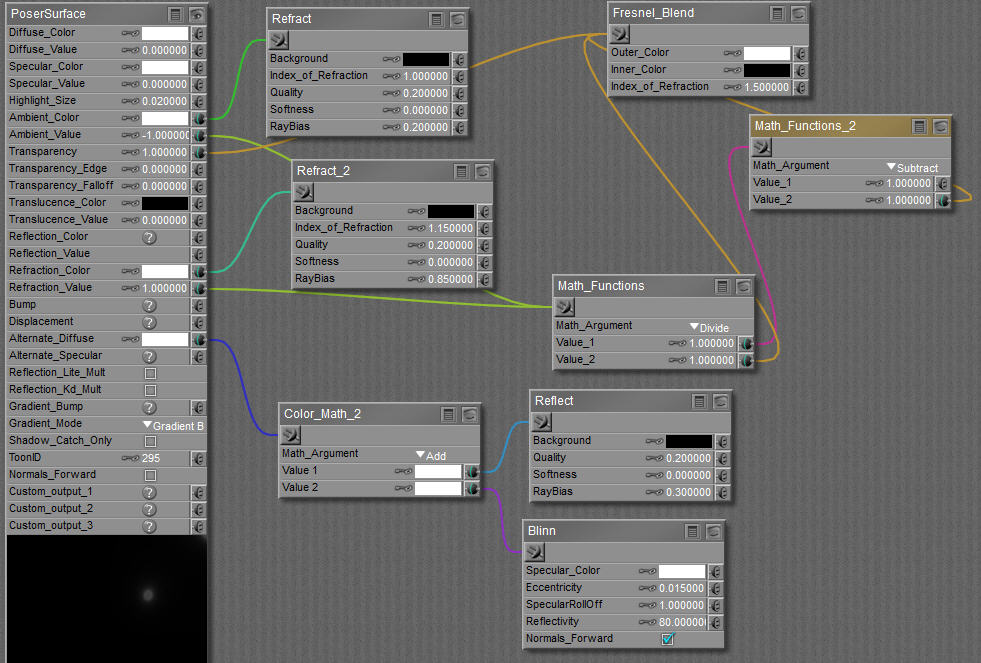
First, the fixed value for opacity can be replaced by a Fresnel_Blend node. This node has to represent opacity too, and so it has to produce high (white) values at skew angles and low (black) ones at the inside of the object.
Second, I add Reflect, and I’ll do so in the Alternate_Diffuse slot which gets adjusted for transparency automatically (like regular Diffuse).And since reflection caters for indirect light only I’ll add its equivalent for direct light: specular. In which case the Blinn node provides the best way forward.
So now I’ve got the definition for homogeneous glass or a liquid, uncolored but with a limited transparency, as presented by Bagginsbill (Renderosity forum, March 20, 2014):
For colored glass or liquid, the Refraction_Color can be adjusted. No other swatches need adjustment, as reflection and specularity go uncolored (except for metals, which are non-transparent) and Transparency goes uncolored as well, so the first Refract (added into Ambient) for compensation should stay uncolored as well: Ambient_Color remains white.