The quick clues and recipes come without explanations and without fine details. These can be found in the detailed chapters in the tutorial.
Cloth Room tips
The Real World connection
Almost everything in Cloth Room is based on grams and centimeters. Collision Offset and Collision Depth for instance, are cm. Cloth Density: gr/cm2. And so on. So people using different Poser settings (like inches), using scripts for determining and adjusting sizes and distances (which work in Poser Native Units, 1PNU=262 cm), and translating real world measures to Poser parameters, do have to take care of units. Cloth Room does not follow your user unit settings.
When timing is involved, be aware that Cloth Room ignores all frame-per-second settings in the animation palette or movie export, and works against 30 frames per (real world) second.
People who (also) use the Gravity script in the Poser menu should be aware that this script
- Uses a gravity constant which is 20% off (compared to Earth surface = Cloth Room)
- Has a minor flaw in the algorithm which make objects move a bit too fast
Collision Offset
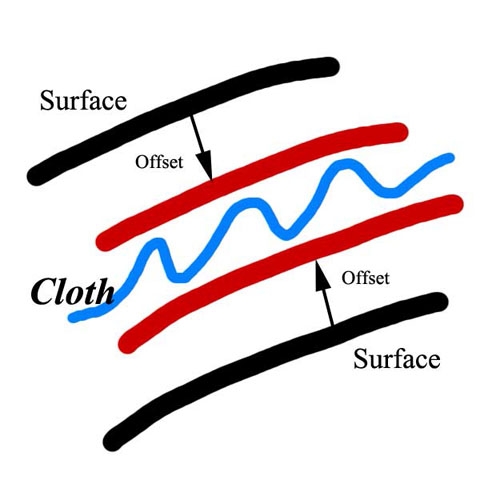
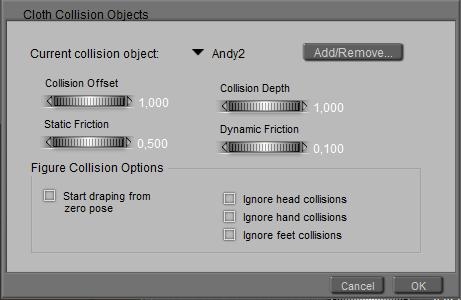
Each figure (but not: figure part!) that’s part of the collection of Collision Objects has a Collision Offset and a Collision Depth. The Collision Offset does not affect the sim calculations as such, but does affect the result as it creates a distance between the collision object and the final cloth position. So it represents cloth thickness, in some way. Values are in cm. Low values (e.g. 0.25) are fine for lace and silk, and make the cloth follow the body contours quite closely. Sweaters will do better at 0.5, the default 1.0 is fine for thick cloth over cars and sculptures, 2.0 might be required for thick winter coats.
Poser limits the values to 0.1 … 10.0 cm, and there are practical limits to the low as well as to the high end:
- When too high, the result looks unnatural, thick, does not follow the body details, visually unattractive
- When too low, one might experience poke-throughs, especially after rendering (and not showing in preview)
- When the cloth has to maneuver in between two collision objects, it needs space to do so. Examples: figure sitting on chair, dress with a belt around it. This limits the upper values: the sum of the offset for the body and the offset for the belt have to be quite less than the distance between those.
Collision Depth and Sim options
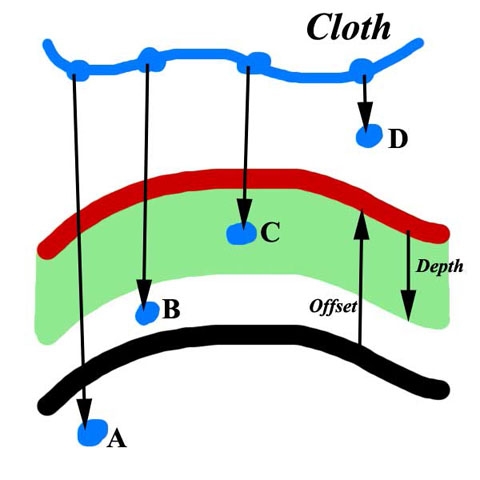
Collision Depth will not affect the final result but is essential in the calculations. Although Offset and Depth are not related, setting Depth about equal to Offset makes a nice first step. Only that, nothing more. When the Depth value is too low, the sim might become chaotic, collapsing and during the calculations the time-per-frame as reported by the progress meter will go up enormously. Poser 9 / Pro 2012 will issue an error message and stop the calculations, when things grow out of hand.
Each countermeasure will increase calculation time and might improve the change of success. In order (use one, if it’s not enough add the next):
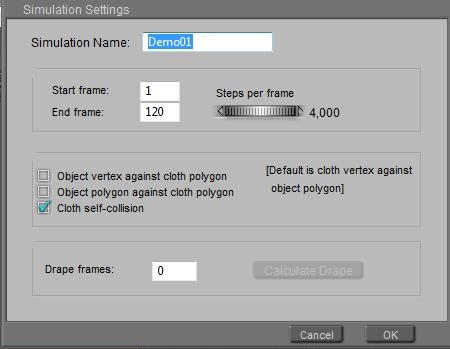
- In the settings of the sim itself, check the first “object vertex against cloth polygon” option.
- In the sim settings, check the second “object polygon against cloth polygon” option.
-
Increase Collision Depth. I tend to double it (0.5 => 1.0 => 2.0 …) once or twice before taking the next step. Poser limits the values to 0.0 … 10.0 cm, and there are practical limits to the low as well as to the high end:
- When too small, the cloth might poke-through in an unrecoverable way (cloth going wild)
- When too large (above 8), the sim might become unstable as well
- When the cloth faces multiple collision surfaces at the same side, it has trouble to tell them apart and the vertices end up at random positions. For example: cloth over fingers (which are just 1 cm thick), cloth on thin chair seat, … – the depth for an object should not exceed (half) its thickness.
- In the sim settings, increase Steps per frame. I tend to double it (2 => 4 => 8 …) until my issues get solved. Poser limits the values to 2…33333 (the manual is wrong at this), the latter implies a simulation in steps of 1-millionth of a second as there are 30 frames per second. However, doubling this number also doubles the time to calculate through one entire animation frame (as reported by the progress meter) and hence also doubles the total time to calculate the sim.
See figure. After one step vertex D has not made it to the surface-after-offset, and will not be taken into account for collision check. Vertex made it, and will taken into consideration. But B and A will not be treated, as the Depth value is too small for that. With a thicker Depth, more vertices will be captured (B, and eventually A). With smaller stepsize, the vertices will travel less, so D and C might get ignored for the right reason but B and A will get caught.
As a rule of thumb, the Collision Depth times the Steps per Frame should be twice as large as the relative speed (in cm per frame) with which the cloth and the collision object(s) move towards each other. For example:
When Vicky changes pose from standing to sitting within 30 frames (1 sec), some body parts, and the surrounding cloth with it, might move as much as 60 cm, so as fast as 60 cm per second = 2 cm per frame towards the couch underneath.
As the default collision depth (1.0 cm) and the default steps (2) just make 1.0 *2 = 2.0 cm per frame, this is not good enough and need to be doubled at least. Doubling depth is the most attractive (requires the least calculation time) but might be limited by various practical considerations, or might – for the same reasons – even be reduced to a value below 1.0cm. Then the Steps have to go up accordingly, to compensate.
In various forum threads (Renderosity), RobynsVeil and KobaltKween have reported a successful use of: Offset = 0.25 and Depth= 0.2, while having the sim options checked. In my view the first value is fine for lingerie and fine clothes (as they use), and indeed when applied to sweaters some poke-through issues were reported around sharp bends (elbow etc). The Depth is indeed of the same magnitude of the Offset, and since the sim options are checked things might work out well as long as the body-moves are not too fierce. Given the poses applied, I would not exceed 1 cm for the Depth anyway so doubling Depth twice is some limit here, maybe even less. Hence in case of the simulation going wild, I would start raising Steps quite soon.
Object thickness
As said, the Collision Depth for an object should not exceed (half) its thickness, otherwise the sim might get confused at which side to land the vertex. The sim also gets very confused when it can see right through the object, e.g. when
Collision Offset + Object Thickness < Collision Depth
Look at this, Offset 1cm, Depth 4cm, Box Scale 600% (=1.50 x 1.50 mtr)
When the box becomes too thin, the cloth falls through it and ends up at an Offset distance… from the bottom, defying gravity. Great fun. But what happens when the object is single sided and does not have a thickness at all?
Nothing.
Whatever my settings are, from Offset=10/Depth=0.0 to Offset=0.1/Depth=10, the cloth does not fall through. For a single sided surface, there is no other side in the scene and Poser seems to treat that as an object of infinite thickness.
Animation
Hence, I have to check my animations against reality. Can the moves be made in the time I set for them in the animation? Normally Poser does not care but Cloth Room offers a physics simulator which relates closely to the real world. When one cannot make fast moves in a tight thick leather outfit, and one cannot run fast or dance fiercely in a wide long velvet dress, then the cloth simulation does hardly support it either and it will be hard to get the calculations done properly. This is all about balancing the animation with the Cloth Properties in panel 4.
Regarding Collision Depth
For example, I want my posing girl to make a cartwheel in a long dress. Then her feet will travel a distance of 5 to 6 mtr, depending on her length (pi (3.142) * body length). Usually, making a cartwheel lasts shorter than 1 sec so the cloth at the ankles makes 600cm/sec, about. When I’ll discuss the cloth parameters (Parameters – Sim Side and Parameters – Real World, part III) we’ll see that pushing cloth with such a speed at the default cloth settings through air takes about three times the gravity force, so the cloth feels and behaves as three times as heavy. If the cloth is a bit elastic too, the sim will take it all over the place.
And… if I’d set the Collision Depth to 1 cm, cloth at that speed will pass through that detection layer within 1/600 sec = 1/20th frame, so I’ve got to set my Steps per Frame accordingly (rather over 20, so say 32 might do).
In other words; move gracefully, keep it realistic, and watch the speeds.
Regarding Poke-through
We also saw that there should be enough room for cloth to maneuver between various objects, or parts thereof.
Sounds simple, but the consequence is that a minimum distance for all collision objects and parts thereof should be observed, for each single frame of the animation. As is the case in real life. So the objects certainly should not poke through each other, and through themselves. This implies that one has to pay real attention when animating a figure from a standard standing pose, towards a sitting pose with arms and legs bends. Upper arms should never come to close to the upper body, under arms should never touch the upper legs and the upper legs should never interacts as well.
For some poses this is not an issue. For most poses, my intervention is required, I cannot do with just a T-stand at the start and the final pose at the end. I have to adjust arm and leg positions in between too. And I need some time, 30 or 60 frames perhaps, to get this animation done properly plus say another 30 or 60 frames to make the cloth settle.
The point is, Cloth Room offers some additional animation by itself as well. Draping, an amount of extra, non-editable frames before the Poser animation starts at frame 1.
The Drape can start in the Frame-1-pose, in which case the figure won’t move but only the cloth drapes, or in T-stand in which case the drape sequence animates from there till the Frame-1 pose. This can be set per figure, in panel 2, (un)check Start Draping from Zero Pose. By the way, it’s available for poseable objects only. Not for props.
But as I cannot affect the animation during the drape sequence, this help only makes sense for animations which do not introduces any risks on self-poke-through of body, arm or leg. Otherwise, draping might turn out to be counterproductive.
Animation Overshoot
Say I want to jump from the ground onto the seat of a chair. So I bend my knees a bit, then I stretch them out, and when landing I bend them a bit to absorb the shock and stretch them a bit to normal again. As a result, my center of mass lowers say 10cm, then raises say 60 cm and then lower 10cm again to make an effective net raise of the 40 cm between the floor and the seat.
Overshoot is good, for making believable animations. Overshoot is not always that fine for cloth sims. It creates additional body movements, which might help the cloth to settle but might be counterproductive as well, or just elongate the required animation towards the final pose. On top of that, the overshoot positions of the various objects, bodies and body parts might raise the risk of collision between them, or even self-poke-through during the movements. Those can be disastrous for a decent sim calculation.
The way out is to linearize the animations involved. Use the animation panel, select the elements that need investigation or adjustment, and click the Linearize button to make straight robotic movement trajectories instead of the smooth natural ones. This works for still images, because who cares about the animation details. For animations the robot-like movements might be undesired, then the overshoot might be better reduced. All in case of issues, there is no need to repair things which are not broken. And again, this kind of fine tuning cannot be done for draping before the animation starts.


