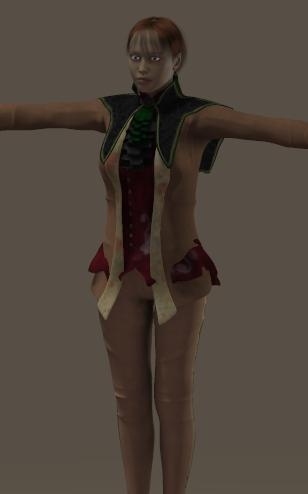
When the scene requires multiple pieces of cloth(ing) to be simulated, the question arises: do I need separate sims or do I put multiple cloth elements in one sim? As in the image, the figure wearing pants (brown), shirt (red), jacket (brown) and cape (green) form the Which Hunter outfit. And we do need Dynamics to make the cape and jacket flapper while hunting, and to keep the shirt under the jacket and over the pants at the same time.
Well, if I put two cloth elements in different, successive sims, I create a sort of hierarchical relationship between two cloth elements. For instance the dress and the coat: if the dress is underneath the coat and the coat does not affect the movement of the dress and the dress might affect the movement of the coat, then the coat can be included in a later sim. Just the dress collides with Vicky and the coat collides with Vicky and the dress, and all is fine.
Unfortunately things work different: the dress does not affect the movement of the coat but the coat does affect (limits) the movement of the dress. Now I can try to collide the coat to Vicky first, and then maneuver the dress in between. I’m not very enthusiastic about that approach, but nevertheless.
Anyway, in some cases using multiple sims instead of just one can help me out. In The Sim List is was already noted that the order in which sims are created is relevant: it introduces some planning beforehand. Something to take into account in that planning as well is that each object can be clothified in one sim only. Once clothified in one sim, it can only be a collision object in others. It’s up to me to pick the right sim at the right place in the stack.
When two cloth elements affect each other, like two dancers wearing wide dresses which collide against each other, they should be in the same sim, and cloth-self-collision must be switched on (third checkbox in the sim settings). When one element affects the other but a hierarchical relationship is not handy (like in the coat-affects-dress example above), they can be in the same sim as well. And when two pieces of clothes do not affect each other at all but share the same set of collision objects, they can be in the same sim too but in two separate sims as well. The first way just reduces the amount of sims and the total calculation time. Even pieces of clothes that do not affect each other and do not share collision objects can be put in one sim, collision objects included. Some collisions will never happen, the sim does spend some time to find that out but not so much.
Example: say I’ve got a leather belt and a piece of cloth, that is supposed to be attached to it. Unfortunately, the 3D meshes are separate. I can make the belt dynamic, and it might quite well get stuck onto Vicky’s hips. But how do I attach the cloth to the belt?
Well, when belt and cloth are in separate sims the cloth can be set to collide against the belt, and the top vertices of the cloth can be put in a constrained group so it sticks with the belt. I create, or at least I run the cloth-sim after the belt sim, and all goes well. This works because the thin linen cloth does not affect the belt-movements while the belt movements do affect the cloth, so the hierarchical relationship holds.
Can I put the cloth and the belt in one sim together? No, because I cannot constrain one cloth element to another cloth element in the same sim. I can only constrain to collision objects, identified for that sim.
But I can put multiple inter-colliding pieces of cloth in one sim, constrain them all to one belt, and put the belt in another (earlier) sim.
Why is there an issue in the first place? Well, the cloth sims take the 3D meshes as they are, and do not care about parent / client relationships which are required for Inverse Kinetics movements, and do not care about conforming settings either. Pieces of cloth are kept together when there are edges between vertices of both pieces, which make them one 3D mesh. When the meshes lack such edges the cloth pieces are considered separate, and the cloth sim might make them fall apart.
Conforming meshes
The Reference Manual is pretty clear:
Objects being converted to cloth must have single-sided, connected (welded) polygons without caps. The exception is decorative objects such as buttons, belt buckles, etc., which should be separate (non-welded) objects. The decorations group favors accessories that are geometrically separated from the cloth mesh object.
Like in real life, buttons should not share vertices with the cloth but it’s handy when there is a little thread connecting the two. But the main point is: lots of clothing meshes are two-sided with caps, as well as non-welded. Various pieces in the same mesh are not stitched together, which make them fall apart during simulation.
As shown above, this is indeed an issue when no hierarchical relationships can be defined, and constraint grouping cannot be used to glue the elements together. In those cases, the 3D meshes should be reconsidered, perhaps pieces can be welded together in Poser, or one needs a separate piece of 3D software to do the job.
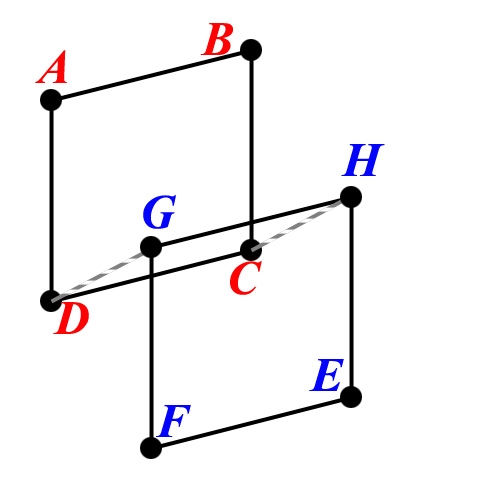
Consider two adjacent quad polys. Ideally, they should have read ABCD and DCEF, sharing the vertices C and D. But in the mesh, we’ve got ABCD and GHEF. In general, there are two variations:
- G and H share positions with D and C, they are copied vertices. The solution is to un-copy them, that is: welding. Tools can do that.
- They do not share positions, just the C/H and D/G edges are missing or: the poly DCHG is missing. Those polys have to be added to the mesh, in the proper subgroup. Or the geometry have to be altered by welding C/H and D/G manually. Some work, in any case.
Welding (always make a backup copy beforehand!) however might present new issues. Tools might weld vertices which shouldn’t, especially in double-sided clothing (the sim will fail quite quickly after that). And as welding alters the vertex-count, they might rise issues with the accompanying cr2/pp2 file – which actually should be adjusted to the welding result.
Dual sided clothes for instance present an outside and a lining which are stitched together (with a trim or edge, in the mesh with some kind of capping). This can result in self-poke-through, which especially becomes annoying when outside and lining show different materials. Some possible solutions:
- Check Self collision and raise the amount of Steps per Frame in the sim settings, so the calculations can solve the issue. This helps to a limited extent.
- Hide the lining, by assigning it a 100% transparency in Materials Room.
- Select the lining and make it a Soft decorated group, perhaps the same can be done with the trim. Now all materials can be applied while the outside is the only portion of the mesh in a dynamics group, and dealt with by the sim calculations. Do ensure that the Collision Offset is large enough to fit the lining in between the cloth and the body, and we might need to give the outside a heavier impression since the presence of the lining stuff is not taken into account in the sim any more.

